Forum Replies Created
- AuthorPosts
 YegonParticipant
That means it’s all about your LCD. Most people with dell laptops have that problem please consult dell for further assistance at dell.com
YegonParticipantPlease try so first to identify whether it’s your lcd that has problems or something else
YegonParticipantSometimes windows media does not support certain media files therefore windows will automatically pick the most suitable program to open that file. In your case, you can right click on the DVD/CD drive and choose play with/ Open with windows media player. To make DVD player play automatically using windows media play, you have to manually set the default apps as shown above. The main reason being that windows media player is no longer the default media player in windows 10. Currently it utilizes the new generation media player capable of running most media files with new interface and features to suit the new changes that was made during the major update.
To get the best out of windows 10, new features were introduced which are not only user friendly but advanced for better experience. In the same way you can still make use of your favorite media player by adjusting settings to enable windows media player as your preferred playing tool for DVD or CD.
YegonParticipantHave you tried using external monitor?
October 1, 2020 at 12:00 am in reply to: Resetting and Removing Windows 10 Password using Command Prompt #26551YegonParticipantResetting and Removing Windows 10 Password using Command Prompt is straight forward as long as you are the administrator. Run CMD as an Admin then enter the following commands.
- net user <username> <password> remember to replace your username and password with your own.
- For new local admin enter the following.
- net user <username> /add
- net localgroup administrators <username> /add
That is all you need when you can sign in and access Cmd as an Administrator.
For more check here https://4sysops.com/archives/reset-a-windows-10-password/
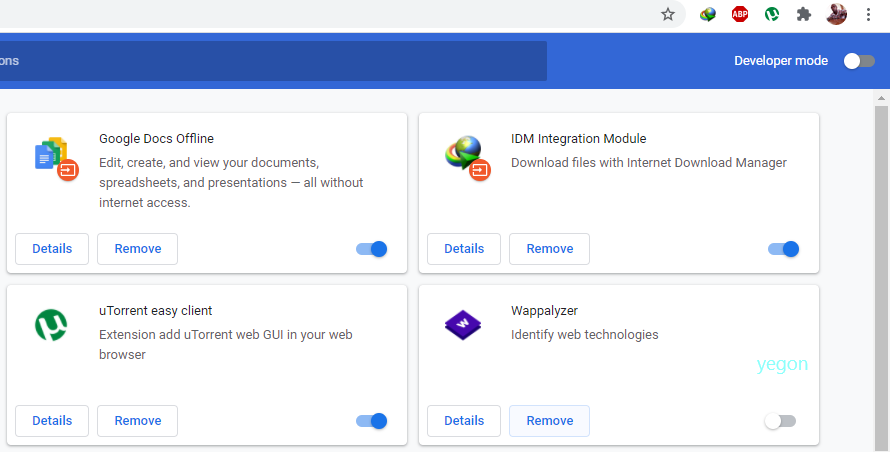
September 30, 2020 at 11:30 pm in reply to: Removing more than one extension and search engine from Google Chrome #26550YegonParticipantFor now google Chrome does not have that option under chrome://extensions/ and they must be working on it. Extensions helps a lot to add features to our browser based on our preferences to make our browsing experience fun and smooth. These extensions are customized according to the intended purpose. They include IDM integration module, Adblock, uTorrents among others. The reason behind not including remove all extensions properties is because they most people can only install a few important extensions to serve them over a period of time and thus it can be easily removed one by one. The only way of removing those extensions if they are too much is resetting your browser to default of which is not a good idea.
We hope some changes will be made in future updates to fix this issue and make work easier to remove those extensions with one click. The same applies to such engines, the research shows that most people prefer to use google as their default search engine a clear indication that few people are likely to install other search engines. For now the most common search engines are very few therefore they are focusing on making their own better and encouraging people to use.
Let us hope for those changes in the coming updates to make it more convenient to remove extensions or search engines with just one click.
YegonParticipantAnother way to get rid of safe finder is via the control panel and resetting your browsers to default setting. First you should know that safe finder normally gets installed together with freeware software. The effects of the adware program includes hijacking your browsers settings especially homepage and redirects everything to safefinder.com. All browsers are affected and thus affects your browsing experience, use a lot of resources in your PC and consumes too much bandwidth affecting your data plans.
From the above instruction by Techexpert, you have been given methods and tools to use to remove from your system and am now focusing on resetting your browsers since this adware affects your browser in most cases thus the need to make a complete resetting of your browsers. You should also know that in windows 8 or later versions, you may not be able to find safe finder in control panel therefore I will start on how to remove it in windows 10 in case it is not listed in control panel Under the new settings panel.
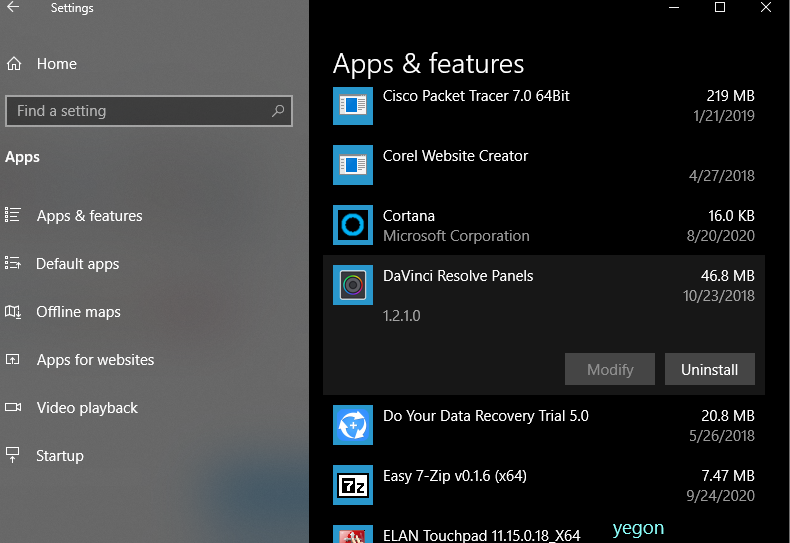
- Go to Settings-> Apps and scroll down to apps & features and find safefinder or safefinder smartbar and click uninstall. See screenshot below for reference.

- Next is resetting your browsers. This will help to reset and remove any extensions or settings that had been made earlier by Safefinder in order to hijack your home pages, and redirecting you while browsing. Follow these steps for Firefox, Chrome and Edge browser.
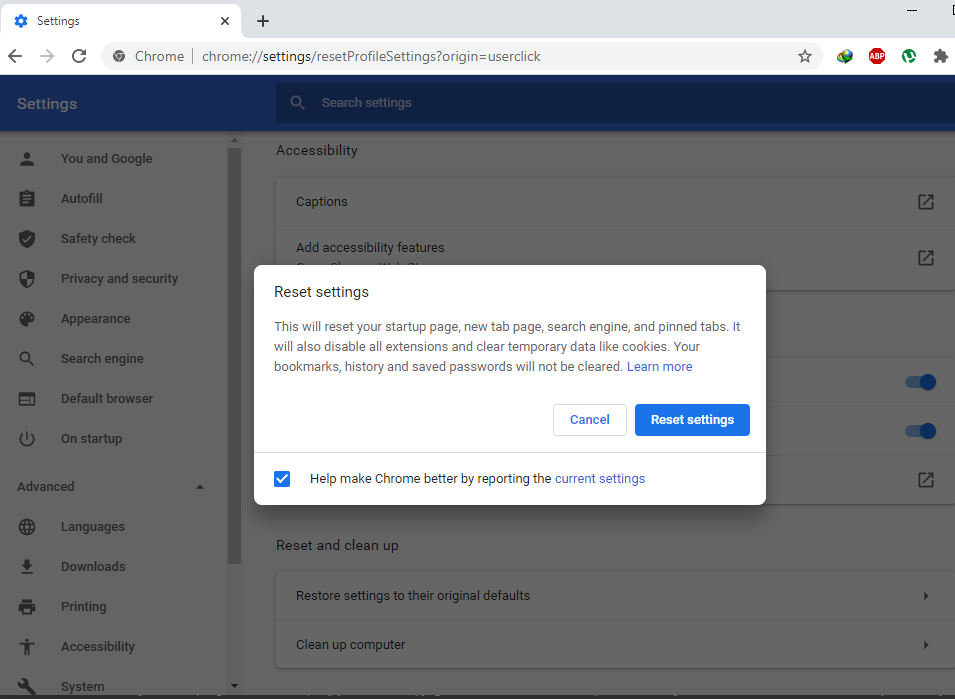
For chrome, Go to settings access using the three dots at the top right corner -> Advanced settings-> click Reset.

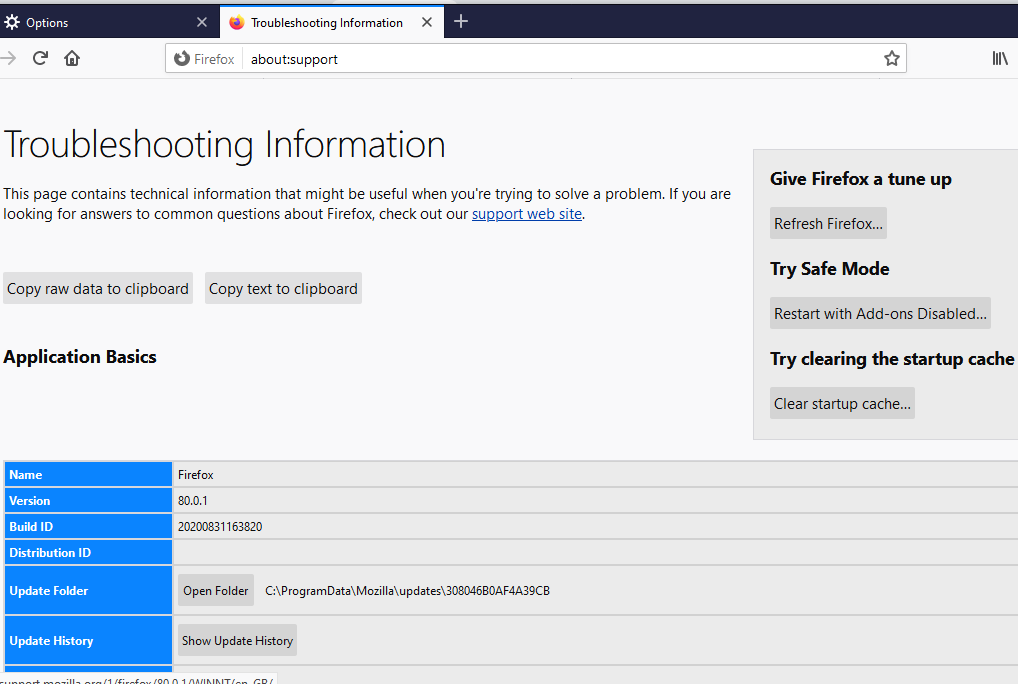
For Firefox , Go to settings-> Help->Choose troubleshooting Information-> then click Refresh Firefox.

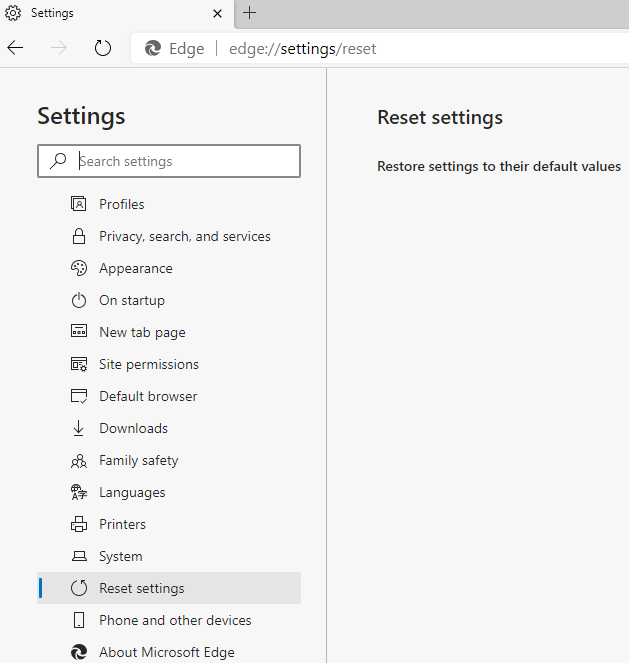
For edge://settings/profiles then Reset settings.
 YegonParticipant
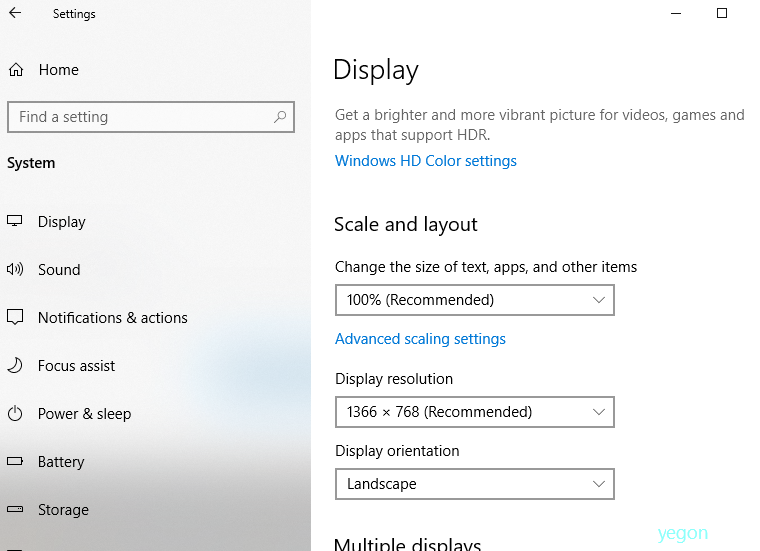
It is a display issue most probably with LCD or Display settings. To get the best out of your screen, make sure the Graphics driver is installed and updated and choose the recommended display settings for your computer. If the problem persists it will obviously be the LCD monitor or connecting cable. This problem is very common for dell users. Kindly use an external monitor to check the difference. This way you will narrow down the solutions and get the best out of your laptop. Dell LCDs have always been one of the best in terms of clarity and display quality. If the problem is still the same, consider replacing your LCD or the cable connector.
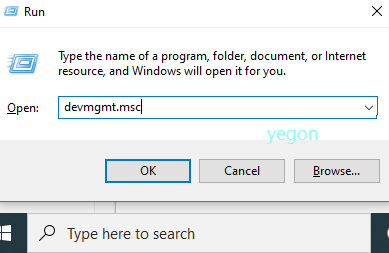
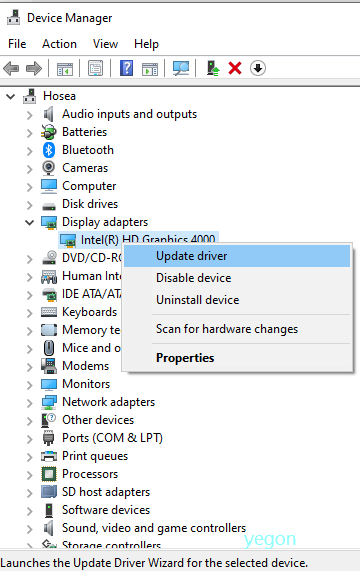
To update your display driver, go to device manager, by searching or press Windows + R then type devmgmt.msc then hit enter button and navigate down to Display adapters and right click on your display driver and click on update driver.

To choose the best display resolution for your PC, go to settings, Display and scroll down to scale and layout.
 September 28, 2020 at 9:25 pm in reply to: What tool would you recommend me to start and stop the print spooler service? #26533YegonParticipant
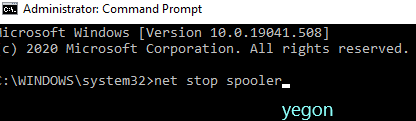
Command prompt is the best tool.
Open CMD and type net stop spooler and hit enter button to stop the service.
To start the service once again type net start spooler then hit enter button.
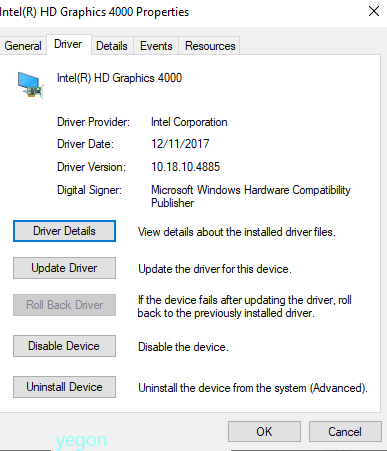
September 28, 2020 at 9:03 pm in reply to: Photoshop has encountered a problem with the display driver, how to fix it? #26532YegonParticipantThis is problem related to display driver. Try the following methods to resolve your problem.
- Update your Graphics/display driver.
Go to device manager and navigate to Display driver or press Windows + R keys and type devmgmt.msc and hit enter. Click on display adapter Right click on your display driver and tab on update driver. Alternatively you can visit your manufacturers driver site and download the updated driver or simply use driver pack online to automatically identify and update your drivers.
- Revert display driver updates.
In Display adaptors section, go to properties section as shown above then select Driver section and hit roll back driver. Make changes and apply the settings.
- Check Photoshop installation directory.
You should install the photoshop setup in windows drive to avoid such errors. Installation directory plays a big role especially when running the application which requires system resources.
- Disable Sniffer.exe service.
This is an application module for Photoshop that detects GPU type installed in your PC. In case this service has issues, you will experience similar errors while using your application.
Find the service using windows explorer in drive C and locate Snifferer.exe. C:\Program Files\Adobe\Adobe Photoshop 2019 cc , navigate down and search for sniffer.exe, right-click on it and cut it then paste it to a different directory then restart your computer to see if the problem was resolved.
- If the problem persists, uninstall and reinstall the Photoshop application. For more check here https://helpx.adobe.com/photoshop/kb/error-photoshop-has-encountered-a-problem-with-the-display-drive.html
September 28, 2020 at 7:51 pm in reply to: Brother printer paper jam error with no paper jammed #26521YegonParticipantSometimes after removing a jammed paper in printer and closing back the lid still gives you paper jam error which is annoying. It is not a serious problem and can be fixed with the following simple steps.
- Try opening and closing the printer cover. If you still get the error, it means a small piece of paper is stuck inside the printer. Follow the steps below to remove it.
Note: Do not touch internal parts of the Brother printer while removing the piece of paper.
- Open the top cover of the printer using your two hands holding the sides of the plastics tabs.
- Pay attention to the position of the printer head. Make sure it is positioned at the center. To do so, Press and hold down stop/Exit or Cancel (X) button until the head moves to the center.
- Power off your printer and unplug it from the power socket.
- Carefully move the printer head head while removing any pieces of papers. You can use tweezers to remove small pieces of papers.
- To release the printer cover lock, lift it up, carefully push the printer cover support down to release printer cover support then close the top cover using your two hands.
- Finally power on the printer to see whether the problem was resolved. If not successful follow this link for advanced printer solution https://support.brother.com/g/b/faqend.aspx?c=as_ot&lang=en&prod=dcpt300_all&faqid=faq00002918_009#JamInside
September 28, 2020 at 12:12 am in reply to: Desktop screen is completely black and all I see is my cursor, please help. #26492YegonParticipantYou do not need to buy a new one before trying those devices on a different computer. Because your problem is not related to CPU or Ram performance.
September 25, 2020 at 9:46 pm in reply to: How to fix ‘there was a problem resetting your pc windows 10’? #26456YegonParticipant“There was a problem resetting your pc windows 10” error normally happens when windows system has issues with system files integrity. There are some ways you can use to fix it even unless you are not in a position to access windows.
- First use the restore point
Restoring your system back to the previous time is so important to fix system errors. Go ahead and restore your windows in safe mode or access directly in your windows. If you do not know about Restore point, check it here https://www.techsupportall.com/enabling-system-restore-feature-windows-10-important/ If not successful, move to the next.
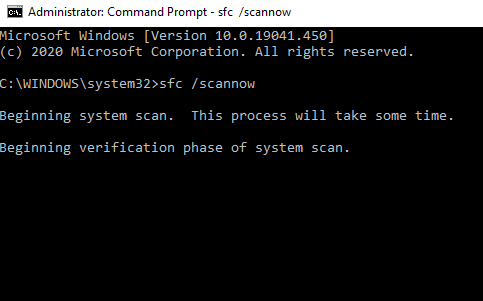
- Second perform a System File Checker (SFC).
Open CMD as Administrator and type sfc /scannow the hit enter and wait for the process to finish then restart it before trying to reset again. If I will not fix your PC move to the next step.
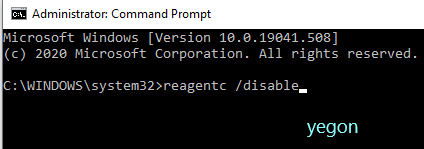
- Third Fix Windows Recovery Environment.
Run CMD as administrator and type reagentc /disable to disable Windows Recovery Environment. Then type reagentc /enable and hit enter again to re-enable. Wait for it to finish then restart the computer and try resting your windows. If it will not work move to the next step.
- Forth Rename the system and software registry
This will help fix registry files by assigning a new name.
Open CMD as administrator and enter the following commands hitting enter after each command. cd %windir%\system32\config Next ren system system.001 next ren software software.001 once done, Type Exit and try resetting your PC after restarting it.
If it Does not work for you, Go to the final step.
- Fifth Reset PC using a reset disk.
Create a new bootable reset disk using media creation tool to reset it using a USB or DVD. If you do not know how to create it, visit here https://www.microsoft.com/en-us/software-download/windows10 . use it to repair or make a full installation.
YegonParticipantHello, Since you have not stated the kind of device you are using, I will give you a general solution on how to remove hangouts both in chrome browser and PC.
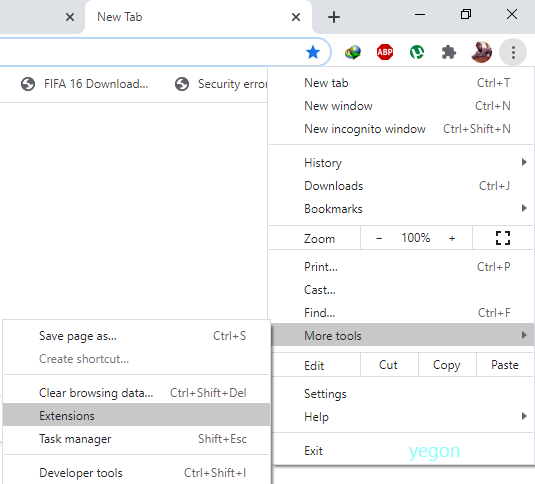
Removing from Chrome browser.
We will start by removing the hangouts extension which can be installed as a chrome extension. To do this open chrome browser->navigate to the top right corner and click on the three dots (Customize and control google Chrome)-> click on more tools->Extensions->Click on Disable->Then Remove


Removing Hangouts from Computer.
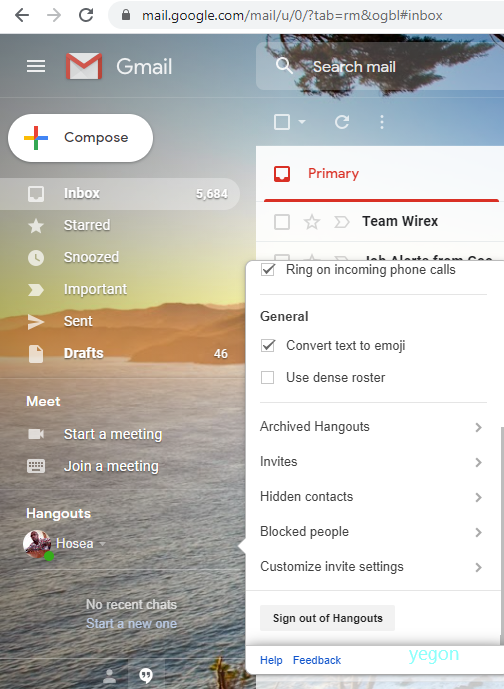
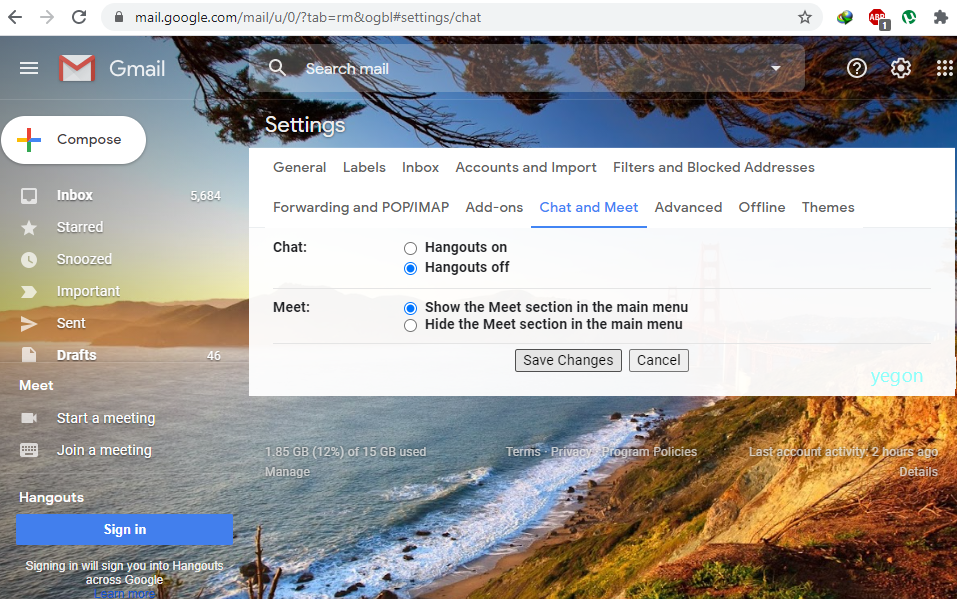
This will ensure that google hangouts is removed completely from your system. To do so, open your browser and Login to your Gmail account-> On the left panel under hangouts in your account, click on the arrow down just after your name->Scroll down to Sign out of Hangouts-> Go to settings on the top right corner and click on see all settings-> Select Chat and meet tab-> Finally click on hangouts off-> Finally Save changes to remove hangouts from from your computer.

 YegonParticipant
Well basically you can rename any shortcut in your desktop as long as you have administrative rights. For the error: 8072 is missing, it means the data for that application has been deleted with only the shortcut remaining. To check whether the data is still available, Right-click on that shortcut and choose Open file location. From there you can validate the integrity of that application data. If the data is available then go ahead and rename it inside the root folder.
- AuthorPosts