
Windows defender is an antivirus software bundles with the Windows 10 operating system. In previous version it was also known as Microsoft security essential or Microsoft antispyware. It came installed by default in Windows xp, vista, windows 7 and also in Windows 10.
Microsoft recommend to install a professional antivirus software in Windows. Windows defender only provide basic protection meanwhile user is not installing a free antivirus software or paid antivirus. As a user install the third party recommended antivirus or antimalware software Windows defender get disabled automatically an let the primary antivirus do its work.
Windows defender get disabled automatically after installing another recommended antivirus in Windows 10
Though you can still enable the Windows defender for periodic scanning. It will act like an on demand scanner. If there is no third party antivirus installed in the system and you want to disable it then you can turn off the realtime protection of the Windows defender. As removing a preinstalled app in Windows 10 is not easy though you can read : how to uninstall a preinstalled app in windows 10 . But we have the options to disable the Windows defender.
How to disable Windows Defender
There are 2 basic methods to turn off Windows defender in Windows 10. First one is using the control panel by turning off real time protection and second is using the registry editor to permanently disable it.
1. Turn off real time protection of Windows defender
- Open Settings.
- Click on ‘update & security’.
- Click on ‘Windows Security’.
- Click on virus & threat protection.
- Turn off the Real time protection.
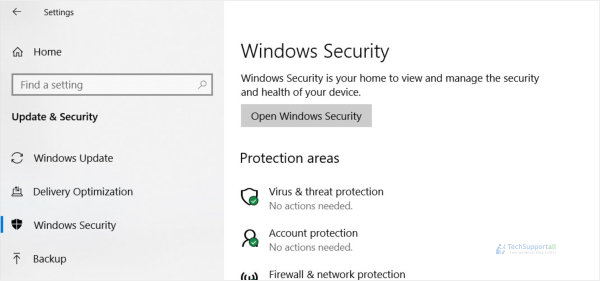
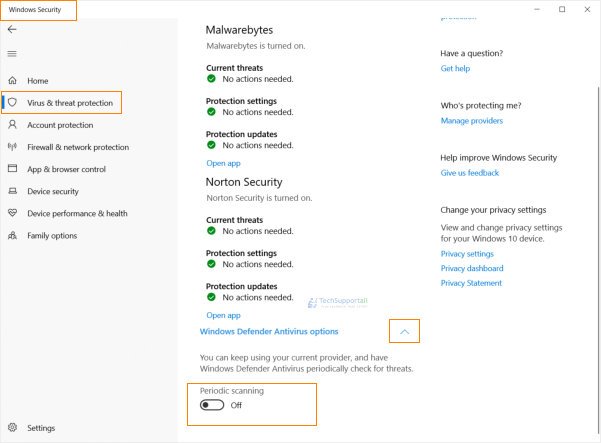
You will only get this option if you have not installed any other antivirus software. If there is another antivirus protection installed in the system you will see that it is already disabled and you can turn on or off the periodic scanning.
2. Disable Windows defender using Registry
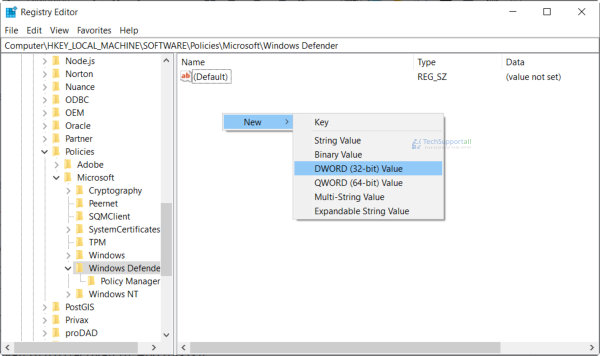
With this intention, we are going to modify Windows Registry, so press “Windows + R” and write “regedit”

We enter the Windows registry. On the left, there is a series of folders. Do double clicking on them shows the sub folders they contain. Do double-click on HKEY_LOCAL_MACHINE. Then in the subfolders SOFTWARE -> Policies -> Microsoft -> Windows Defender.
- Go to the route – HKEY_LOCAL_MACHINE\SOFTWARE\Policies\Microsoft\Windows Defender.
- We have to do Right-click anywhere within the empty space in the right panel of the Registry Editor and select New> DWORD Value (32-bit). See the image below
- We have to do right click on the created DWORD value, a new Registry Entry will appear named NewValue#1, after that we must do Right Click on it, select rename and type DisableAntiSpyware. Then, once again do right click and select Modify, change value data from 0 to 1. By doing it, Windows Defender will be disabled permanently.
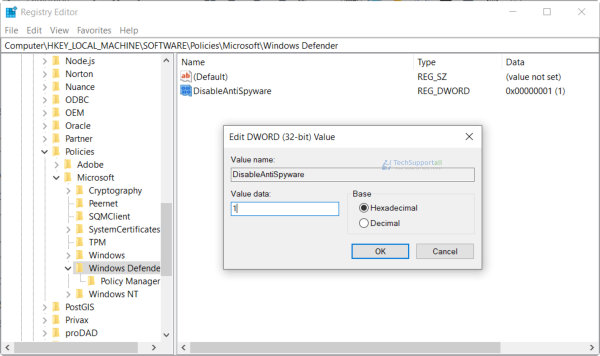
On the other hand, if we want to enable it again, we just need to repeat previous procedure. we have to enter the registry again by pressing Windows + R, type regedit, navigate to HKEY_LOCAL_MACHINE\SOFTWARE\Policies\Microsoft\Windows Defender, now we need select the registry entry we make before, do right click, and select modify, change value data from 1 (deactivated) to 0 (activated). And this is it!
There is another method to disable Windows defender is by using the powershell commands
