It is essential to have security if you are browsing the Internet on any gadget. Fortunately, there are many security programs (Antivirus) available in the market that we can use to protect ourselves. In this article, we will discuss the Windows Defender security that comes (built-in) with Windows 10 and 11. Additionally, we will discover how to activate and deactivate the Microsoft Defender Antivirus in Windows 11. We might have to turn it off sometime. At least for a moment. You can easily do it from your end because it’s a simple process.
Index:
- Go to: What is Windows Defender
- Go to: How to Disable Microsoft Defender Antivirus in Windows 11
- Go to: How to Enable Microsoft Defender Antivirus in Windows 11
What is Windows Defender?
Windows Defender is the security suite (Antivirus) that Microsoft built-in Antivirus with all its operating systems from Windows 7 onwards. Over the years, it has greatly improved its performance. Besides that, it has been evolving along with the different versions of Windows like Windows. Through it, Microsoft has increased the possibility of detecting malware and ransomware on our device. Certainly, this security system in Windows 10 and Windows 11 operating systems works really well. Many times it is able to detect any virus, Trojan, and malware in general.
For several years now, several malware labs have proven that the performance of this security suite is excellent. It certainly has nothing to envy other paid solutions such as Kaspersky, BitDefender or McAfee, among other companies. Logically, all these companies have more advanced security solutions than the one that comes by default on Windows. They also incorporate additional security-related tools such as safes for storing confidential files. Many times they also add password managers and other tools.
In relation to the antivirus and firewall, the one that comes by default on Windows is more than enough for a normal user. So much so that many manufacturers have withdrawn their free versions because they recognize that Windows antimalware is much better than their security suite.
This security suite is always enabled by default in Windows 11, 10, 7, by default. If you disable it, a warning message will be displayed. By means of it, the system tells you that you are at risk. Consequently, it is recommended to use the protection again. Or in any case, resort to third-party antivirus, such as those mentioned above.
We have already mentioned that Windows Defender is a good antivirus. Indeed, it includes projections against ransomware threats to stop processes. As a result, we will be able to prevent all the data on our hard disk from being encrypted. In this way, the detection engine will be able to detect if many files on our PC are being modified simultaneously. Based on this fact, it is able to stop the process and keep all the files and folders on your computer safe. This Windows defender is enabled by default, so let’s learn about disabling it first.
How to Disable Microsoft Defender in Windows 11
Note: I don’t think it’s a good idea to turn off the Microsoft Defender Antivirus on Windows 11, but you can do it if you need to.
As mentioned above, Windows Defender is enabled by default. This is logical, since it protects the system from threats and risks. If at any time you wish to deactivate it, just follow these steps:
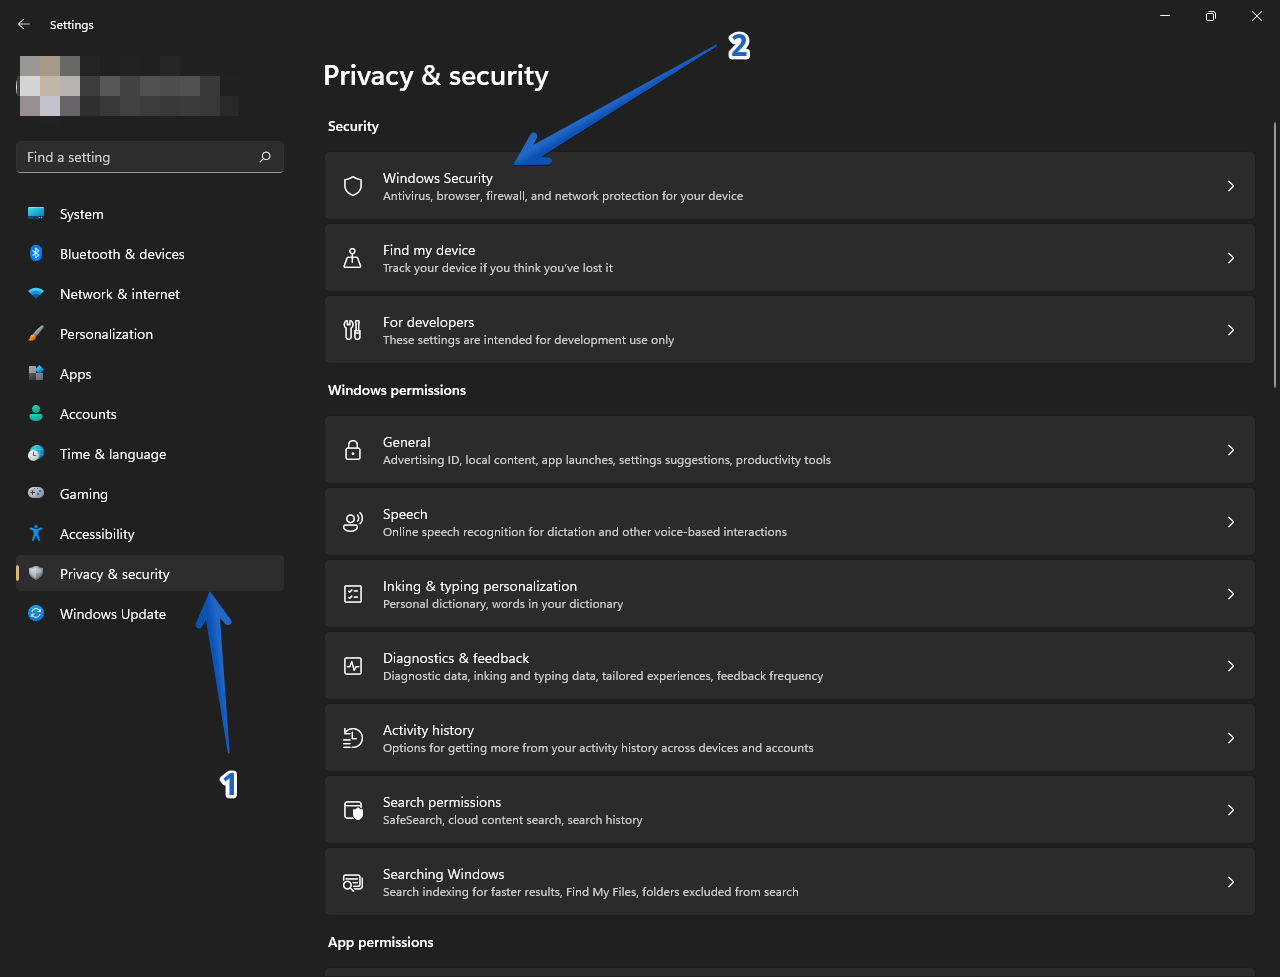
Step 1: The first thing you have to do is to go to Windows Settings. With this in mind, press the Win+I combination. Once you’re there, click on Privacy & Security. Once you’re there, please click on Windows Security.
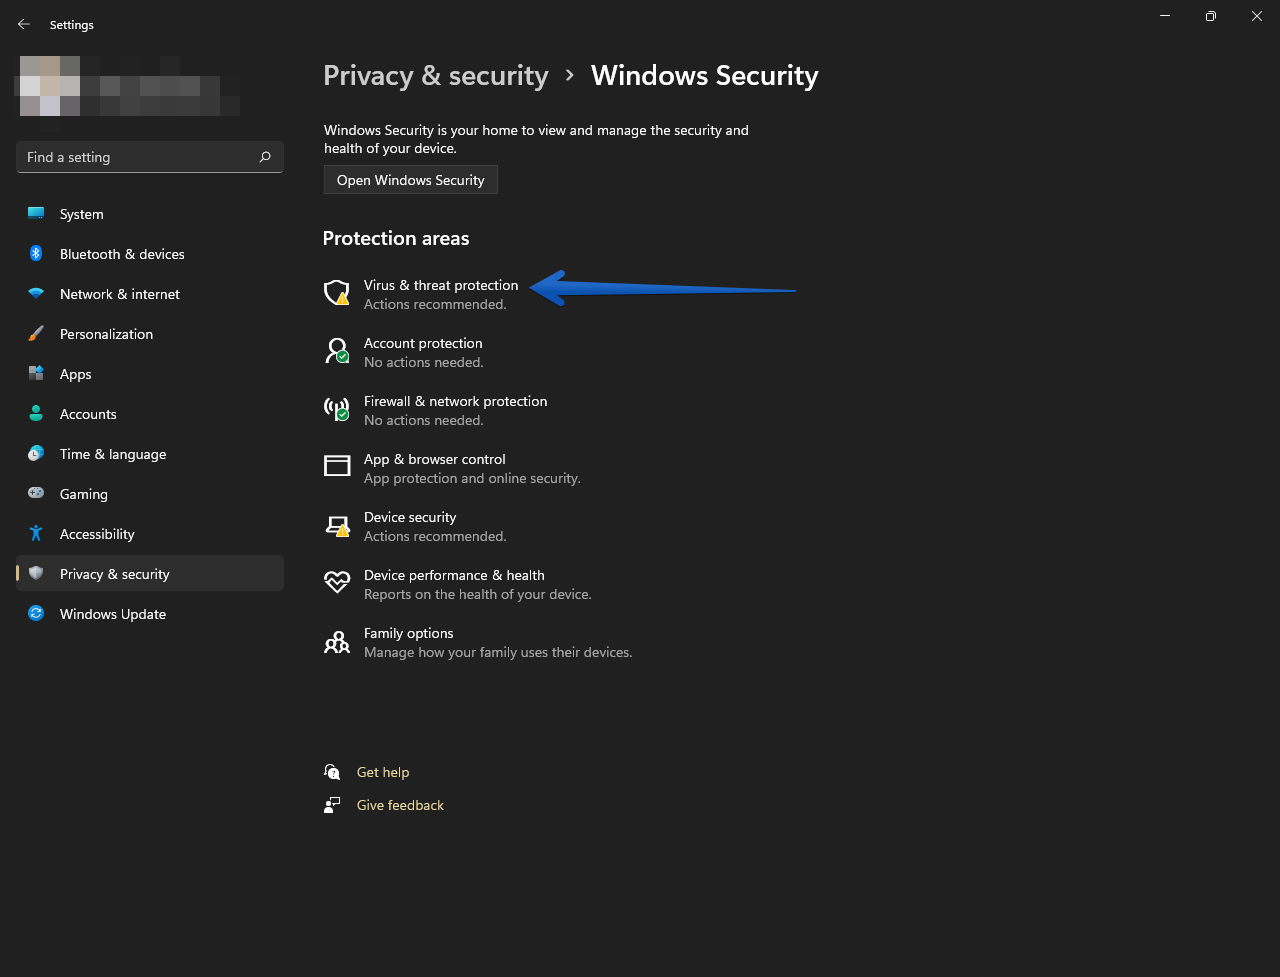
Step 2: In the following window, please click on Virus & Threat protection.
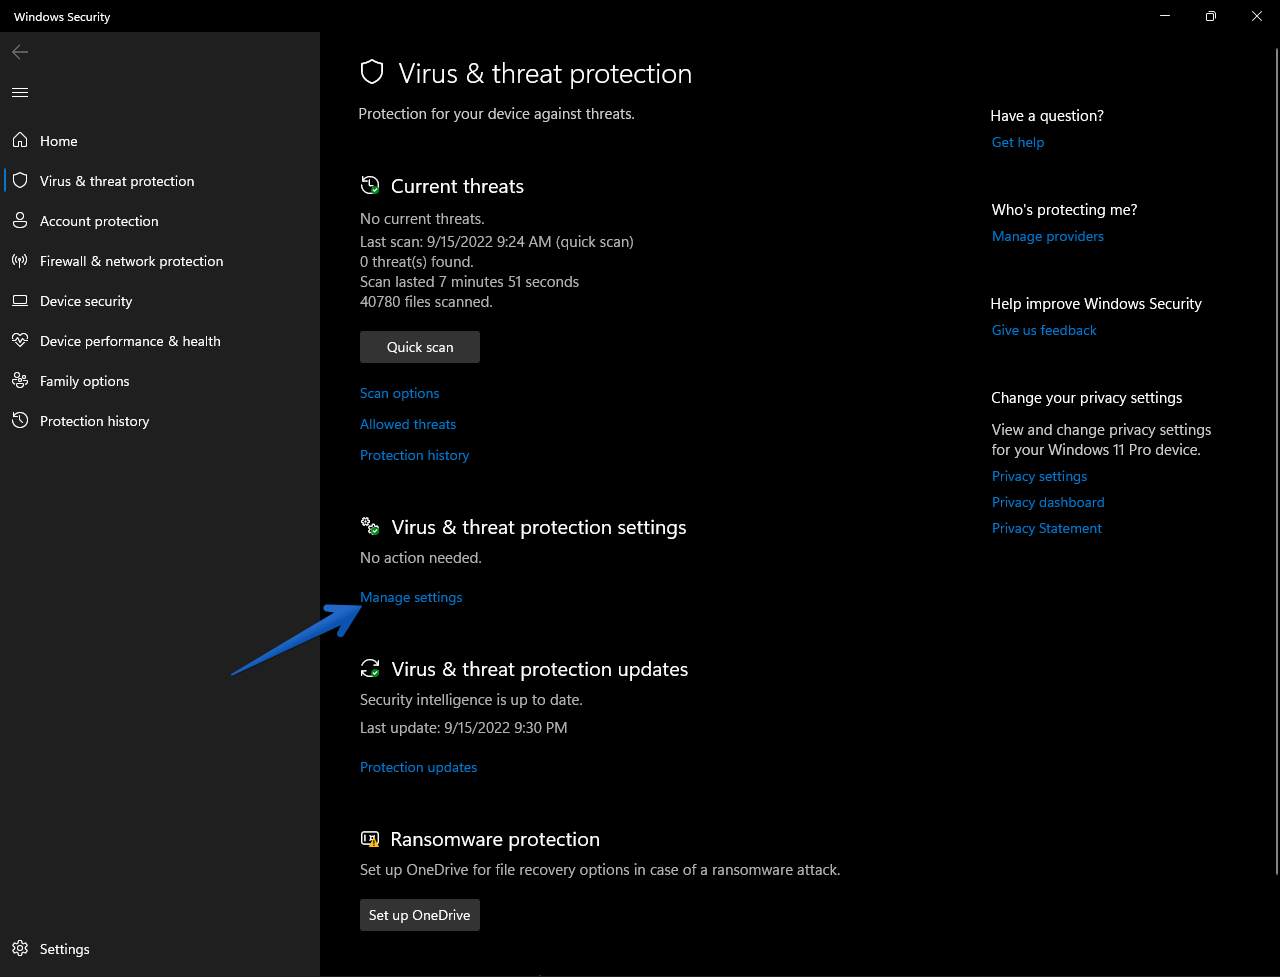
Step 3: You will then be redirected to a new screen. As you can see, all the options related to system security are displayed. Please go to the Virus & Threat protection settings. Specifically, click on Manage settings.
Step 4: There, you have to uncheck the Real-time Protection box. Automatically, Windows Defender will stop being active. So you will no longer analyze the files you download or the programs you install.
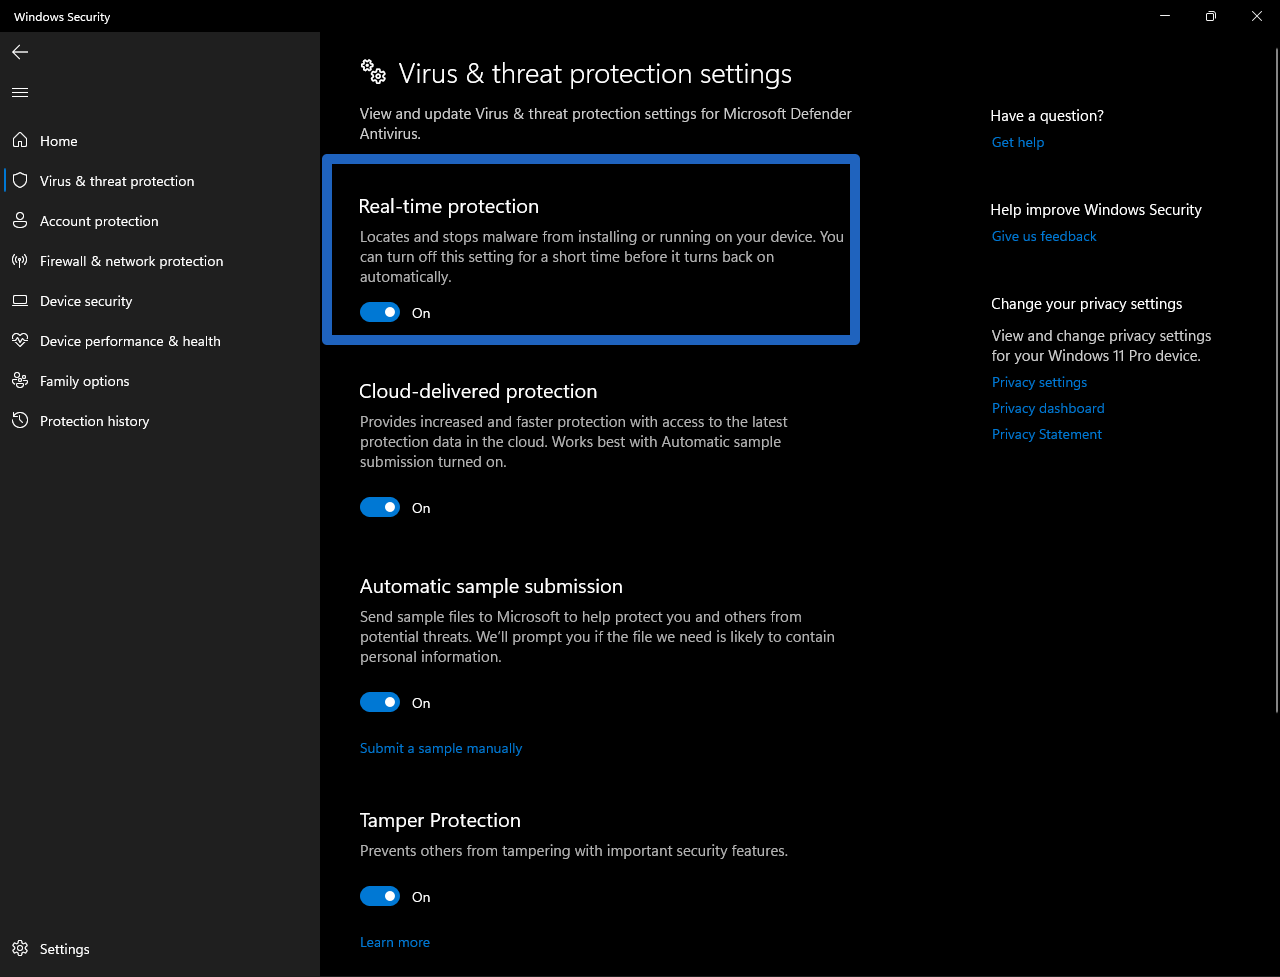
It is necessary to keep in mind that this does not disable Windows Defender completely. In fact, it is a temporary solution. Nevertheless, you will stop having problems if you get a false positive. However, it is perhaps the main objective of many users who opt for it. Please note that this deactivation is only temporary. To disable it completely, you have to follow the following steps that we are going to explain.
Completely disable Windows Defender (Advanced Steps)
As mentioned, the above solution is temporary. This is logical since the device remains unprotected. But in case you want to disable Windows Defender completely, this is what you should do. Please know that we do not advise you of this action unless you are going to use another antivirus suite. Well, the first thing you have to do is to disable it temporarily. In other words, do what we indicated in the previous steps.
Step 1: Once you have done this, you will need to enter the Group Policy Editor. To do this, you simply have to press the key combination Windows+R and run gpedit.msc. From there, you will have to access Computer Settings>Administrative Templates>Windows Components and enter Microsoft Defender Antivirus.
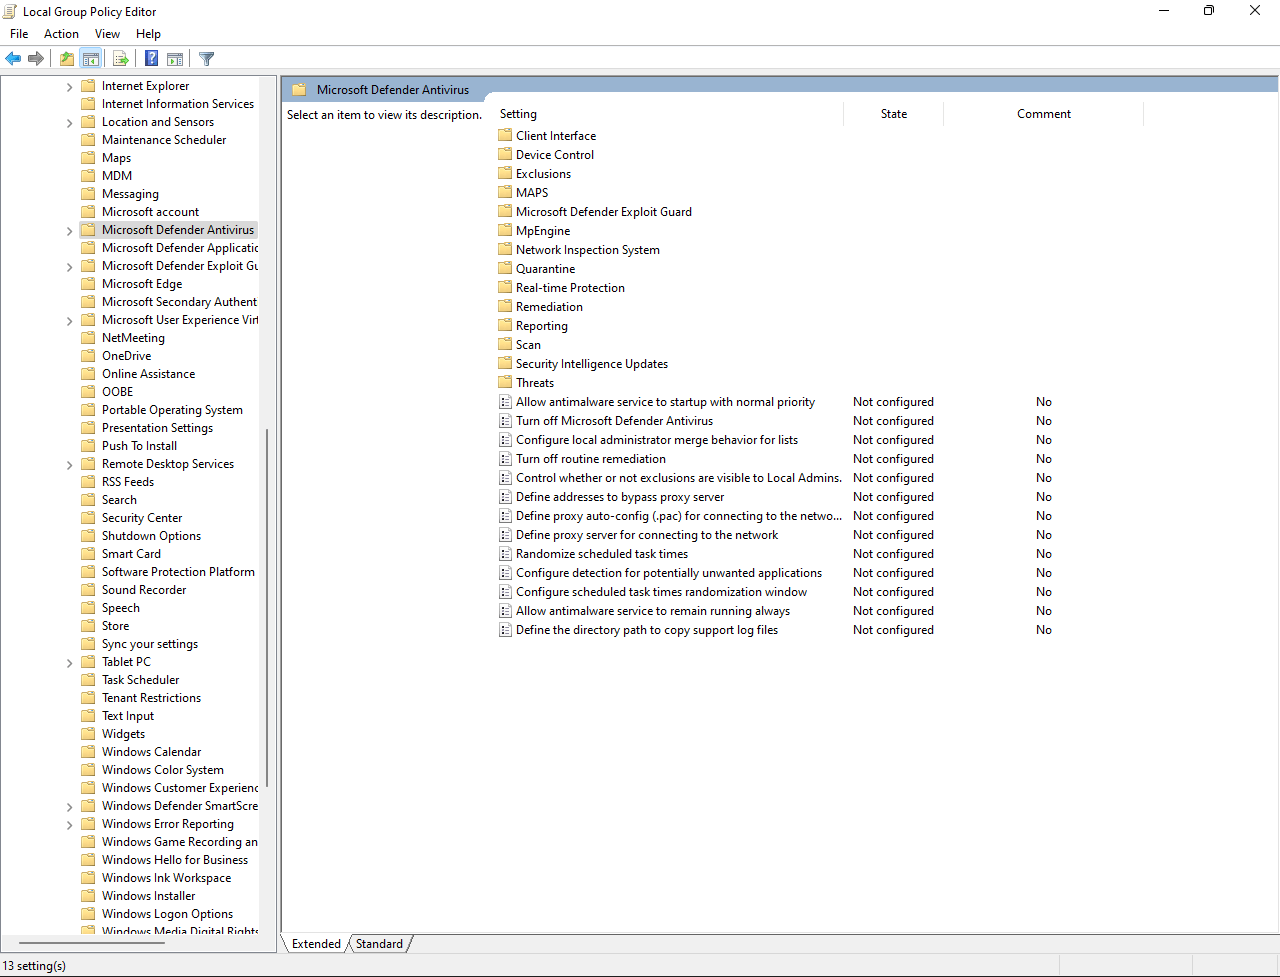
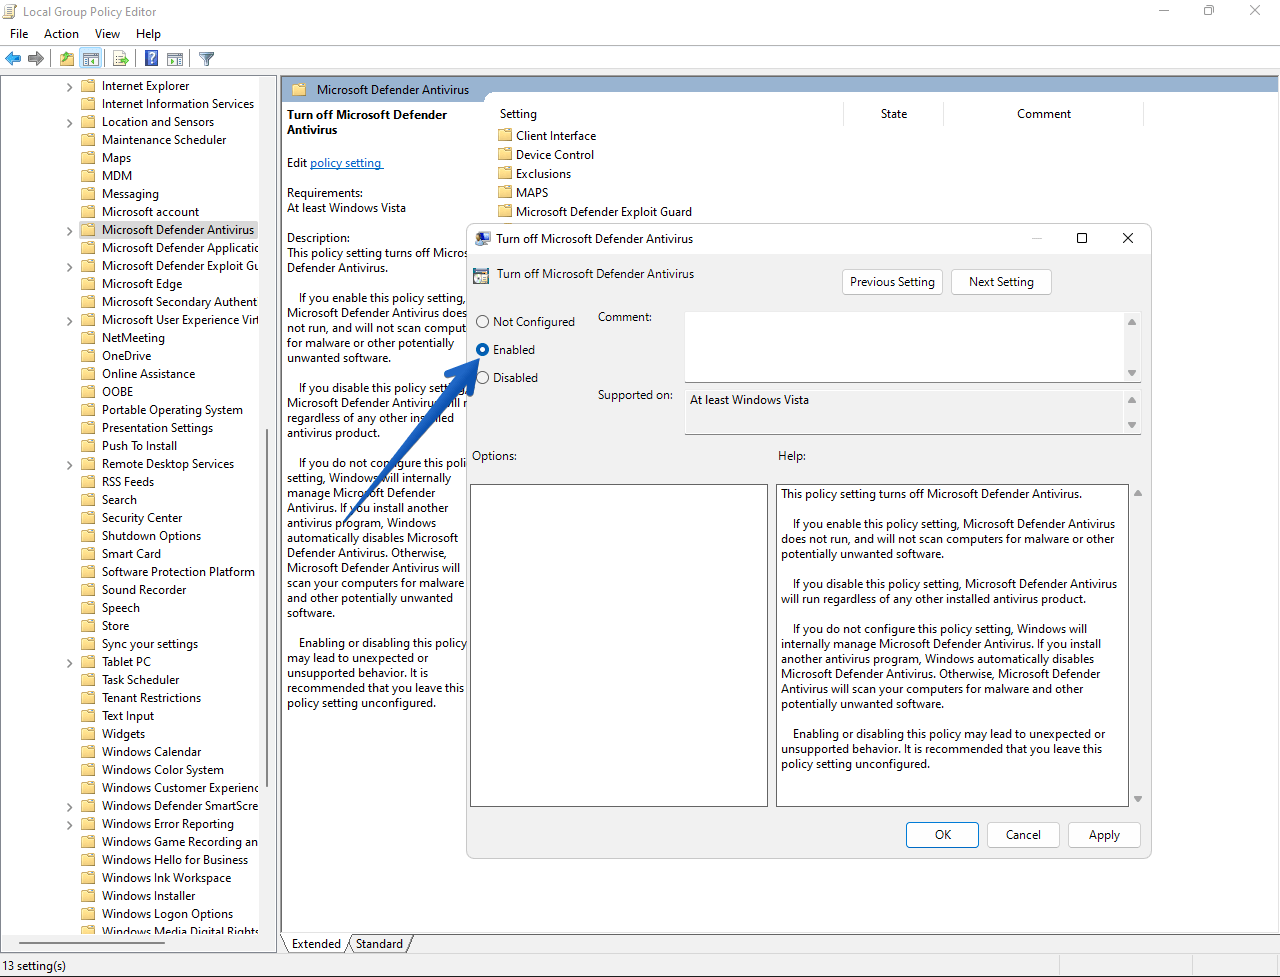
Step 2: There you will find the option to Disable Microsoft Defender Antivirus. Just double-click and enable this function. A drop-down menu will open, as you can see in the image, and you have to select the Enabled checkbox and apply the changes. From that moment on, you will have disabled the Windows antivirus. To re-enable it, you would have to follow the same steps, but remove the Enabled checkbox.
How to Enable Windows Defender in Windows 11
If you wish to reactivate Windows Defender, the process is as simple as turning the protection switch back on.
Well, as we mentioned, Microsoft Defender is very intuitive in this regard. Therefore, at the moment of installing some antivirus, the Defender is deactivated automatically. In addition, if at some point you dispense with a third-party solution, then Microsoft Defender will be active again. As always, the decision is yours. We only advise you to proceed with common sense. It is not the wisest thing to completely disable Microsoft Defender if you are not going to use any other antivirus solution. See you soon!
FAQs:
Question: Can Microsoft Defender and third party antivirus work together?
Answer: In principle, Microsoft states that it is not necessary to use additional antivirus protection. Indeed, the company claims that Microsoft Defender is more than enough to protect the user from possible threats. However, it is always at the user’s discretion to opt for another antivirus suite.
In any case, Windows Defender behaves in a very intuitive way. Therefore, if you decide to download any other antivirus, you do not need to make any changes to the computer. Remember that it is not advisable to have two antiviruses working at the same time on the system. In fact, you are likely to have performance and system performance problems.
