
Suddenly if your Windows 10 computer become unresponsive or become very slow then issue could be of the 100% disk usage. Please note that slow computer could be due to other reasons.
To make sure that it is due to the 100% disk usage issue navigate the Task manager by pressing Ctrl + Alt + Del and check if it is showing the disk utilization 100% as like in the below screenshot. If it is not showing a 100% disk then there must be some other issue for your slow computer.
If drives are not full it means actually you are not utilizing the 100% space. It could be a temporary software issue and can be solved easily.

‘100% disk utilization’ in task manager could be a temporary issue and most of the time just restarting your computer can solve this.
Before going further to fix the issue lets know what is the cause of this problem
What causes the ‘100% disk full’ problem?
Are you looking for the answers, that why is it happening? What are the cause of this issue? What is responsible for the 100% disk utilization? Actually, there is not any specific reason for this issue. Below can be culprits.
- Sometimes, Windows System Process or different applications like chrome, skype or Microsoft Office can force Windows 10 to utilize most of the hard drive.
- Windows Search get stuck in the loop. or It can be caused by the Superfetch service of Windows.
- A Windows update process running in the background can also slows down your system and show a 100% disk utilization issue.
- A disk defragmentation running on a SSD can also create this issue.
It is not easy to determine which process is the culprit, even you can’t find the exact information in task manager. So you have to follow some step by step procedure to get rid of this problem.
How to fix 100% disk usage issue?
If you are getting this occasionally it is normal and is easy to fix. Just restarting the PC can fix this issue. Follow the below steps to quickly overcome this error.
- Close the running apps using task bar manager.
- Temporarily turnoff the Windows search and Superfetch services.
- Disable disk defragmentation.
- Switch to high performance power plan.
- Check for system file errors using DISM and SFC commands.
Please check if Windows 10 is not downloading any update or not running any windows update process. If it so then let the Windows finish first and it will solve the issue automatically.
1. Close the running apps using task manager
First of all wait for a while to let the system finish its processing. May be it will finish the process and get back to normal state.
If disk usage not go down then try to close the running processes or applications. You can do this from the task manager. It will bring down the disk usage.
- Open up task manager by pressing Ctrl + Alt + Del buttons on your keyboard.
- Right click on a process and click End task to end the running process.

2. Temporarily turn off the Windows search & superfetch services
Open up the command prompt as an administrator and type the following commands to stop these services temporarily. Some times Windows search service stuck in the loop, so to escape from this situation you need to stop these services. Then start these services again.
net stop "windows search"
net stop prefetch
net start "windows search"
net start prefetch
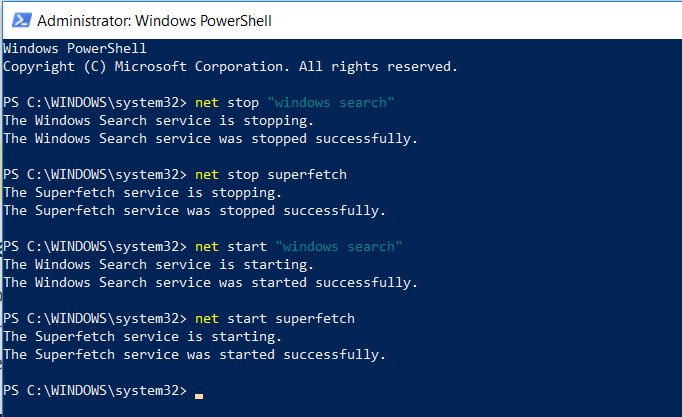
Note: We do not recommend to stop these services permanently to fix this issue. But disabling there is no harm in disabling them temporarily.
3. Disable disk defragmentation
Sometimes disk defrag can also cause the 100% disk usage error. Specially when you are using a SSD and in task scheduler a defrag task is in schedule. So disable the Disk defragmentation task by turning it off. Below steps will help you to do this.
- Search for defrag and open the application Defragment and Optimize Drives.
- Select the drive for which you want to turn off the defrag task and click on the Turn off.

As per the feedback by the Microsoft community, it mostly happened due to the conflict between two software. Mostly it was caused by the Chrome and Skype apps.
Also Read: SSD vs HDD
Hopefully above steps will fix the issue quickly for temporary issue. But if you are facing this issue more often then below steps are also worth to try.
4. Windows update
Updating Windows 10 to the latest release is the first step that you should perform after eliminating the issue temporary. Some times this could also be due to the unfinished Windows updates. So if this is so then let the Windows finish the updates first.
Windows update will also fix some other issues which are the cause of the 100% disk usage issue. So check manually that your windows is up to date. If problem still persists then move to the next steps.
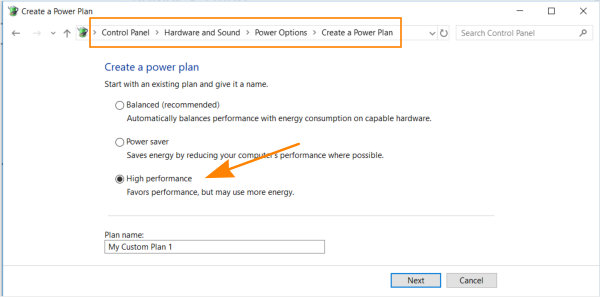
5. Switch to high performance power plan
Switching to a high performance power plan can speed up the process which windows is doing by utilizing the disk space. So it can also solve the issue. Actually it just increase the performance of the system. Follow the below steps the to change the power plan to high performance.
- Go to the Settings -> System -> Power & Sleep -> Additional power settings. Or alternatively open the control panel and follow the path given in the screenshot.
- Click on the Create new power plan.
- Select high performance option give it a name and save the new power plan.
6. Run system file checker command
Sometimes a corrupted system file can also be the cause of this issue. Chances are less but it is worth to give it a try. Run the SFC command by running DISM command first. This command will also fix some other errors of operating system.
Read : How to run DISM Command.
Simply if still you are unable to fix the Windows 100% disk usage issue then the problem is somewhere else. Now your next step should be to Reset Windows.
IF resetting or repairing will also fail to solve the issue then surely either your hard disk is really full or you need to replace the Hard Disk.