
BitLocker is a disk encryption function integrated into some versions of Windows 10. This is in the editions of Windows 10 Pro, Education and Enterprise. This feature incorporates an additional layer of security for hard disks. However, if you would like to disable it for any reason then see how to disable BitLocker in Windows 10.
Index:
- Disable Bitlocker from control panel
- Disable BitLocker through the Group Policy Editor
- Disable BitLocker using command prompt
- Disable BitLocker using PowerShell
- Disabling the BitLocker Service from the services page
1) How to disable BitLocker using the Control Panel
In fact, the first method I propose is to use the Control Panel.
- Press the Win+Q combination and type BitLocker in the search bar.
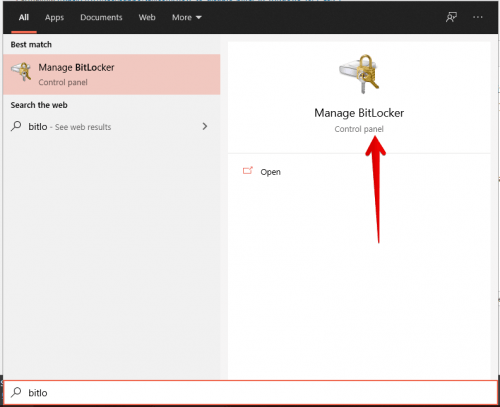
- The list of hard disks presented on the computer will be displayed immediately. Now all you have to do is turn BitLocker on or off, as may be the case.


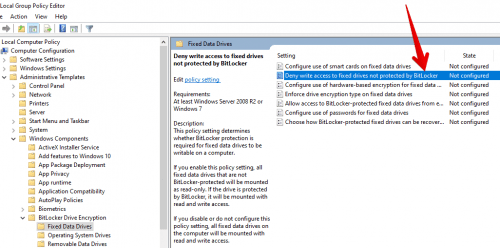
2) Disable BitLocker through the Group Policy Editor
Another method of disabling BitLocker is to edit the Local Group Policies.
- With this intention, press the Win+R combination and run the following command:
gpedit.msc

- Now, please navigate to the following path: Computer Configuration > Administrative Templates > Windows Components > BitLocker Drive Encryption > Fixes Data Drives. Finally, locate the option Deny write access to fixed drives not protected by BitLocker:

- Now is the time to disable the BitLocker policy. Double-click on it. Once there, change the status to Disabled. Finally, press OK and restart the computer.


3) Disable BitLocker using command prompt
It is also possible to disable BitLocker via a system symbol as an administrator.
- With this intention, press the Win+Q combination and type command prompt in the search bar.

- Once there, please run the following command:
manage-bde -off X:
Please remember to replace X: with the corresponding unit letter. After pressing Enter the decryption process will begin. Please do not interrupt it until it is over.


4) Disable BitLocker using PowerShell
With a few steps similar to the previous one, we can use PowerShell as an administrator to disable BitLocker.
- With this in mind, press the Win+X combination:

- Then run the following command:
Disable-BitLocker -MountPoint «X:»

- Once again, remember to replace X with the corresponding unit letter. Depending on the size of the disk, the process can take quite a while. So wait while the task is completed. Now to decrypt all existing volumes, please run these two commands in order.
$BLV = Get-BitLockerVolume
Disable-BitLocker -MountPoint $BLV


5) Disabling the BitLocker Service from the services page
Finally, it is possible to disable BitLocker by disabling the associated service.
- With this in mind, please press the Win-R combination and run the command:

- Type in the following command: services.msc
services.msc
- Once the Services are deployed, please select BitLocker Drive Encryption Service.

- Then double-click on it. And in ‘start type’, please change it to Off. Press OK to make the changes.

- Ultimately, we have seen how to disable BitLocker in Windows 10. Also, for your convenience we have broken down several options. See you later!


