Hi, today we’ll talk about one more amazing feature of Windows 10. In this opportunity, we will study a very particular function named ReadyBoost, which is used to speed up Windows 10. It is about a feature that Microsoft incorporated into its operating system in Windows 10 and that allows converting the Flash drive into a hard disk cache to improve the system read performance.
What is ReadyBoost
Readyboost is a Windows feature that convert your Flash drive into a hard disk cache to speed up the computer. Thanks to this functionality, we can use the best access times that flashcards usually have regarding mechanical hard drives. Thus, Windows will automatically copy files that we usually use (like the part of the swap file) to that unit, and when it is necessary to access them, it will be assessed in less time. From there will come the improvement in performance. ReadyBoost is capable of working with USB drives, SD cards, and CF cards and from Windows 7, it also offers the possibility of configuring more than one USB memory drive for it. Therefore, let’s go to see how to try to speed up Windows 10 using ReadyBoost.
How to Enable ReadyBoost in Windows 10
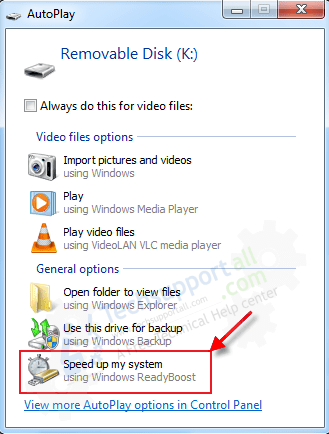
- The first thing to do is to insert a flash drive / USB Stick.
- Format it.
- Then, we need to go to file explorer (My computer / This PC) where all the drives are listed, then select your just inserted flash drive or memory card, do right-click on it, to select properties.
- Next, we need to click on the ReadyBoost tab.
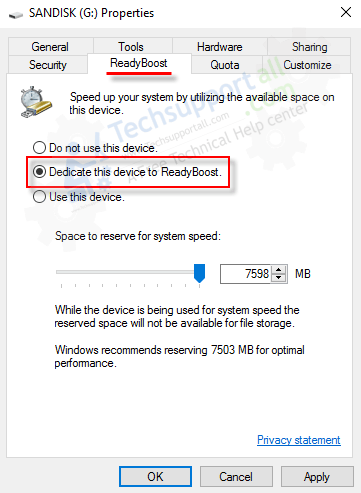
- In this window, all the three options are shown here relative to ReadyBoost. In my particular case, I use a 8gb flash drive, so check the following options below.
- Do not use this device (if we do not want to use it).
- Dedicate this device to ReadyBoost (if we want to use full storage to ReadyBoost)
- Use this device partially (if we only want to use part of the space of the USB drive for this function, in which case, we will be enabled with a slider to choose the amount of memory we want to allocate to ReadyBoost).

- So select the second or third option and wait while system configures ReadyBoost and there you go.
- Reboot your computer once. After that, the ready boost is activated.
Use it for data transfer
If you have thought to use that flash drive for other files and connect it to other computers, do not worry, you can use it first, because you can extract the flash drive or card whenever you want without having to do anything in the operating system. And second, for privacy, since the file used by ReadyBoost is encrypted and is only manageable on the computer on which it was configured.
My views on ReadyBoost Feature
ReadyBoost is a great option to all those who have old equipment with limited performance due to its reduced memory and, above all, having a mechanical hard drive, we can use ReadyBoost to improve system performance by taking advantage of the best access times of the flash memory.
FAQ
Q: What capacity of pen drive is ideal for this feature?
A: 8 GB pen drive is enough for a quick boost. Though you may use the higher capacity as well.


