
In this page, we’ll show you how to fix the Back screen with mouse pointer issue in Windows 10. What is actually happens, when you start your PC, you are stuck with the Black screen with the mouse pointer where you suppose to get your desktop ready after login. Only the mouse pointer showing on your screen and it’s moving all around the screen as you can see below screenshot.

There are many reasons for this issue but the most common reasons we have seen is got corrupted the computer’s shell. It may be due to system updates or malware infection.
A system shell handles most of the Windows explorer functions which are related to desktop (like desktop icons, taskbar, theme, etc). As I have stated that it might be due to malware infection. It is possible that Malware has targeted the system shell and change its registry value. Anyway, here we’re showing you the step-by-step guide on how you can fix Black Screen with cursor issue.
Steps to Fix Black Screen with Mouse Pointer Issue
Follow the following steps.
Step 1: Reboot your computer
On some boot, the Windows Explorer file couldn’t start. So, before going to any advance step, we suggest you please reboot your computer. To reboot the computer on a Black screen with cursor only is:
Press “Ctrl + Alt + Delete” altogether, once you press them, you’ll get a blue colour screen with some options, look at the right-bottom side corner, you’ll see a power button, please click on that power button and then click on shutdown, your computer will be restarted.
Step 2: Start Windows Explorer Manually
This error is a failure of the operating system’s registry lines leading to Shell, the graphical interface layer of Windows.
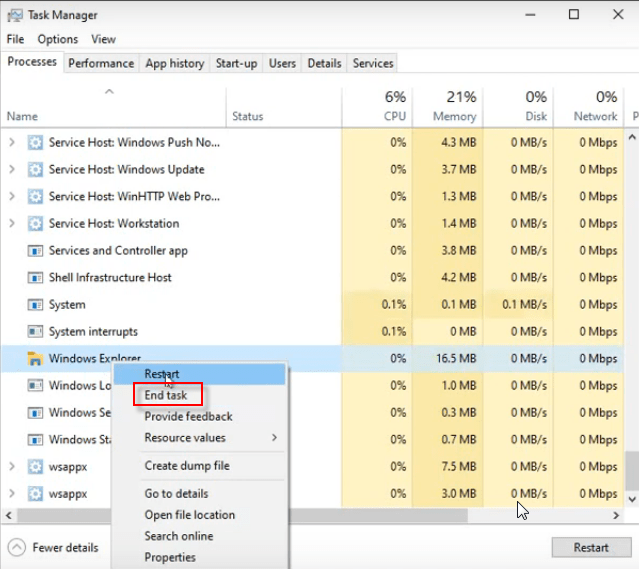
- Press Ctrl + Shift + Esc keys together (shortcut) to open the task manager.

- In the task manager, look for Windows Explorer in the list. If you don’t find it then jump to the next step, if you find it in the list then right-click on it click on End Task.
- Then, click on File menu, and then select Run new task.

- Then type explorer.exe and check the administrative permissions option. Then click on OK.

- After clicking on OK, Now you can see your desktop icons. The issue is resolved but it is temporary. To fix it permanently, follow the further steps.


Step 3: Correct Windows Explorer’s Shell Registry Values
If the above step did not work for you, then it’s time to try a more tricky solution. In fact, it involves modifying the Windows registry, so you should proceed with caution.
- Press Ctrl + Shift + Esc keys together (shortcut) to open the task manager.
- Then, click on File menu, and then select Run new task.
- Type regedit in the RUN box and then click on OK. This will open the Windows registry editor.

- Double-click on “HKEY_LOCAL_MACHINE” from the left side pane and then go to Software → Microsoft → Windows NT → Current Version, finally click on WinLogon Logon. Now, look right side pane, you’ll get the registry value named “shell”. Double-click on “Shell” and change its Value data to “explorer.exe“. Please see the following screenshot.

- Shell registry change is completed. Now, change one more registry entry. Follow the followings steps.
- Go back to the HKEY_LOCAL_MACHINE and then go to SOFTWARE → Microsoft → Active Setup → Installed Components → click on {89820200-ECBD-11cf-8B85-00AA005B4340} and look to the right-side pane.
- Once there, right-click on the “Default” value and then click on delete to delete this value.

- After that reboot your computer. If the issue still persists then apply step 4.


Step 4: Perform Automatic Startup Repair
- Press “Alt + Ctrl + Delete” altogether. You’ll get a blue colour screen with some options.

- Look at the right-bottom side corner, you’ll see a power button, please click on that power button, and then press and hold SHIFT key from your keyboard and press RESTART button together.

- Your computer will be restarted with some advanced boot options, and it says, choose your option. You’ll get three following options: Continue, Troubleshoot, Turn off your PC.
- Click on Troubleshoot.

- Click on Advanced Option

- Click on Startup Repair. It will restart the computer.

- After the restart, it will ask from you to choose your user account. So please select the user account.
- After selecting the user account, it will ask from you for its password, so please enter its password. If your user account doesn’t have any password then leave it blank and click on continue. After clicking on continue, it starts the startup repair process and this process will fix your black screen issue.


Step 5: Uninstall The Latest Updates
- Go to the advanced boot options again by following step 4’s steps.
- Then go to the troubleshoot option → Advanced option → Uninstall updates.
- You’ll get two options. First, try to uninstall “Quality updates” if it doesn’t work then try “Feature Updates“. Follow the on-screen instructions to process it.


Step 6: System Restore to an earlier date.
- Go to the advanced boot options again by following the step 4’s steps.
- Then go to the troubleshoot option → Advanced option → System Restore.
- Choose the most latest stored system restore point and click on continue and follow the further on-screen press to complete it.
Click here for more detail about system restore.


Step 7: Start computer in Safe Mode Once to find out the faulty app
Then restart the system in safe mode to solve the problem definitively. Follow the next steps:
- Press the combination Ctrl + Shift + Esc to enter into the task manager.
- Next, select File and then Run New Task.
- In the dialog box, type msconfig.

- In the next window, select the Boot tab. Once there, select the Safe Boot and restart the computer.

- If the computer starts usually in safe mode then it seems like a problem with a startup application or with the startup services. To fix this issue, we suggest you to disable all the startup applications and services from your computer and the boot your computer. This process is called “cleanboot”. So please “cleanboot” your computer and then turn on the apps and services one by one and check which one is making conflicting with the explorer.exe. Determine the faulty application and uninstall or reinstall that. See the following screenshot.


If the issue still persists after applied the above steps then apply the fourth one.


Step 8: Scan and fix system files corruption
Next, we will try a more complex solution. This is to use the SFC command to scan and repair the system for possible errors. With this intention, follow the same steps of the previous method. But when you open the task execution box please type CMD. Also, check the box to enable administrative privileges.

Immediately the Command Prompt will be displayed with administrator privileges, please execute the following command:
sfc/scannow

Windows will start a system scan that will take quite a while. Consequently, it will review all files and if there are any errors, it will restore it. You may need to reboot the system to confirm the changes.
Additional Information:
Today we will talk a little about stability in Windows 10. Indeed, a very criticized aspect of Microsoft systems is that sometimes they collapse. Despite the performance improvements, there are still episodes with Windows crashes.
Well, one of these inconveniences is related to a black screen with the cursor. That is, in some cases when the system is started, only a black screen is shown. In addition, when using the mouse, the cursor moves across the screen. This situation occurs more often on laptops.
Usually, this issue takes between 5 and 15 minutes depending on the equipment. But the worst thing is that apparently nothing can be done except wait for the system to boot up on its own.
However, there are several methods that can be tried to solve the problem. And even to prevent it from happening again on the next boot. So, let’s see how to Fix Windows 10 Black Screen with cursor issue.