
Using a printer on a computer is usually a simple process. However, when sharing it over a local network, it could be a bit tricky but not too hard — you can do it easily. You can easily share your Wireless printer or USB printer. It will connect it through networking. So let’s see how to share a printer on Local Network in Windows 10.
How to Share a Printer on Local Network
Follow the following step-by-step guide to share a printer on the local network. First, we’ll see how it works and what you will require to do that, then follow the given steps.

How it works
One of the computers from the local network will be host computer (where the printer will be connected directly), and the other computers which are connected to the same network will work as a client computer. You’ll have to share the printer on the host computer, and the client’s computer will set up this printer using network through the host computer.
Requirements
- First, you’ll require a minimum of two computers connected on the same local network. All the computer must be connected either by Wi-Fi or by Ethernet cable through router or switch.
- Additionally, the printer must be connected to one of the computers via USB and with the updated drivers. Normally, Windows will install it automatically. Otherwise, you will need to go to the manufacturer’s download page.
- Require basic driver (.inf driver) of the printer to install it on client’s computer.
- The host computer should be turned ON while printing from another computer. If in case, your host computer is off, then you’ll not able to print from the client’s computers.
Preparations before going to follow the steps
- Enable “Network Discovery” on the host computer
- Turn off password protected sharing on the host computer
- Determine the IP address of the host computer
- Make sure, both the computers are connected to the same network
- Download your printer’s basic driver (.INF Driver)
Step 1: How to Share printer on the host computer
Once the preparations have been made, it is time to share the printer. So follow the following steps.
- Go to the control panel from the computer where the printer is physically connected. Once there, click on View devices and printers.

- Then choose the printer and by right-clicking on it, enter the Printer Properties.

- Now, click on the Sharing tab, tick the Share this printer option. Then press OK.

- Back to the previous screen, you can see the printer with an icon indicating that it is being shared.


Step 2: How to set up shared printer on the client computer
We’re coming to the end of the tutorial. We will now add the printer on the client computer.
- Open control panel Control Panel → then Hardware and Sound → Devices and Printers → Add a printer.

- Then click on the option: Select a shared printer by name. then press Next to continue.

- In this window, the shared printer should be found and then listed here automatically. If it doesn’t find your shared printer then make sure the network discovery option is enabled. Click here to know how to do that.
If this process doesn’t bring the shared printer here then you’ll have to do it manually. Then please click on The printer I want isn’t listed.

- In the box below please add the IP address preceded by \\, in this case, 192.168.1.59 (this is the IP of the host computer). Here is the step-by-step guide on how to get the IP address of the host computer.

- The shared printer will be displayed here. Please select it to share. It will install the printer driver automatically.

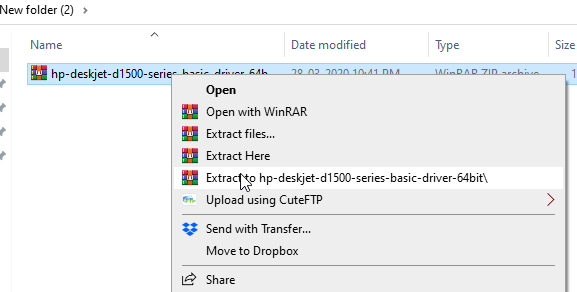
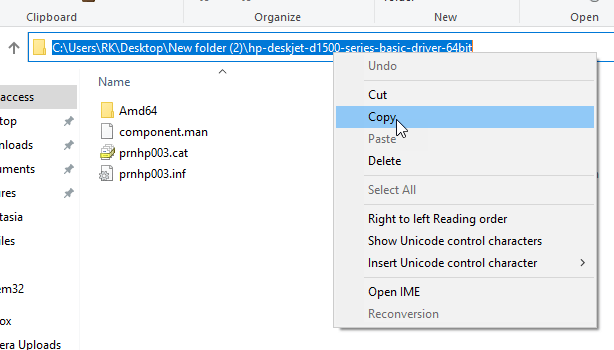
- After click on select, now it will ask you to provide the printer’s driver in “.inf” format. If it is asking for driver then you’ll have to download its basic driver first. Click here to know how to download a printer’s basic driver (.inf driver). After download, extract the driver’s zip file and then copy the extracted folder path.
- After get the driver’s path. Click on have disk.
- Right-click on the filed and click on paste and then click on OK.
- All the driver that are mentioned in the .inf file will be listed here. Select the printer model number or its series from the list and then click on Next.
- Name your printer and click on Next button.
- It will start the installation process. So let it be completed.
- Select “Do not share this printer”
- You’ve successfully installed the shared printer. Click on Finish to close this installation wizard.
- Open control panel Control Panel → then Hardware and Sound → Devices and Printers → Add a printer.


We have finally seen how to share a printer on a local network in Windows 10. It has been a bit of a long road, but I hope that with these instructions you will be able to access the printer successfully. See you soon!
Preparations
1. Enables Network Discovery on the host computer.
It is necessary to have the detection of networks and shared resources. With this in mind, press the Win + E combination to open the file browser. Then click on Network. Immediately, click on the warning message.

Then, activate the network and file-sharing detection.

Immediately, a window will be displayed with two options regarding private and public networks. I recommend using the first option and making the network private to allow visibility and file sharing. However, this action is not recommended for public networks such as airports and squares.

Below, you can see the network infrastructure and available devices

2. Turn off the password protected sharing.
In order to successfully share the printer, it is necessary to disable the password protection. This is a Windows security method to prevent intrusions. But in our case, we are using a secure private network so there are no problems. With this in mind, follow this path: Control Panel>Network and Internet>Network and Sharing Center>Change Advanced Sharing Center. Once there, scroll down to get the All Networks option. Please display the options and disable the protection in the Password protected sharing section.

3. Determine the IP address of the Host computer
To check the communication between the main computer and the clients for the printer, we will use the ping command. But first, it is necessary to know the IP address of the main computer. To check the communication between the main computer and the clients for the printer, we will use the ping command. But first, it is necessary to know the IP address of the main computer.
With this intention, press the Win + R combination and run CMD

Then execute the ipconfig command.

Depending on the connection of your equipment, copy the value corresponding to IPv4 address.
4. Make sure both the computers are connected on the same network.
Use the Ping command on the client machine
Then, the client team repeats the same steps to open a CMD. Additionally, it runs the following command: ping (IP address)

Please remember to replace the IP address with the value copied above. If the sent packages are displayed as shown in the image, then the connection is correctly established. If not, check the IP address or that both computers are connected to the same network. The recommendation is that the domestic network is configured as private.
5. Download the basic driver (.INF Driver) It will require when you install on the client’s PC.
Download your printer’s basic (.INF) driver. It will require when we’ll install the shared printer on the client’s computer. If you couldn’t find the basic driver from the printer’s official website, then you can download your printer’s basic driver manually from here.
