The Windows Task Manager gives you quick access to monitor the real-time performance of your Windows 10 environment. One such performance metric provided by the Task Manager is the disk usage of your computer at the moment. This is important information as free disk space directly affects the working speed of your computer. Sometimes, in Windows 10 Task Manager shows 100% disk usage, which is a dangerous sign and a risk for your computer. In this guide, we will describe effective methods on how to fix Windows 10 100% disk usage in Task Manager.
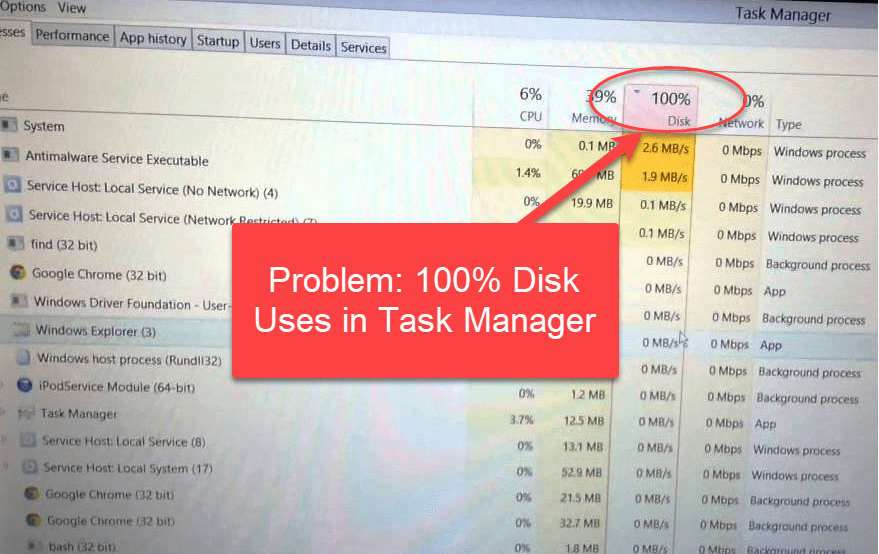
Why Windows 10 100% Disk Usage in Task Manager?
Most users think that the Windows 10 disk usage 100 problem is due to some hardware issues. In some cases this can be true, but you can’t immediately jump to this conclusion. There can be other reasons as well.
- Overloading of Windows Files
- Outdated Windows Files
- Malware Infection
- Corrupt Disk Files
- Improper Memory Management
- Excessive Memory Consuming Applications
There can be more reasons which cause this error and we will cover all of them in our solutions given below.
How to Fix Windows 10 100% Disk Usage in Task Manager?
Now that you know what can be the probable reasons for the 100% disk usage Windows 10, its time to look at the methods which can solve this problem. We have shared multiple methods and you should try them one-by-one in their correct order.
Method 1: Windows Restart
Sometimes certain applications running on your Windows loads-up so many files that the disk usage reaches maximum levels. The simplest solution is to restart your computer and get back to normal working.
- Click on the ‘Start’ button, then choose ‘Power’ from the menu and select ‘Restart’ from the options.

After Windows reboot, check whether Windows 10 disk usage 100 or less. If the disk usage is still 100%, then go to the next solution.
Method 2: Update your Windows
Updating your Windows to its latest version can help in resolving the 100% disk usage Windows 10 problem. Follow the steps given below:
- Click ‘Start’ button and choose ‘Settings’ from the menu.

- In the Settings page, click on the ‘Update & Security’ option.

- Under Windows Update section, click on the ‘Check for updates’ button and follow the prompts to complete the update process.

After the Windows update has completed successfully, restart your computer and check Windows 10 disk usage 100% or less. If the disk usage problem persists, then move to the next method.
Method 3: Scan with Antivirus
Sometimes a malware infection can cause 100% disk usage Windows 10. Therefore, you should run a complete virus scan to check your computer for any malware or virus infection.
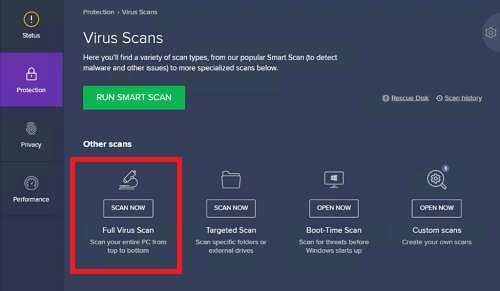
- Double click the antivirus icon in the task bar to open the antivirus app. Click on the ‘Protection’ link, then choose ‘Virus Scan’.

- In Virus Scan, click to select ‘Full virus scan’ option and wait for the virus scan to complete.

If the antivirus program finds an infection, then remove that infection and check whether the disk usage problem is solved or not. If no infection is found on your computer, then disk usage error is due to something else and you should try the next method given below.
Method 4: Deactivate Windows Search
When Windows 10 gets into a search loop, then you may experience high disk usage. The solution to this condition is to deactivate Windows Search temporarily to check if that’s the reason behind 100% disk usage Windows 10.
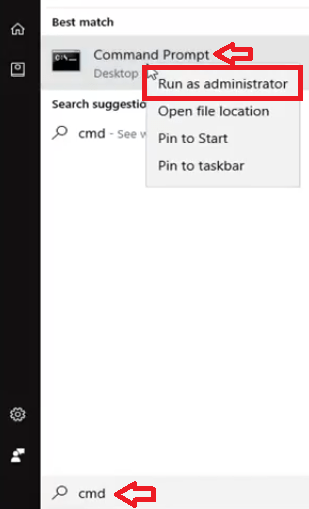
- Type ‘cmd’ in search box, choose and right click ‘Command Prompt’ from the search results, then click on the ‘Run as administrator’ option.

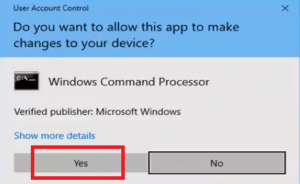
- Click on the ‘Yes’ button to proceed.

- In the Command prompt, type ‘net.exe stop “Windows search”’ and press ‘Enter’, then wait for the service to stop successfully.

Restart your computer to see if the disk usage problem is resolved or not. If the problem is resolved, then disable Windows Search permanently by following the steps given below. Otherwise, move to the next method.
- Press ‘Windows’ + ‘R’ keys together, then in the run dialog box type ‘services.msc’ and click on the ‘OK’ button.

- In the list of services, locate and double click on the ‘Windows Search’ service.

- In the Properties window, click on the Startup type drop-down and select ‘Disable’ from the list.

- Click on ‘Apply’, then ‘OK’ button to finalize the new settings.

Restart your computer for the changes to take effect.
Method 5: Disable Superfetch Service
Superfetch is another feature of Windows which can cause Windows 10 100% disk usage on your computer. Therefore, you should temporarily disable this feature.
- Type ‘cmd’ in the search box, select and right click ‘Command Prompt’ in the results, then click on the ‘Run as administrator’ option.

- Click on the ‘Yes’ button to move ahead.

- In the Command prompt, type ‘net.exe stop superfetch’ and press ‘Enter’, then wait for the superfetch service to stop successfully.

Restart your computer to check whether the 100% disk usage problem is fixed or not. If the problem is fixed, then stop Superfetch permanently by following the steps given below. Otherwise, move to the next method.
- Press ‘Windows’ + ‘R’ keys together to open the run dialog box. In the run box, type ‘services.msc’ and press ‘Enter’.

- In the list of services, find and double click on ‘Superfetch’ service.

- In the Superfetch Properties window, click to view the Startup type drop-down menu and choose ‘Disable’.

- Click on the ‘Apply’ button, then the ‘OK’ button to finalize the new settings.

Restart your computer for the changes to take effect.
Method 6: Change Windows Performance Options
When you don’t know how to fix 100% disk usage Windows 10, then a highly effective method is to choose high performance option instead of the balanced performance.
- Type ‘control’ in the search box and choose ‘Control Panel’ from the search results.

- In the Control Panel, click on the ‘Power Options’.

- In the Power Options page, click on the ‘High performance’ plan to activate it.

Restart your computer for the plan to take effect, then check if the Windows 10 100% disk usage issue is fixed or not. If you still face the disk usage issue, then try the next method given below.
Method 7: Disable Antivirus Program
Temporarily disabling antivirus program is also recommended to solve the Windows 10 disk usage 100 above problem. However, apart from the antivirus program installed on your computer you should also disable the Windows Defender in Windows 10.
- Right click the antivirus program icon in the taskbar and select to right options to disable it.

- To disable Windows Defender, click on the ‘Start’ button and select ‘Settings’ from the menu.

- In the Settings page, click on the ‘Update & Security’ option.

- In the Update & Security page, choose ‘Windows Security’ and under Protection areas click on the ‘Virus & threat protection’ option.

- Under Virus & threat protection settings, click on the ‘Manage settings’ link.

- Under Real-time protection, click on ‘On’ to toggle it to ‘Off’.

- When the real-time protection is off, you will see the warning that your device is vulnerable. Ignore this warning.

If disabling antivirus solves the 100% disk usage issue in Windows 10, then try changing your antivirus package. Otherwise, try the next method.
Method 8: Reset Virtual Memory
Virtual memory is a sort of extension of your system’s RAM, which means it is there to improve the performance of your computer. However, sometimes the virtual memory file is set so big by some users that it takes too much disk space and you end-up seeing the 100% disk usage Windows 10 in Task Manager. This is caused due to the error in the pagefile.sys file created for virtual memory and the solution to this problem is to reset the virtual memory of your computer. Follow the steps given below to complete this task:
- Type ‘control’ in the taskbar search box and choose ‘Control Panel’ from the search results.

- In the Control Panel window, click on the ‘System’ option.

- Inside System window, click on the ‘Advanced system settings’ option.

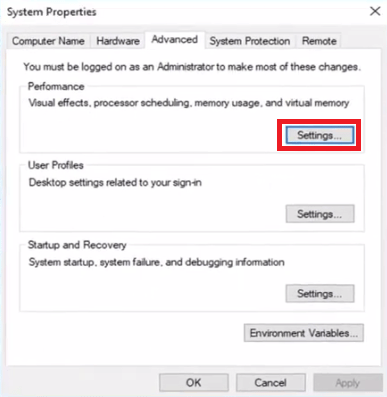
- In the System Properties window, click on the ‘Settings’ button under the ‘Advanced’ tab.

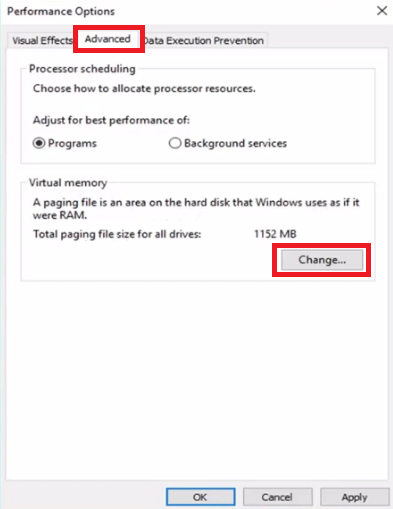
- In the Performance Options window, select the ‘Advanced’ tab and click on the ‘Change’ button.

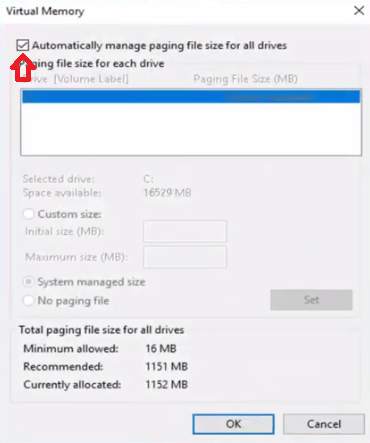
- In the Virtual Memory window make sure that the ‘Automatically manage paging file size for all drives’ is checked.

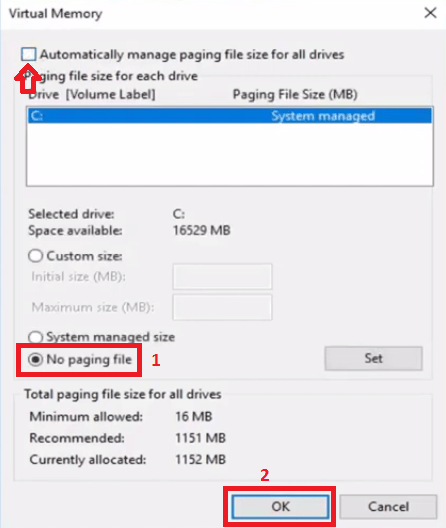
- If already virtual memory is automatically managed, then uncheck the checkbox and select ‘No paging file’ option below. Finally, click on the ‘OK’ button to confirm the settings.

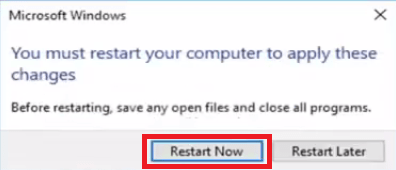
- Close all the windows and click on the ‘Restart Now’ button to reboot your computer.

After restart you should check the Windows 10 disk usage 100% issue. If the problem is fixed, then you should reduce your virtual memory to its minimum allowed settings. Otherwise, reset your virtual memory to its previous settings and move to the next method.
Method 9: Use Check Disk Tool
Sometimes the Windows 10 disk usage 100 issue is caused due to a damaged disk drive files. Fortunately, there is an in-built Windows tool called Check Disk, which you can use to verify the health of your disk drive files. Follow the steps given below to use this tool:
- In the taskbar search box, type ‘cmd’, then choose and right click ‘Command Prompt’ from the search results, and select ‘Run as administrator’ from the options.

- Click on the ‘Yes’ button to continue.

- In the Command prompt window, type ‘CHKDSK C: /F /R’ and press the ‘Enter’ key.

- Since, your Windows is running on C drive, thus, the Check Disk tool will not be able to check this drive right now. However, it will ask for your permission to check this drive during the next restart. Press ‘Y’ key to give that permission, then press ‘Enter’ to confirm.

- Restart your computer and wait for the Check Disk tool to verify the health of your disk drive files.
If after the restart the Windows 10 disk usage 100% in Task Manager has been fixed, then the problem was with your disk drive files. Otherwise, try the next solution.
Method 10: Change Settings of Some Programs
There are certain settings in your installed programs which can be a cause behind the Windows 10 100% disk usage problem. These programs are Google Chrome, Microsoft Skype and Windows Disk Defrag. Follow the steps given below to make the necessary changes in these application settings.
A) Google Chrome
In Google Chrome you need to disable Flash support as large Flash files can use a lot of unnecessary disk space.
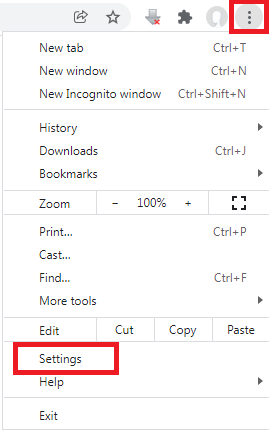
- Click on the ‘Menu’ button on Chrome and choose ‘Settings’ from the menu.

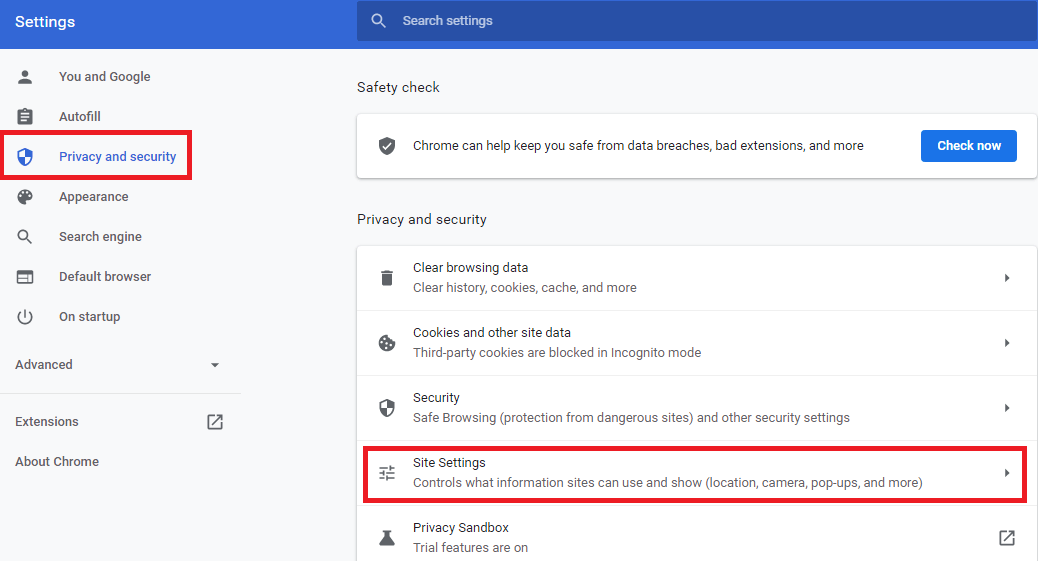
- In the Settings page, choose the ‘Privacy and security’ option and click on the ‘Site Settings’ link.

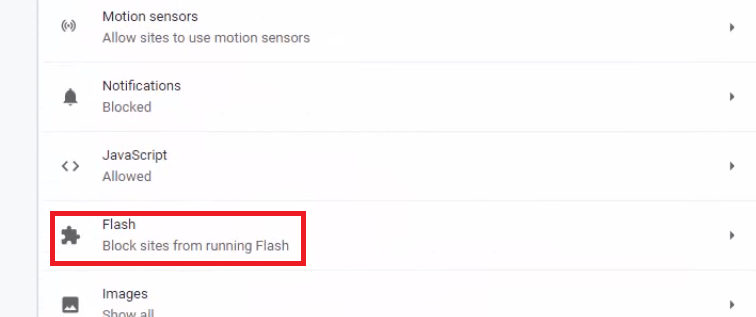
- In Site Settings page, scroll to find and click on the ‘Flash’ option.

- In the Flash page, toggle ‘Off’ the link in front of ‘Block sites from running Flash’ option.

That’s it, close your Google Chrome browser.
B) Microsoft Skype
In the Skype you need to give its executable file the Write option privilege.
- Go to the program folder where Skype is installed, then right click on the ‘Skype.exe’ file and choose ‘Properties’ from the options.
- In the Properties window, choose the ‘Security’ tab and click on the ‘Edit’ button.
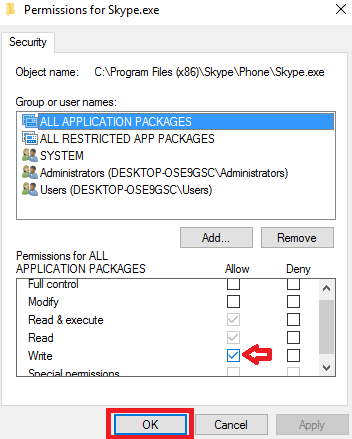
- In the Permissions window, choose ‘All Application Packages’ under Group or user names section, then click to select ‘Write’ check box under ‘Allow’ column, and finally click on the ‘OK’ button to confirm the changes.

That’s it, you have made the necessary changes in the Skype.
C) Windows Disk Defrag
Some users have reported that disabling automatic defrag process has also helped them solve the Windows 10 disk usage 100% error. Follow the steps given below to complete this task:
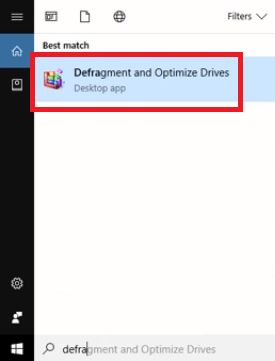
- Type ‘defrag’ in the taskbar search box and select ‘Defragment and Optimize drives’ from the search results.

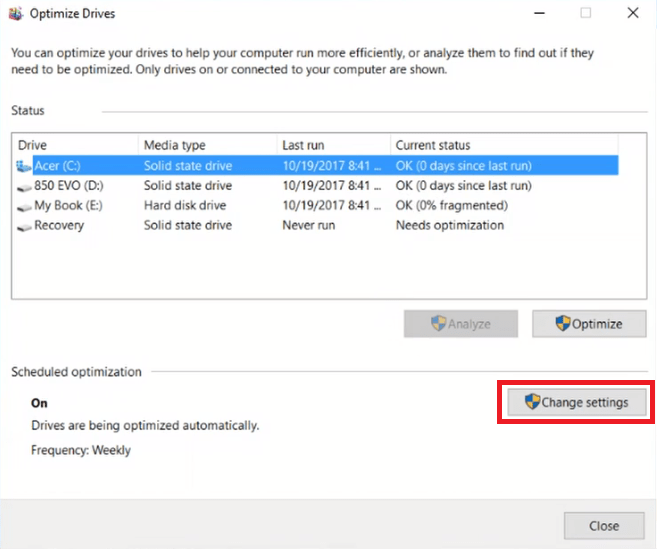
- In the Optimize drives window, click on the ‘Change settings’ button.

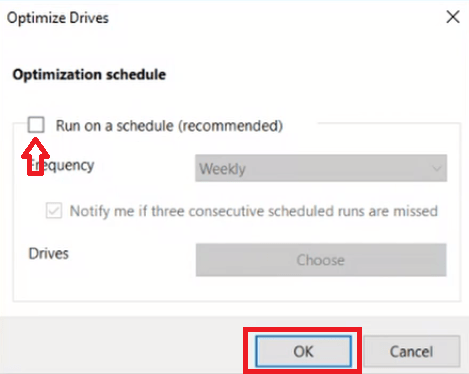
- Under Optimization schedule, click to uncheck ‘Run on a schedule’ option, then click on the ‘OK’ button.

- Make sure that the Scheduled optimization is ‘Off’, then click on the ‘Close’ button.

After making changes to all these apps restart your computer and if this problem is not with your hard drive, then the Windows 10 100% disk usage will get fixed.
Now you know how to fix 100% disk usage Windows 10 on your computer. All the solutions given above have been found effective by many users in resolving this Windows Task Manager error. However, if none of the above methods was able to solve your problem, then most probably it’s time for you to change your disk drive as the problem maybe with your hardware.


