
Usually the hardware acceleration accelerates the graphics performance of your computer. Some applications want it to stay on and some want to keep it off. So today we will see how to disable hardware acceleration in Windows 10.
Hardware acceleration is an option to boost your hardware performance more than a normal state. Specifically, the it accelerates the graphics performance and rendering. This is possible from CPU to GPU (Graphics Processing Unit). Know more about it at Wikipedia.
Many software uses the hardware acceleration to speed up the their performance, so some times in older computer they may create some performance issue and you may require to turn off the hardware acceleration feature to work that properly. Like mostly all the modern browsers use this feature. Checkout here how to manage hardware acceleration in web browsers. Similarly you can also manage this feature in Windows 10 as well. So, let’s see how to disable hardware acceleration in Windows 10.
How to disable hardware acceleration in Windows 10
Before going any further, it is necessary to make some considerations. First, this option is not available for all computers. That is, the latest machines with a dedicated video card do not have this possibility. In fact, this feature is generally available for older computers or those with an integrated video card. In that sense, the way to enter the configuration depends on each computer.
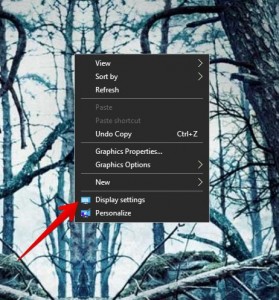
- The first thing you have to do is right-click on a blank space on the desktop. After the context menu is displayed, please click on Display Settings.
- The following will display the graph options within Windows Settings. Please scroll down and select Advanced Display Settings.

- On the next screen, please click on the properties of the display adapter.

- Then a window with the properties of the graphic adapter will be displayed. Please click on the troubleshoot tab. Then select the Change Settings option.

- Troubleshooting options will then be displayed. Please modify the hardware acceleration level according to your needs. Or simply disable it completely. Just move the pointer to edit the configuration.


2. How to disable hardware acceleration from the Windows system registry
Sometimes, it is not possible to access the configuration following the previous method. In such cases, it is necessary to check if the system is compatible and the driver is updated.
- Necessary to enter the Windows registry editor. With this intention, please press the Win+R combination and run the following command: regedit

- Next the Windows registry editor will be displayed. Please go to the following address: Computer\HKEY_CURRENT_USER\SOFTWARE\Microsoft\Avalon.Graphics
- Once there, please verify that a DisableHWAcceleration registration key exists. Then double-click on it to verify the value. If the value is 0 then hardware acceleration is enabled.
- On the contrary, if the value is 1, then this setting is disabled. On the other hand, if the entry is not there, then we can create it. With this in mind, right-click on a blank space. Then, create a new DWORD (32-bit) Value.

- Finally, assign the indicated name and value 1 to disable hardware acceleration.


Finally, we have seen how to disable hardware acceleration in Windows 10. Additionally, we explain a couple of methods to do so. Either by Windows system settings or by editing the Windows registry. If you have any questions or suggestions regarding this then you can write us in the comments section down below.

Hi
Value is just : “DisableHWAcceleration” and not “DWORD DisableHWAcceleration”
Thanks for reporting the bug, I have just fixed it.
In the troubleshooting tab (which is missing on my device) there are a lot more options then just disable or enable. How do I access the steps in-between from the registry?
Registry steps are also given also given in the article, please check out the second method.
Yes, but as I said, it’s only a “disable” key. What about the other positions of the slider? According to the screenshots there seem to be several positions, not just “Full” and “None”.
Sorry, we did not understand your query exactly. Now I understand. The “Troubleshooter” tab has been discontinued by Microsoft in the Windows update. The registry method doesn’t give you the option to adjust the slider part. We are still working on it to find a new way to disable the “Hardware Acceleration”. We’ll update you once I get something on it.