Windows 7 was the last Microsoft operating system with widget support. They have since disappeared, especially for security reasons. However, some users missed them. Now, the recent release of Windows 11 brought with it the reintroduction of these beloved widgets to the desktop. Even, the no. of widgets has also grown. Consequently, you can choose any of them to enhance your user experience. Let’s find out more about widgets in Windows 11.
What are Widgets in Windows 11
Widgets, according to Microsoft, bring us closer to the information we need and desire in the most effective way.
Widgets are a convenient tool for displaying little amounts of data without taking up too much room on the user’s screen. They pop up when you need them and disappear when you don’t, enabling you swiftly switch between tasks.
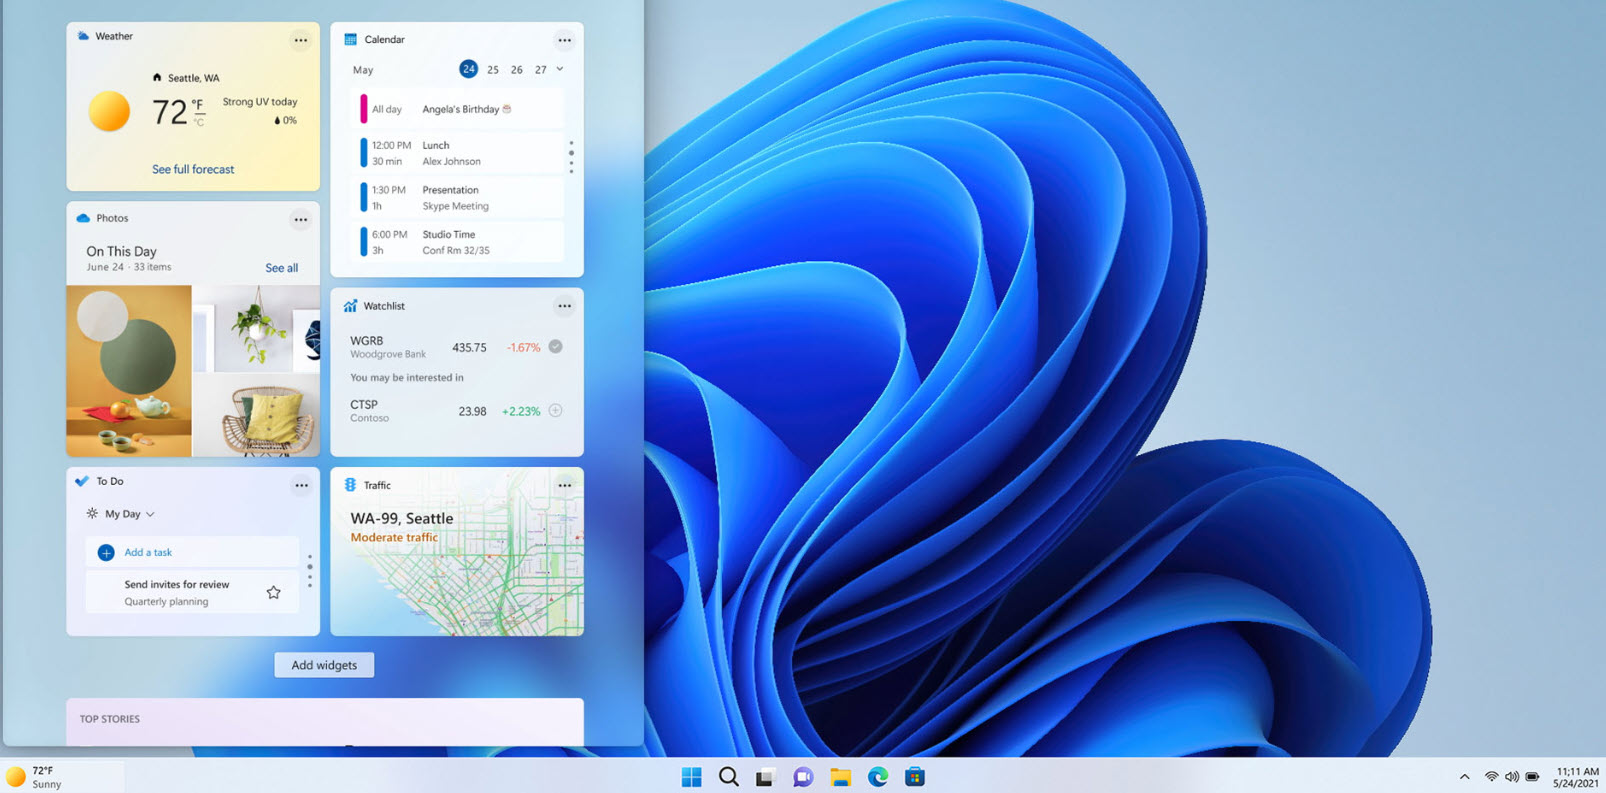
Some predefined widgets have a default configuration. In this scenario, it displays the weather, news, stocks, sports, and other relevant information. We may also change the settings of the Widgets. Indeed, you may add those relating to the Microsoft To Do, Outlook Calendar, and Traffic applications in addition to those supplied by default. It also incorporates an MSN news section. Some people also call widgets as gadgets.
Which widgets are available and where
Microsoft has added in its new operating system the Widgets shortcut in the taskbar. Specifically, in the lower left corner. Once we click on its icon, its dashboard will open from the left side of the screen. This panel occupies almost half of the screen. Consequently, it allows us to see better the information that it provides us.
At the moment, compatibility is limited to some of Microsoft’s own applications. For example, OneDrive, Calendar, Traffic, Tips and Microsoft To-Do, etc. However, it is to be expected that third-party applications will also appear in the future. As a drawback, it should be said that the new tab is configured by default to open with Edge. So we can not choose another browser for ourselves.
List of available widgets from Microsoft
Add or remove Widgets
By default, Microsoft has included some gadgets in this panel. However, we can customize it to our liking.
How to add a widget?
Step 1
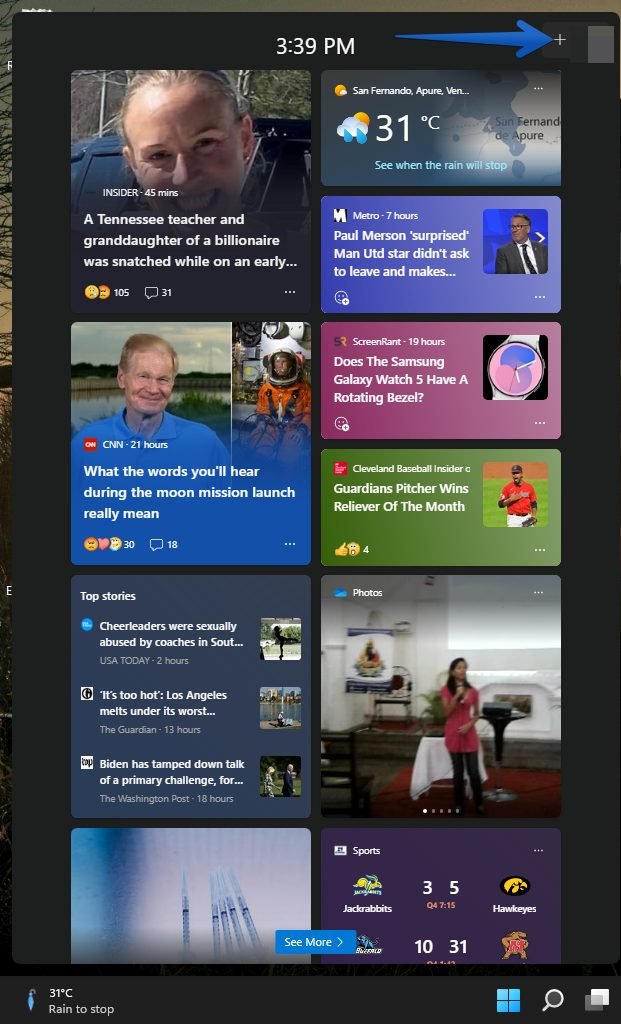
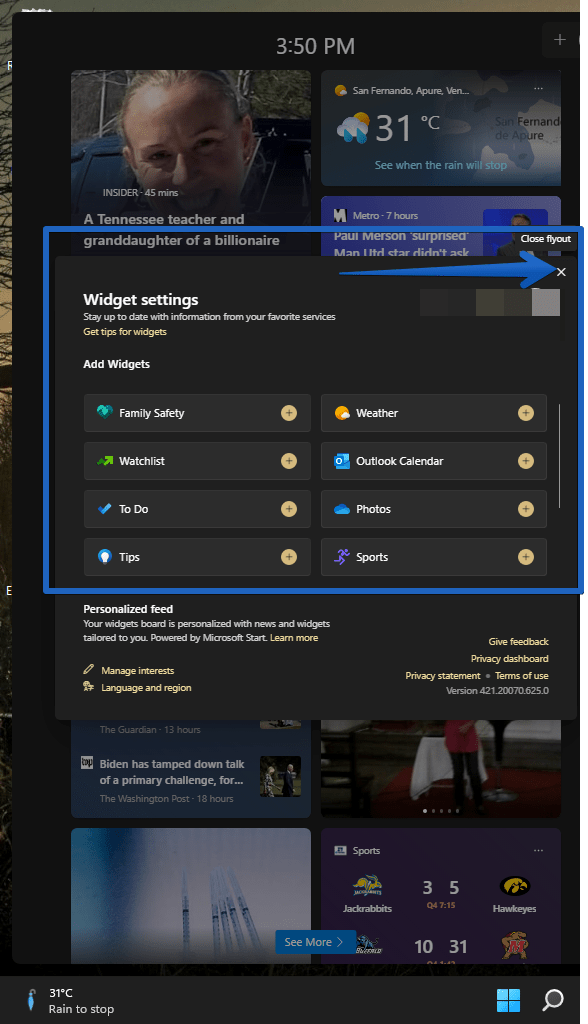
To do this, we open the widgets’ panel by clicking on its icon located on the taskbar. Once it appears, we click on the + sign located next to the image of the account. Look at the following image:
Step 2
Consequently, a new window is displayed from the same dashboard. Once there, you will see all available widgets. Immediately next to it is a plus symbol. Just click on it to add the widget. After the selection is done, just close this window by clicking on the x. Immediately, you will see that the widget was added to the panel correctly.
How to remove a widget?
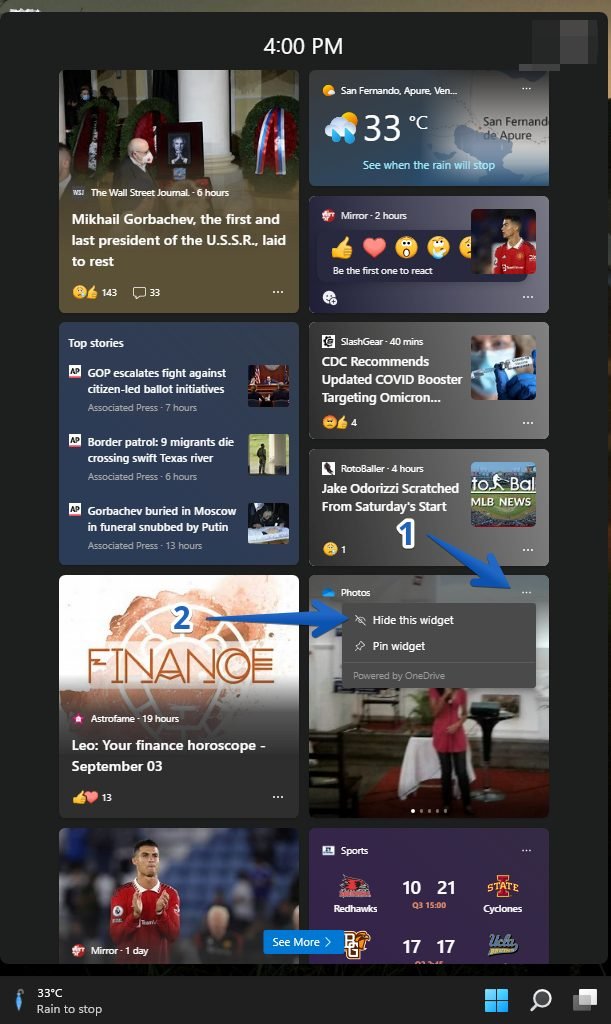
In case we want to delete any of these gadgets that we have available in the panel, the process is even simpler. We simply need to click on the button with three dots that appears at the top right of the widget. This will open a small contextual menu where we will click on the Hide widget option.
Customizing Widgets
Step 1
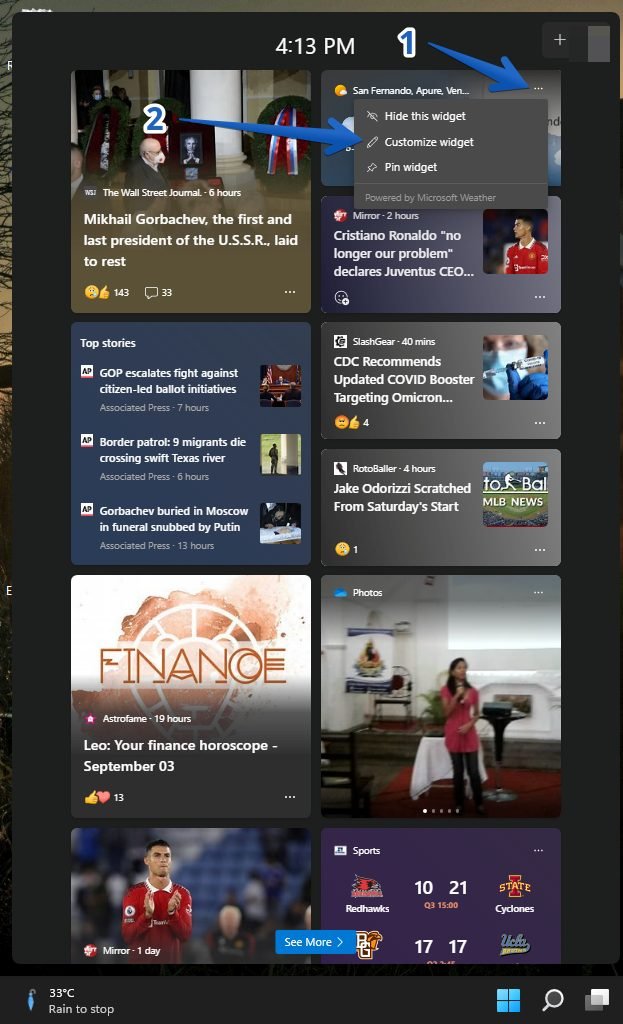
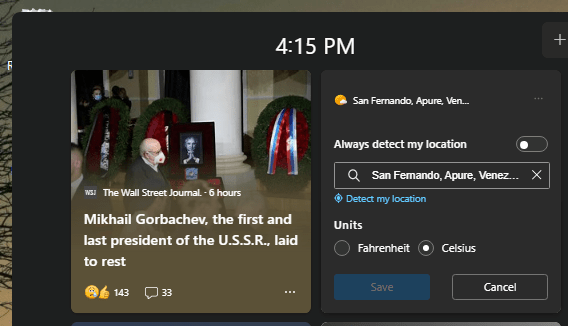
We have already mentioned that each Widget has a menu that is displayed when you click on the 3 dots. Well, in this context menu you can customize it. When you click on the Customize widget option in any of them, a window will open with some options that you can modify. They are options related to the content displayed. However, they are usually few, such as the units or dates displayed, and the like. Do not think that you will be able to make big changes.
Step 2
From here you can customize the settings of a widget.
It is also possible to change their position within the panel according to our preferences. We can keep the most useful ones at the top and the rest at the bottom. With this in mind, we only have to pass the mouse pointer over the upper part of the widget. And we will see how it changes its shape and adopts the position of an open hand. It will only be necessary to click and hold it to move it around the panel and place it where we like.
Disabling and enabling Widgets
These elements, so expected by many users, may be not so practical and interesting for others. We may see that we are not going to use them. Or that they hinder our workflow unnecessarily. Then, we should know that it is possible to deactivate them so that they are no longer displayed.
With this intention, we must access to the Configuration menu by means of the keyboard shortcut Windows + I. Then we click on Personalization in the left menu and on Taskbar in the right panel. We can also access here directly by right-clicking on the taskbar and clicking on Taskbar Settings.
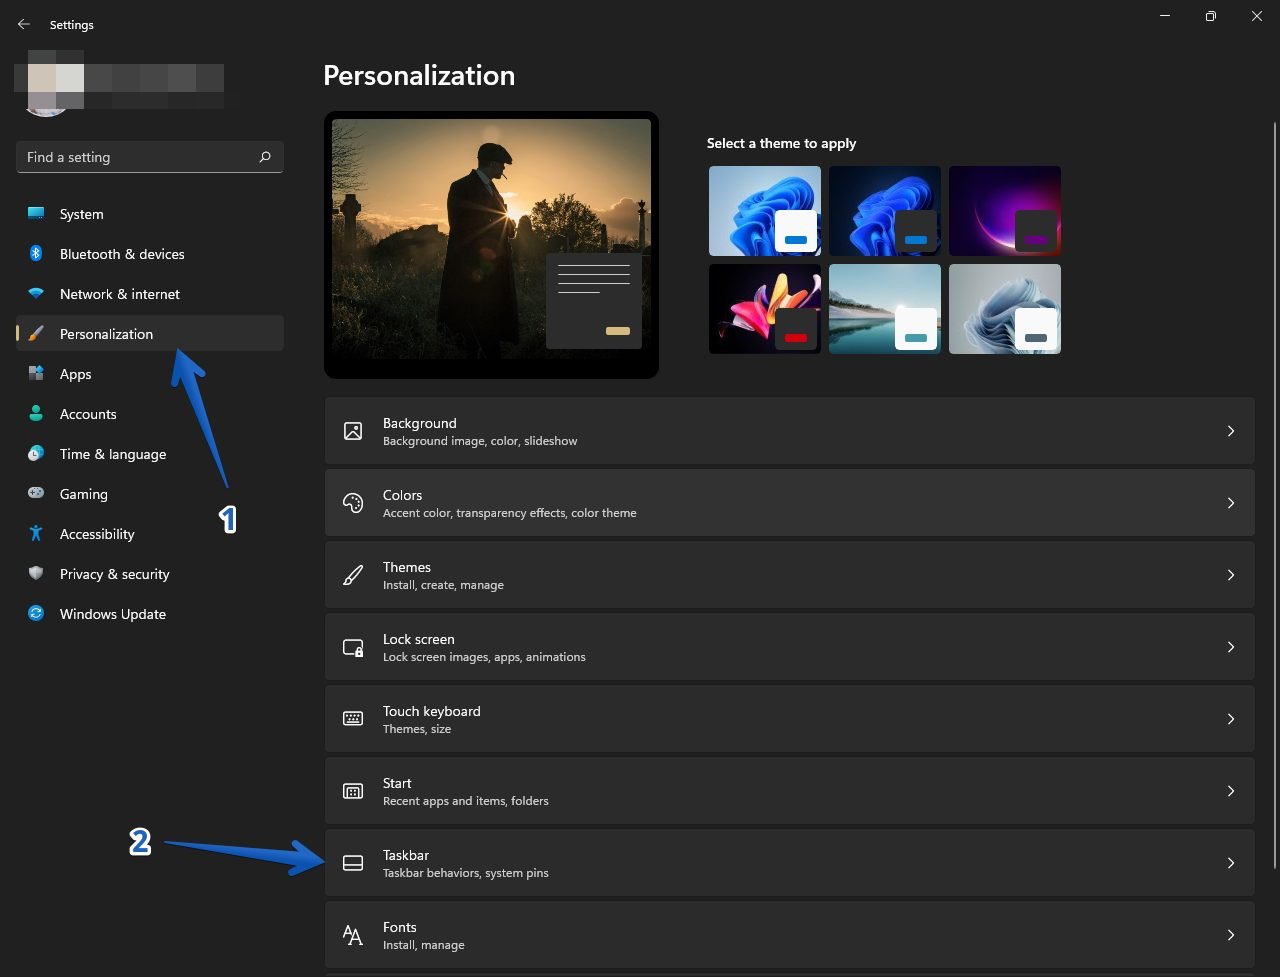
As a result, a new window opens. Once there, we must look for the section Taskbar items. Here you will find all the elements that are in it and that we can deactivate. Therefore, it will only be necessary to click on the Widgets button so that its icon disappears automatically from the bar.
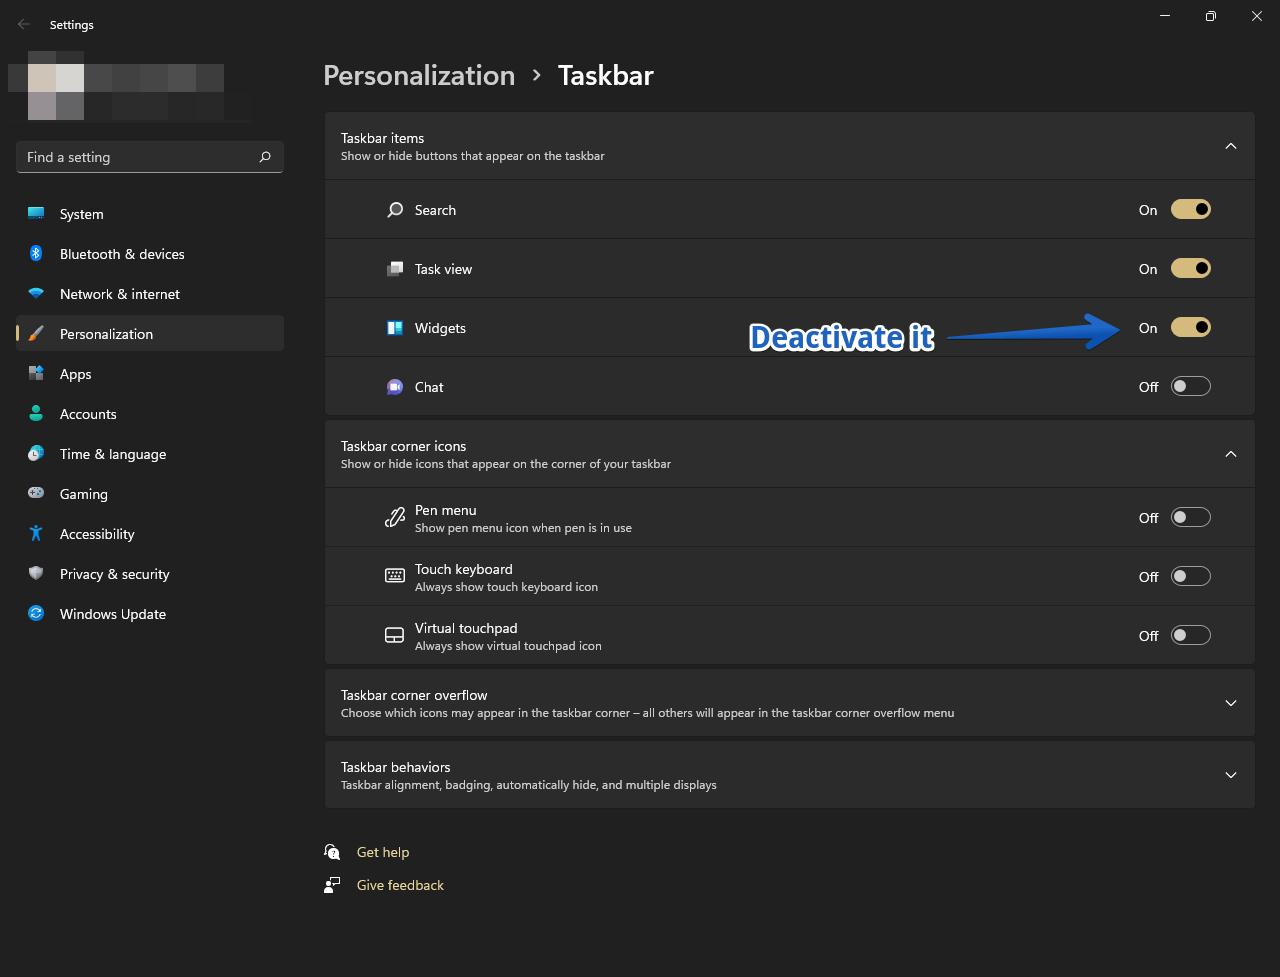
In the case that in the future we want to activate it again, it will be as simple as doing the previous steps again. Just clicking again on the Widgets icon to verify that it appears again in the bar, and we will be able to use it. Very well, this way we have seen how the widgets work in Windows 11. In addition, we learned how to activate and deactivate them in a simple way.
