
Today we will talk a little about the restoration points. Indeed, these are a kind of backup of fundamental elements in Windows. Consequently, if a serious failure occurs due to a change in the system, then it can be restored to an earlier version. On the other hand, this method should not be confused with restoring Windows. System Restore is a feature that has been built into Windows for some time. As mentioned, this allows you to save the current state of the computer and restore it in case something goes wrong. Also, occasionally the system creates restore points automatically. Well, today we will see how to create these restore points manually.
Steps to Create Restore Point in Windows 10
Although this feature is important for security, it is usually disabled by default. But don’t worry, I’ll show you how to activate it step by step. To start the process I offer you several options.
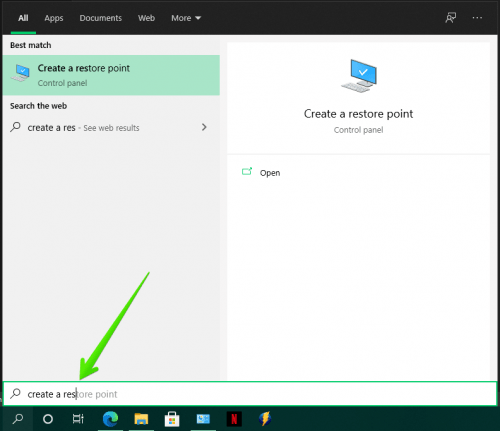
- In the first place, you can write in the search bar and create a restore point. You can either click on it or press the Win+Q combination.
- Similarly, you can press the Win+Pause combination. Once there, click on System Protection.

- For this function to work properly, it is necessary for the protection to be activated on any of the available disks. In this case, the protection is already activated. However, if this is not the case, just click on Configure.

- You can then turn on the system protection. Additionally, it is possible to set the available disk size for the system protection.

- After the protection is activated, it is time to create the restoration point. With this in mind, please click on Create.
- Finally, you only have to assign a name for the restoration point. Then, just wait for the wizard to create it.

- In this simple way, it is possible to create a restore point in Windows 10. From now on, if any problem occurs with the system, you can repair it using this method. To do this, just click on System Restore.
- From there, you just have to choose the point of restoration and follow the instructions of the wizard.

- That’s it.


Video:
Create a Restore point automatically when computer starts
New restore points are created automatically only just before a major event happens, for example during installation of new apps, drivers or software updates. The only caution is that using a non-recent restoration point will eventually lead to many unwanted changes. However, you can set up a System Restore to create extra checkpoints each time you boot Windows 10 to ensure you are safe.
You can now use the Windows 10 restore points. This will allow you to recover the system from any error or unexpected change. As a result, the user has more control over the security of the system. See you later!
