In this article, we are going to learn how to enable virtualization in your computer BIOS. You can run VMs virtual machines free and easy. Now within windows, there are a couple of indicators that will show you that virtualization is not enabled within your BIOS, and we’re going to go ahead and do that. Please follow the following steps.

Steps to enable the Virtualization in BIOS
Diagnose:
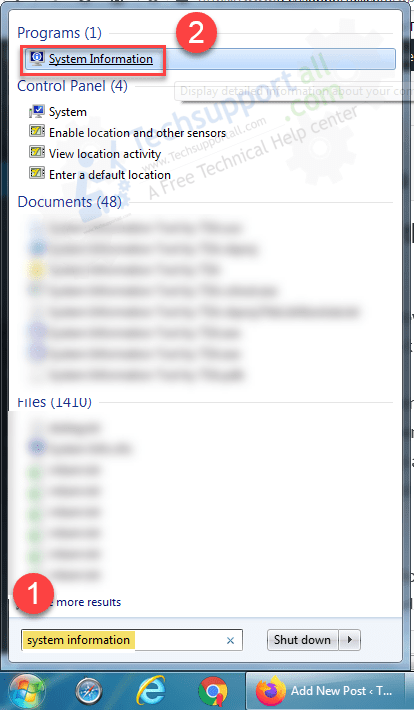
- First of all, let’s go down to our search line here and type in system information, and we’ll go up here and click on that “system information”

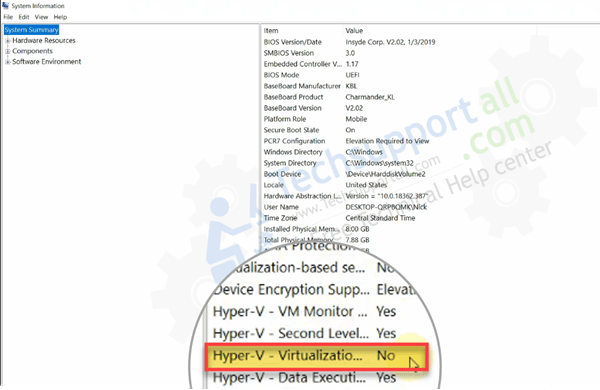
- After that, it will open up the system information window here, and go down the column in the centre-right down here you can see virtualization = NO (virtualization is not installed) or not enabled. Let’s go ahead and close this out and the second way to see if virtualization is running or is enabled on this computer is to actually try to open up a VM virtual machine I have.

- Oracle VM Virtual Box installed on this computer. So, I’m going ahead and open up Virtual Box and I have already two clients installed on here Windows 10 have installed twice and I’m gonna attempt to open up one and I get this error and if I try to open up the other one I also will get the same error and let’s go ahead and do that and there we go we got the same error so it’s not able to open up a VM on this machine because virtualization is not enabled in this computer’s BIOS or the CPU itself may not support it.
Solution:
- So let’s go ahead and do a restart the computer. I’ll go down to the Start menu here and click on the restart and when the computer restarts.

- I’m going to press F2 on this computer because F2 allows me to get into the BIOS on this one. Now in some computers, the Delete key will allow you to get into the BIOS, you have to try both and see which one’s gonna work.

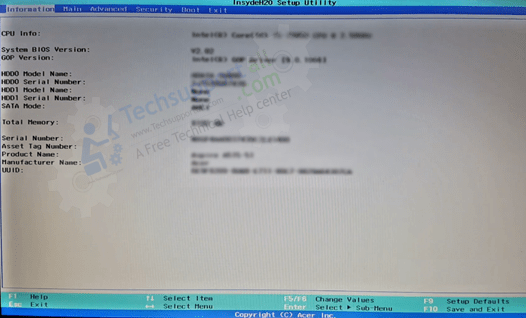
- You’ll get BIOS settings page like below screenshot.

- Now I am in the BIOS now. Click on the Advanced tab here and this is where I want to enable two items intel VTX and intel the VTD and you may have one or the other or both but go ahead and enable them.


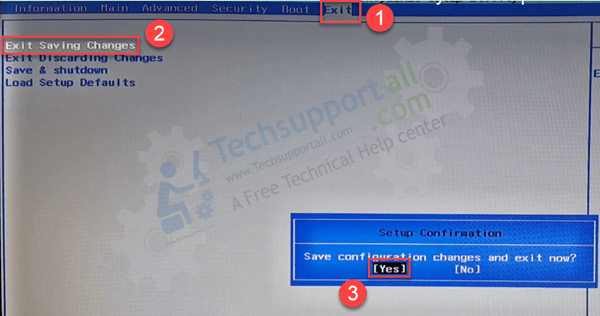
- Once you do go ahead and save the configuration just press F10 button and click on YES, this will go ahead and restart the laptop computer again.

- I’ll go ahead and type in my password and get back into Windows where I’m gonna go back into msinfo by going down to the search line again and typing in msinfo go up and click on the app system information and I’ll open this up and scroll down the centre column and there you go it says, yes now on the virtualization because before it did say no as you recall earlier all right we’re good to go and close this out.
- Now I’m going to go ahead and attempt to open up a virtual machine on this computer I have Oracle VM as I mentioned before installed. So, I’m going to go ahead and open up Virtual Box and I have two clients and it doesn’t make any difference which one I click on here and I’ll go ahead and click on the second one here and this should go ahead and open up the Virtual Box VM machine on this computer and it is going right into Windows 10.
Here for me as you can see and so virtualization is good to go on this computer now a few things to keep in mind that once you virtualization is enabled in your BIOS it should work just fine with any VM app such as VMware or VirtualBox also what’s important is that the CPU your processor also should support the virtualization, some of them don’t so keep that in mind. Here in this article, we’ll guide you how you can enable the virtualization in Windows 10 by changing BIOS settings. The step will be applied on asrock, ryzen, gigabyte, msi, Lenovo, hp, dell, acer, asus motherboards.


