
If you want to share your wired internet connection to other over WiFi through your laptop, then this tutorial can help you to create a wifi hotspot in Windows 10 based laptop without any third party software.
What is WiFi Hotspot?
WiFi Hotspot is actually a wireless access point which makes it possible to share the internet with other devices. Normally a WiFi router do the same thing but if you do not have a wifi then you can use the wireless network adapter of your smartphone or laptop to serve as a network access point.
Laptops come with built-in WiFi hardware and you can easily make hotspot and share WiFi but if you are using a PC then you need to purchase and install a separate WiFi dongle for it.
However, a third party app is required for it. Installation and downloading of tons of bloatware were some major issues you face when you try to to use third party software or apps. Some of the third party apps like Connectify have put on a price tag which was free in the past. Even when you try to use free version you need you need to pass several restrictions.
Don’t be disappointed because we are here to solve this problem. You can create WiFi hotspot without using third party apps with the help of Command Prompt . All you need for this, is an installed WiFi card or a WiFi dongle.
How to create Wifi Hotspot in Windows 10
Creating a wireless hotspot in windows 10 is an easy task which can be done with the help of some commands. The overall configuration takes a few minutes to connect the wireless Hotspot Network.
Step 1: Setting up
Before proceeding further please also check whether your network adapter is hotsport ready or not?
1. First of all, you have to set SSID and Key which are the name of your network and password of the network i.e WiFi Hotspot. Password must be atleast 8 characters long.
NETSH WLAN set hosted network mode=allow ssid=YOUR_SSID key=YOUR_PASSWORD

2. To activate / start the newly created hosted network type the following command and press enter.
NETSH WLAN start hosted network
Step 2: Sharing of Internet Connection with Hosted Network
Other devices can now connect to the hosted network using the password given in step 1. But still they can not use the Internet over this network. To enable the internet sharing use “Internet Connection Sharing” option.
- Open the power menu button by using the Windows + X keyboard shortcut and select Network Connection.
- Now right click on Internet connection enabled network from the list and select Properties.
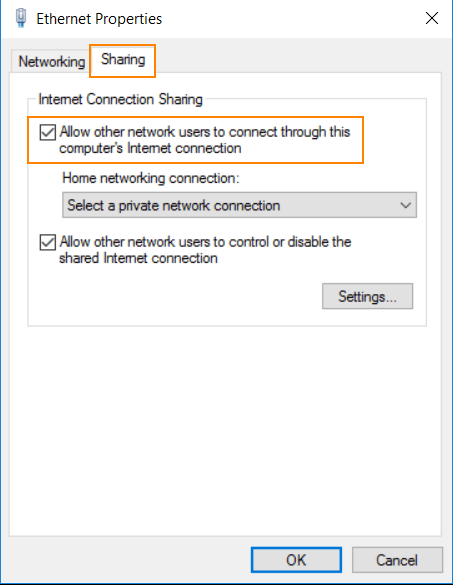
- Select Sharing tab in the properties window.
- Check the “Allow the users of another network to connect with your computer’s Internet Connection” option. Choose Home Networking Connection option to open a drop-down menu and select Microsoft Hosted Virtual Adapter.

- Click on OK to accept all changes. After that, you can see a connection created with an internet connection.
Stop sharing Internet Connection with Other Devices in Windows 10
Windows 10 also allows its users to stop the connectivity of the WiFi with the other devices. Just type the below command to stop the network.
NETSH WLAN stop hosted network
Just by using a single line of command you can enable and disable WiFi Hosted Network.
NETSH WLAN set hostednetwork mode=allow
NETSH WLAN set hostednetwork mode= disallow
Change Hosted Network Settings in Windows 10
Windows 10 is very user-friendly and you can change settings as per your requirements. If you want to make amendments in your current settings of WiFi network like SSID or Password, then you can make them with the help of these commands.
NETSH WLAN set hostednetwork ssid=Your_New_SSID
NETSH WLAN set hostednetwork key=Your_New_Passphrase
To view the settings, add these prompt commands in your computer.
NETSH WLAN show hostednetwork
NETSH WLAN show hostednetwork setting=security
WiFi Hotspot option in Widows 10 is a great option which has solved a big connectivity problem. Though the performance of the network isn’t similar to the performance of the physical network connection but you can’t deny from the usefulness of it in sticky situations and definitely, all credit goes to Windows 10 and its exciting features.
Check if wireless network support Hotspot?
Before setting up and starting the WiFi Hotspot, you need to check whether your wireless adapter supports hotspot or not. To check the physical presence of adapter on your computer you need to run the following command.
Press Windows Key + X
Select Command Prompt (Admin)
Type NETSH WLAN show drivers and press enter
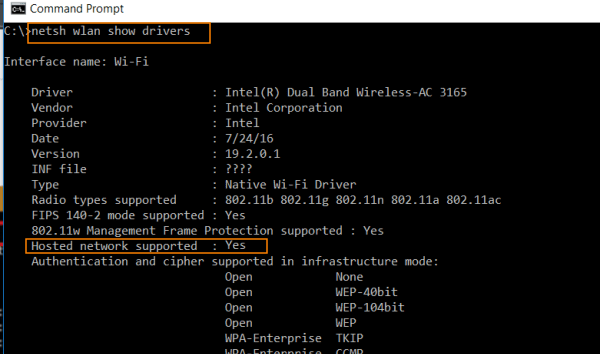
Yes will appear next to the Hosted network supported. If your laptop or PC support WiFi then you can follow the further instructions. Otherwise, you need a USB wireless adapter for this purpose.
Also Read: How to recover forgotten WiFi password in Windows 10
