
This is a common task, that every computer user require to take the screenshot of the screen for different purposes. Like to show the error to the experts, or to create a simple tutorial, or for personal use to memorize the important things on the screen etc. Many new users don’t know how to take the screenshot on Windows. So here we are writing the steps & methods to take a screenshot.
How to take screenshots on Windows 10?
There are the 3 main methods to take screenshot easily without installing any additional software in Windows 10.
1. Use PrtScr Button with other key combinations
If you already don’t know simply press the Print Screen button on the keyboard and it will take the screenshot of the screen. It is an old and easy method to capture the computer screen. Follow the below steps to get the screenshot in image format.
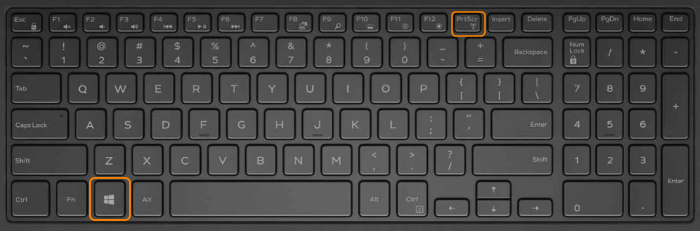
- The first thing you need to do is to locate the key PrtScr, which is located in the superior lane of the keyboard, just next to F12 key.
- Once we have on screen what we want to capture, Press the key and Windows 10 automatically copy the screenshot of the entire screen to the clipboard.
- Once this is done, we open the Paint program, and push in the “paste” icon (or press Control + v). After this, the screenshot appears in paint and we will only have to save the image with the name and format that we want. We can also paste in any other program other then paint.
You may not be aware about, that are 2 more option which you can use with the print screen button. It will make it easier to take and manage the screenshots. Use the PrtScr button with combination with other keys get some different results.
Alt + PrtScr – Capture current window only
If all you need is a screenshot of the current program you are using, then we press “Alt + PrtScn”, screenshot will be copied in clipboard.
Windows + Shift + S – Capture custom area on the screen
By Pressing Windows + Shift + S, Mouse cursor will change and screen will get grayed out to select the region on the screen. Click and drag on your screen to select the part of your screen that you need to capture. Screenshot of the selected region will be get copied to the Clipboard.
But if you do not like the idea to paste in the paint and then save it. Then use the key combination to save image directly and quickly to a folder. Using the Windows key with the print screen key it will automatically save the screenshot directly to the image file.
Use Windows Key + PrtScr to save image directly in the folder
This is a feature present since Windows 8. just touch these two keys simultaneously, and the screen will flick, just like a camera shutter, which indicates that the screenshot is ready.
To find it the image, we open “file manager”, going to “picture”, “screenshot” folder, and our screenshot will be there in image format. You can share or use this screenshot image.
Windows key will work with all the combination shortcuts of print screen (PrtScr) commands mentioned above to save screenshot as an image
2. Capture with Snipping Tool
Snipping tool is an inbuilt Windows 10 free app that capture the screenshot and make it easy to edit or annotate them. We can easily draw or highlight something on the captured screen with the help of snipping tool. So snipping tool is the best alternative to print screen method.
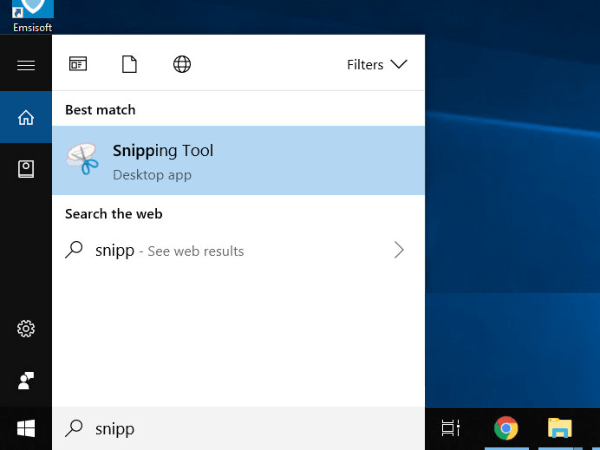
- Type snipping in the search bar. Click on the snipping tool app to open it.
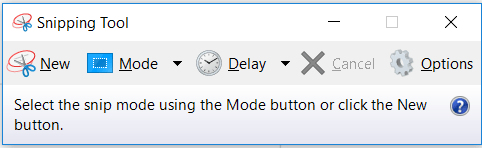
- By pressing “Mode” We can use four options to capture the screen and act upon: “Free-form Snip”, “Rectangular Snip”, “Window Snip” and “Full-screen Snip”.
- Select New to blur the screen and convert the cursor to +. Drag the mouse to select the area you want to capture. The clear part of the screen indicates the selected part.
- If required, edit with the options available in the tool
- Save the screenshot. Click Save or click File > Save as to store the screenshot on your PC.
3. Record with Game Bar
Game bar is a new feature in Windows 10. It let the gamer to record video or capture screen while in game mode. But you can use it to take screenshot of other programs as well.

To activate the game bar press the button Windows Key + G. It will bring up the game bar at bottom of the screen. Where you can find options to take a screenshot or record a video. You can found the recorded screens and videos at the location.
Apart from these free to use methods there are many other third party paid software / apps are also available in the market to take the take a screenshot on Windows. You can also record the video of the screen. Here are some best screen recording software.
