
This time we will explore a very useful function for mobile devices. Specifically, we’ll see how to do a screenshot on Android. This function allows you to capture any element present on the screen of the mobile device. Consequently, you can save some data without having to write it. Or save some chat. You can also backup any image that cannot be saved. As you can see, it is a very interesting function. Well, let’s see how to do it.
Many times we need to save the content currently displayed on the mobile phone screen. For this reason, you need to take a screenshot. This function was implemented from Android 4.0. In fact, it was not enabled in previous versions. You have to resort to third-party apps. Which often did not run correctly because they needed root permissions. Fortunately, this is no longer the case. So today we will see the methods to take a screenshot in android.
How to Take a Screenshot in Android
Prepared 7 methods to take a screenshot in Android. Let’s see how to do it?
- Take a screenshot using Universal Method
- Take a screenshot using swipe 3 fingers
- Take a screenshot using using quick menu (For Xiaomi)
- Take a screenshot using Google Assistance
- Take a screenshot using side buttons
- Take a screenshot using swiping palm (For Samsung)
- Take a screenshot using 3rd party app
1. How to take a screenshot using universal method
Please note that Android is a free operating system based on Linux and managed by Google. This means that the operating system with its source code is delivered to the manufacturers. Then, each one gives it its distinctive touch or leaves it in a pure state. Consequently, most functions work equally on almost all devices. Well, the universal method for taking a screenshot is as follows:
- First, go to the screen you want to capture. Please note that any icons displayed there will appear in the screenshot.
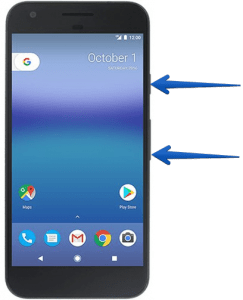
- Once the image is selected, please press the Power + Volume down buttons in combination. You will immediately see a short animation (usually the edge of the screen is illuminated). This is proof that the capture was done correctly.
- Some devices do not have the volume buttons. Or they may be damaged. In that case, simply select the screen to be saved. Additionally, press and hold the power button. A menu with various options will then be displayed. Please press the option to take a screenshot.

2. How to take a screenshot by swiping three fingers
You can simply use your three fingers to take a screenshot. Let’s see how to do it.
- Go to the screen which you want to capture.
- Simply swipe your three fingers across the screen from top to bottom. That’s it!! Your screenshot has been taken. Check the screenshot in the image gallery.

- Go to Phone Settings. Once there, open Additional Settings.

- Next, scroll down to Button shortcuts.
- In the listing, you will see the 3-finger gesture available to take a screenshot.
- Motorola has also included this possibility in its mobile devices. To activate it, just go to the Moto application. From there, go to settings and then to Three Finger Screenshots. Similarly, Huawei also incorporates this feature. Just go to settings and then to Smart Assistance. From there it is possible to enable the function. Either way, the gesture consists of swiping 3 fingers up and down on the screen. This gesture will take a screenshot. Take a look at the following image:


3. How to take a screenshot using quick menu button on Android
There’s also another way to take a screenshot on Android. To do this you need to use the quick settings. These are a series of switches located at the top of the screen. Correspondingly, these allow you to activate Wi-Fi, deactivate data, use the flashlight, among others. Well, there is also a button that allows you to save a screenshot.
- In the first place, select the screen to be saved.
- Then slide your fingers across the screen from the top to the bottom. Consequently, the controls will be displayed. Please select the one for screenshot button and that’s it!

4. Take a screenshot using Google Assistant
Another quick method to take a screenshot is through the Google Assistant. With this intention, enter the app, and once there enter the text: take a screenshot.

Immediately the assistant proceeds to take the screenshot. In addition, you will see the option to share the image.

5. Take a screenshot with the side button (Classical method)
Since it was first implemented, this method included a combination of buttons. Specifically, the power button + volume down. The screen will flash and emit a short beep. This is a sign that the capture was successful.
6. Take screenshots using Samsung’s palm method (For Samsung)
Samsung was one of the first manufacturers to include gestures in its devices. Therefore, these features are present in most models released after 2013. Well, this method consists of placing the phone on a flat surface. Then, put the edge of your hand in a perpendicular position. That is to say, similar to a karate chop. Then, drag it over the screen from left to right, as if it were a scanner. It also works from right to left. If you did it correctly, the screen will blink and make a sound. Just look for the screenshot in your phone’s gallery.
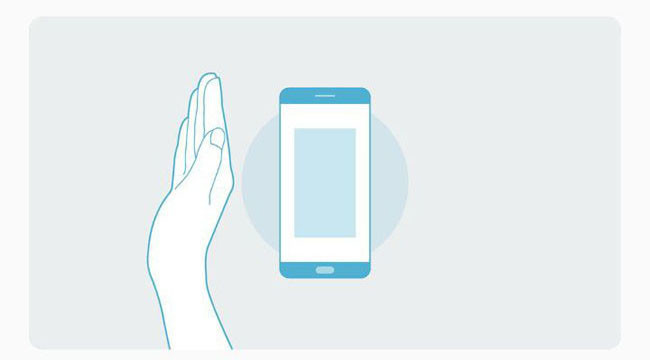
To use this feature, follow this path on your Samsung device:
Settings → Palm swipe to capture → Motions and gestures → Palm swipe to capture
7. Take a screenshot with a third-party application on Android
If by chance the physical buttons of the device are damaged. Or if you like to use apps for any function. Then you can make use of a large number of apps present in Google Play. Of the many options, there are, I recommend Screen Master. Because besides saving the screen in a simple way, it also offers a simple but complete image editor. It also offers special functions to capture web pages. Well, you can download it from here. Once downloaded and installed, please set the options. The app offers the option to display floating buttons in addition to having the remainder in the notification bar.

After setting up the app, just press a blurred button to take the screenshot.


Similarly, the program allows you to take a screenshot by means of a reminder in the status bar.

Alright, we’ve seen several methods of taking screenshots on Android. In this, we have explained 6 methods to do it. It covers most of the Android used phone brands: Samsung, LG, Xiaomi, Oneplus, RealOne, Oppo, Vivo, Motorola, and other android used phones. This way, you can use native operating system options, or download third-party apps.
Don’t worry if you don’t get it right the first time. These types of gestures get better with practice. Also, it is very interesting as it allows you to take screenshots with one hand. Okay, so we have seen several ways to take screenshots. See you later!
