
Windows 10 is designed to give the user a comfortable experience. In fact, several elements of the system have been carried forward from its previous versions. One of these elements is the file explorer. Similarly, this component allows you to view the files and folders present in the system.
However, since the beginning of Windows, the system has kept several files hidden. In general, these are system files. And if they are hidden it is for a fundamental security reason. Because manipulating or deleting them can damage the proper functioning of the Operative System.
In any case, it is also advisable to see the hidden system files to keep track of them. In any case, it is also advisable to see the hidden system files to keep track of them. Additionally, some programs require you to modify data present in some hidden folders. Well, in this post we will see some methods to show ‘hidden system files & folders’ in Windows 10.
Method 1: View hidden system files using file explorer.
The first method I will show you to view hidden files and folders is by using the file explorer.
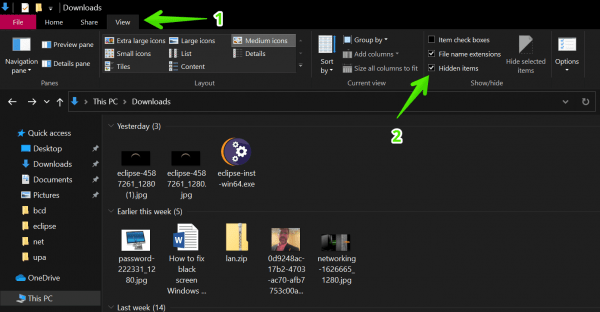
- Step 1: Press the Win+E combination.
- Step 2: Once the file explorer is launched, please click on the View menu at the top of the screen.
- Then find the box corresponding to Hidden Items. Please check it to start viewing the hidden files and folders on your computer.
- From this point on you can check that the browser shows the hidden folders. In effect, these are shown with the darker folder icon.


Method 2: How to view hidden system files using folder option.
Using the previous method, we saw how to view hidden files and folders. However, for security reasons, some system files remain hidden. If you still want to see them, then follow the next steps:
- Press the Win+E combination to open the File Explorer
- Please click on the menu View. Now scroll to the right and display the Options section. Finally, click on the Change folder and search for options.

- A menu with Folder Options will immediately be displayed. Please click on the View tab. Now scroll down and deselect the check box “Hide protected operating system files” section (Recommended).
- Once you deselect the check box, a warning message about the sensitivity of these files will appear. Press Yes to set up the changes. Finally, click on OK to start viewing the hidden system files. You may revert to this option later after you have done your work.

- Back in the file explorer, you can look at previously hidden system files.

- That’s it. If you have any doubts about the steps above, then see the following Microsoft Guide to view the system files.


Method 3: How to view hidden system files using Control Panel
It is possible to manage the view of hidden system files from the Control Panel. Indeed, let’s see how to do it.
- Open the control panel by typing the Control Panel in the search bar.

- Now click on Appearance and Personalization.

- Next, locate the File Explorer Options section. Once there, click on Show hidden files and folders.

- The File Explorer menu will be immediately displayed. Please follow the same steps taught in the previous method.

- That’s it.


Thus, we have seen several methods to view hidden system files and folders in Windows 10. I sincerely hope that I have solved your doubts. Let us know your impressions about this post, and if you liked it, please share it on your social networks.
