
There are currently many options for sharing information. Sharing files or folders on your local network is essential if you usually share some data to other members on the same local network. However, if you use a router and have several computers connected to the same network, then you have another option. Indeed, it is possible to share files between devices connected to the same network. And this without the need to be connected to the Internet.
Requirements
- Two or more computers connected to the same network.
- A network infrastructure managed by a wired or wireless router
How to share File / Folder on Local Network in Windows 10
This process in Windows 7 was a little simpler. In fact, it was enough to set up the home group in a few steps and that was it. However, in Windows 10 it’s a little more complex. But do not worry, with these steps we will see how to do it.
In the first place, you have to configure the network as private. Most likely, when you start the network connection, a wizard asked you if you wanted to make the network public or private. This is very important since a public network has more security protocols. In fact, this configuration is suggested if you connect in a public place such as an airport, restaurant, or hotel. In these cases the protection of privacy is vital.
On the other hand, if you are on a trusted network, then you should choose the private configuration. Consequently, your computer will be visible to others. Using this configuration is vital to be able to share files or folders in Windows 10.
Steps
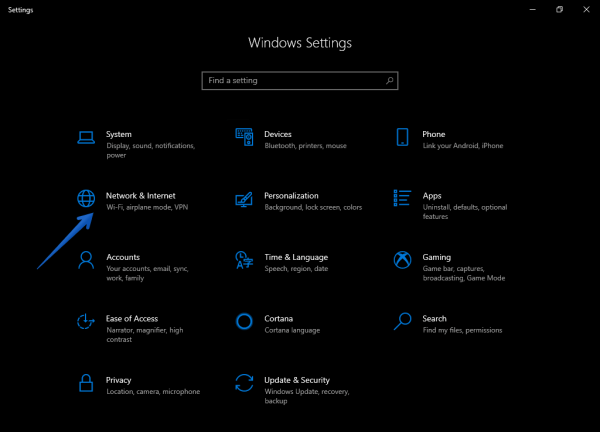
- Press the Win+I combination. Once there, enter the Network & Internet.
- Then scroll down and click on Change connection properties.

- Then select Private as the network profile. As mentioned, this will allow the computer to be discoverable and to share data.
- Thus, the network profile has been changed to private. This can be checked on the previous screen.
- Set up the network for file sharing. Next, you need to configure your network to be able to share files. With this in mind, repeat the above steps to get to the network configuration. Next, scroll down to Network and Sharing Center.
- Then, the Control Panel window regarding the network configuration will be displayed. Please click on Change advanced sharing settings.
- This menu displays the private network profile settings. Verify that the network discovery and file-sharing options are turned on. If not, turn them both on. Save the changes.
- Scroll down and click on ‘all network’ main menu. Go down and turn off the option “Turn off password protected sharing“. If you want a password protection of your shared folder then you should keep it turned on.

Sharing settings has been done now. It’s time to share the folder that you wanted to do. - Prepare the folder you want to share. We are almost ready, we just need to configure the folder we want to share within the local network. With this intention, please select the folder you are going to share. Then, right-click on it to enter the Properties.
- Then click on the Sharing tab. Now scroll down and click on Advanced Sharing.

- In the next window, just check the box to share the folder and then click on permissions.

- You’ll get another permission window. Click on ‘Everyone’ and then tick all the checkboxes that are under allow column. Then click on apply and then OK.

- Click on Apply and OK on the previous window.
- Go to the folder properties again and go to ‘sharing‘ tab.
- Here click on ‘Share‘ button. It will open another window ‘Choose people to share with’.

- Click on dropdown menu and choose any user you want or share the folder or ‘Everyone‘ to share with all the peoples in the local network, after that, click on Add button.

- After clicking on ‘Add’ button, ‘Everyone’ will be listed beneath. Click on the ‘Everyone’ in the below list and change its permission from ‘Read’ to “Read/Write“. Then click on Share button to save the settings.
- And that’s it. The file & folder sharing process has been completed. Now, it is time to learn how to access this shared folder on your local network on the other computer that is connected to the same network.


Steps to access the shared folder on another computers
To access the folder please enter the file browser of the computer connected to the network.
- To do this, press the Win+E combination and click on Network. Then click on the computer where the shared folder is located.

- If you have done everything correctly, then the shared folder should be shown here. Double-click on it to access.

- When you’re in, you can see all the files in the shared folder.


All right, so we’ve seen how to share files and folders in Windows 10. That’s it for now, see you later!
