
Question
How to Remove Secure-surf.net from Internet Explorer, Google Chrome, Mozilla Firefox.
Solved Answer
Sure, we’ll help you with this, you just need to follow our given removal step by step guide how to remove it from your computer for completely. Let’s start with what is Secure-surf.net? This is a kind of usually unwanted software known as a browser hijacker. It’s called this because, once on your PC, it can change the settings in your favorite browsers – Chrome, Firefox, IE, etc. – without asking you. It does this to push certain sites for marketing reasons. This is potentially dangerous, as you may find yourself being redirected to sites hosting viruses or other malware. Please uninstall Secure-surf.net – we will explain how.

Infection Causes: Secure-surf.net claims to be a search engine that respects your privacy, so it’s possible you may have believed this claim and used it deliberately. However, it’s also often “bundled” with other programs. This means that the adware is installed automatically, without always telling you. If you use the quick or default settings while installing programs, you’ll be told nothing until the hijacker is on your computer!
Symptoms: This hijacker works like many others, so the biggest warning sign is if your homepage changes to something else, sometimes ads and sometimes the Secure-surf.net website itself. Check carefully when you open your browser for a new session on the web. The Secure-surf.net site is very plain, mostly white with just a few text links and a search box. However, if you use it, it will spy on you to see where you browse. It does this to make marketing easier.
Prevention: Yes, you can avoid a lot of the problems connected with unwanted software like this. You just need to have your eyes open when you’re on the Internet. Don’t download files from websites you don’t trust, especially sites which other people have warned about. If you install new programs, set the “Detailed” or “Custom” options to let you see everything that’s being added to your system. Don’t open spam email attachments, either.
How to get rid of Secure-surf.net completely?
Yes, of course! There are two ways to do this, and you can choose the one you like best. The automatic method uses a special Secure-surf.net removal tool to completely remove Secure-surf.net from your PC. With the manual method, you find and permanently delete each file yourself. Both work great, and we have step by step instructions to help you. So, you can look forward to happy, fast, and smooth browsing again.
Removal Instructions
Automatic Fixit
Download Adware Remover Tool to remove Secure-surf.net Automatically, It’s a Freeware utility specially designed for Adware Removal. This tool can remove most of the Adwares from Internet Explorer, Google Chrome and Mozilla Firefox. It can remove all the traces of Secure-surf.net from registry as well.

Manual Steps
Step 1: To Uninstall Secure-surf.net from computer
- Click on Start button and then click on Control Panel.
- Now click on Programs –> Uninstall a program or Program and Features (Windows-7, 8, Vista). You also may click on “Uninstall a program”

- For Windows XP users click on Add/Remove Programs.

- You’ll get a window which has listed all the installed programs.
- Uninstall “Secure-surf.net” from there.
(Note: If you face any type of problem while uninstalling Secure-surf.net” then you can use Revo uninstaller tool, it can it remove forcefully. Click here to download Revo Uninstaller Tool).
- Also do uninstall all the unwanted & unknown programs which are listed in “Suspicious Programs list”(See below for the list). You should uninstall them immediately if you found any into your computer.
(Note: If you face any type of problem while uninstalling anything from control panel then you can use Revo uninstaller tool, it can remove any software forcefully. Click here to download Revo Uninstaller Tool).

- Uninstall all unwanted programs

Suspicious Programs list
- Browser defender
- HD-Plus 1.8
- Vplay
- Browser protect
- Browser protected by conduit
- Delta search, Babylon
- LessTabs
- WebCake 3.0
- Yealt
- LyricsContainer
- VideoSaver
- AddLyrics
- privacy safe guard
- unfriend checker
- Price peep today
- Coupon amazine
- TidyNetwork.com
- DownloadTerms 1.0
- Yontoo
Also uninstall all the unwanted & unknown programs which are not listed here.
Step 2 : To Remove Secure-surf.net from Internet Explorer.
Step 2.1: Remove Secure-surf.net from homepage
- Open Internet Explorer then go to Tools menu (Press “F10” key once to active the menu bar) and then click on Internet Option a configuration page will be opened, then click on General tab. Now look into under HOME PAGE Edit Box you will get www.Secure-surf.net, replace it to www.google.com, then click on apply and close.
Step 2.2: Remove Secure-surf.net add-ons from Internet Explorer.
- Open Internet Explorer then go to Tools menu (press “F10” key once to active menu bar) and then click on Internet Option a configuration page will be opened
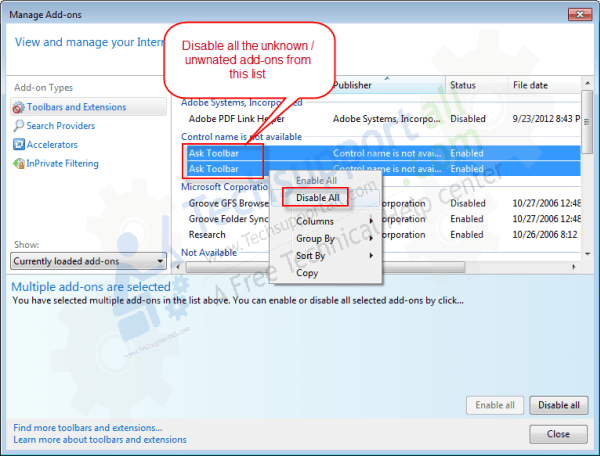
- Click on Programs tab then click on Manage Add-ons, now you’ll get a window which have listed all the installed add-ons.
- Now disable the Secure-surf.net add-on, also disable all the unknown / unwanted add-ons from this list. (As per below screenshot).
Step 2.3: Reset Internet Explorer
- Open Internet Explorer. Click on Tools menu (Press “F10” key once to active the menu bar), click on Internet Option. A internet option window will open.
- For IE9, IE10 users may click on Gear icon
 . Then click on tools.
- Click on Advanced tab then click on RESET button.
- Now you will get a new popup for confirmation, tick mark on Delete personal setting then click on RESET button on that. (As shown on below screenshot)
- Now your Internet Explorer has been Restored to default settings.

- Now you will appear a popup stated “complete all the tasks”. After completion click on close button.
Step 3 : To Remove Secure-surf.net from Mozilla Firefox
Step 3.1 : Remove Secure-surf.net from Mozilla Hompeage
- Open Mozilla Firefox, Click on Tools menu (If tools menu doesn’t appear then press “F10” key once to active the menu bar) then go to Options, after that a configuration page will be opened, then click on General tab and then look on the very first section named as Startup. Under start-up you will see a HOME PAGE Edit Box, under this edit box you will see www.Secure-surf.net, please replace it to www.google.com, then click on apply and close.
- Restart Firefox Browser
Step 3.2 : Remove Secure-surf.net from add-ons
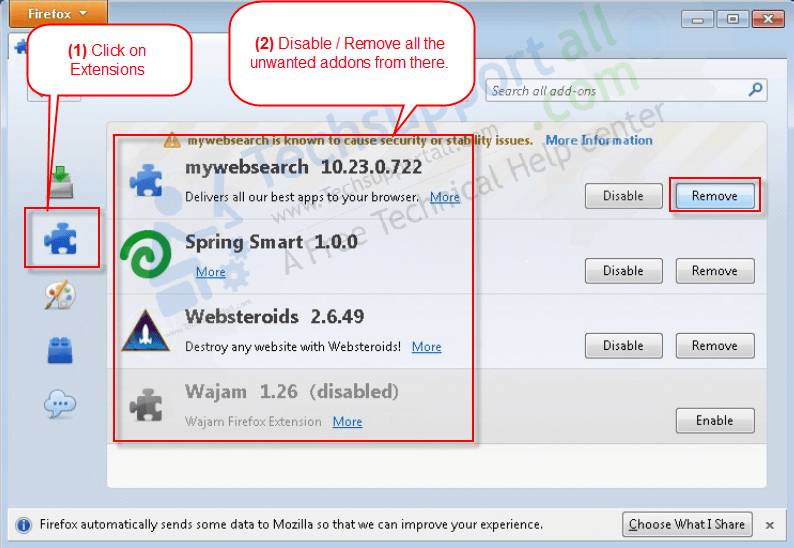
- Open Firefox and then go the Tools menu (Press “F10” key once to active Menu bar) click on Add-ons, you’ll get a page click on extensions from the left side pane. now look on right side pane you’ll get all the installed add-ons listed on there. Disable or Remove Secure-surf.net add-on, also disable all the unknown / unwanted add-ons from there. (As per below screen shot)
Step 3.3: Reset Mozilla Firefox
- Open Firefox and then go the Help menu (Press “F10” key once to active Menu bar)
- Go to Help menu then click on “Troubleshooting information”
Note: you can also open this page in this ways, open Firefox then type this command in the address bar “about:support” (without quote) and then hit enter or OK.
- You will get a page “Troubleshooting information” page, here you will get “Reset Firefox” option in the right side of the page.
- Click on Reset Firefox option and then follow their instructions to reset firefox.
- Mozilla Firefox should be Restored.


Step 4 : To Remove Secure-surf.net from Google Chrome
Step 4.1: Remove unwanted homepage & search engine from Google Chrome
- Start Google Chrome, click on options icon
 (Located in very top right side of the browser), click on Settings. You will get a configuration page.
 - Under configuration page find a option named as “Open a specific page or set of pages” click on its Set Pages. Another window will come up. Here you will appear the bunch of URL’s under “Set pages”. Delete all them and then enter only one which you want to use as your home page.


- In the same configuration page click on Manage search engines button. Delete all the search engines from there, just keep only www.goole.com as your default search Engine.


Step 4.2 : Remove unwanted extensions from Google Chrome
- Start Google Chrome, click on options icon (Located in very top right side of the browser), then click on Tools then, click on Extensions. (As shown on below screenshot)

- You will get a configuration page which have listed all the installed extensions, remove Secure-surf.net extension. Also remove all the unknown / unwanted extensions from there. To remove them, click on remove (recycle bin) icon
 (as shown on screenshot)

Step 4.3 : Reset Google Chrome – Restore to default setting.
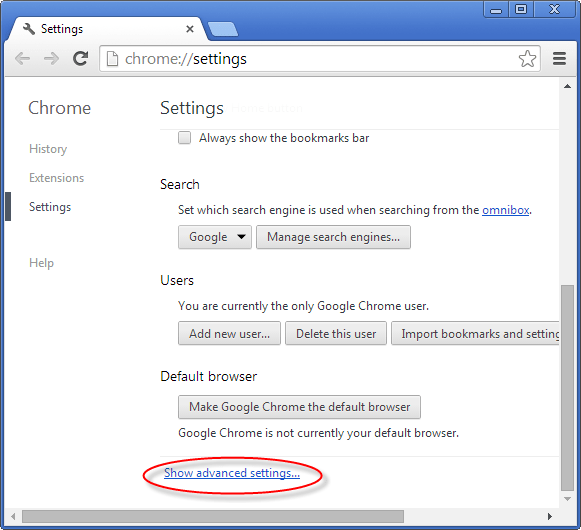
- Open Google Chrome, click on menu icon and then click on settings (Note: menu icon is located right side top corner it is look like this: ). (See the below screenshot for better understand)
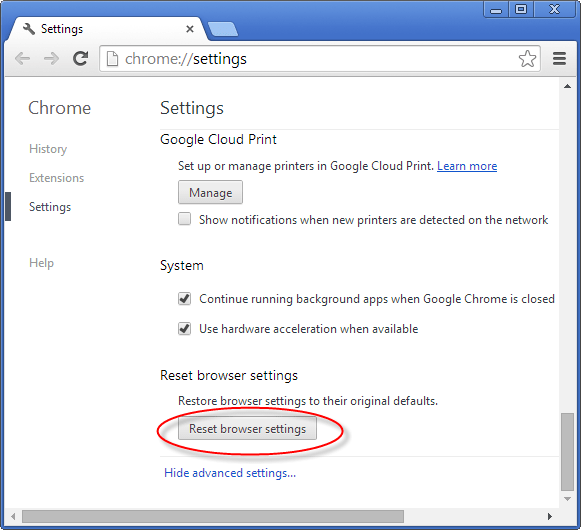
- Scroll down and click on “Show advanced settings…”option, after click on that you’ll appear some more options in bottom of the page. Now scroll down more and click on “Reset Browser setting” option. (See the below screenshot for better understand)
- Now, Close all Google Chrome browser’s window and reopen it again.
Step 5 : Remove Secure-surf.net infection from Windows shortcuts.
Follow the following steps for all browser’s shortcuts like: Internet Explorer, Firefox, Internet Explorer and Safari as well.
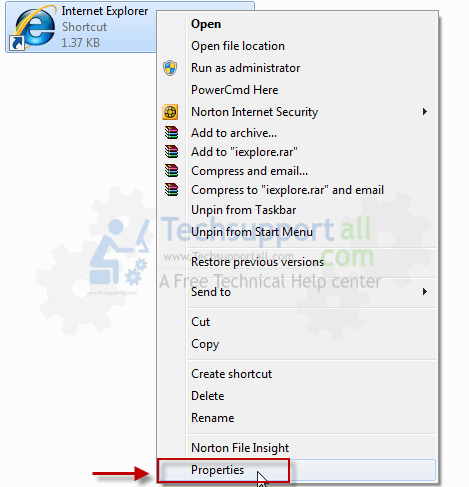
- Right click on the shortcut of Internet Explorer and then do left click on the properties option. You’ll get a shortcut’s properties.
- Click on shortcut tab and then delete the “www.Secure-surf.net/?utm” string from target field.
- Need to delete this URL:
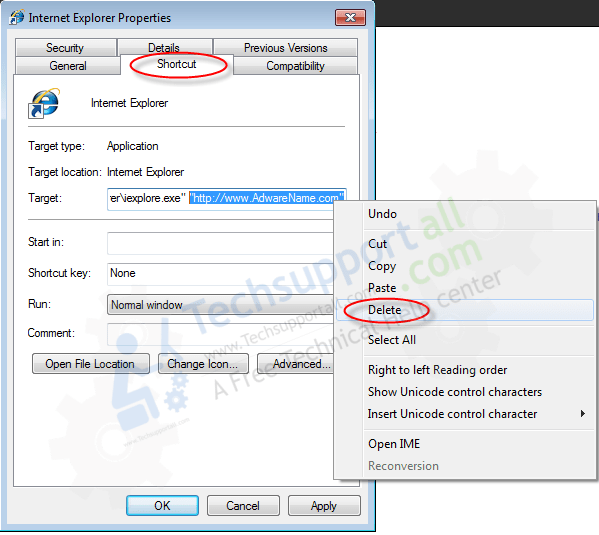
Repeat the above steps on all browser’s shortcuts like: Internet Explorer, Firefox, Internet Explorer, Safari in all location Desktop / Taskbar / Startmenu.
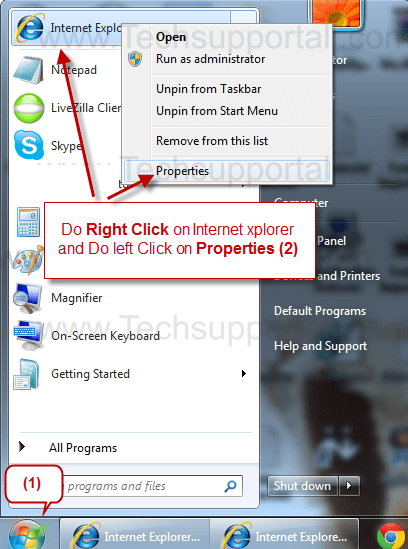
- Remove Secure-surf.net infection from startmenu’s shortcuts.
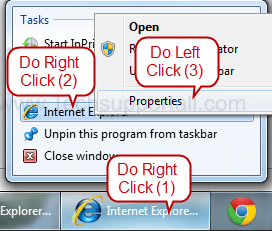
- Remove Secure-surf.net infection from taskbar’s shortcuts.
Step 6 : To Remove Secure-surf.net from Registry
- Press “window key + R” (Flag sign key + R) you will get Run box then type “REGEDIT” into the run box then click on OK. You’ll get a registry editor window.
- In the registry editor, click on Edit menu and then click on find option, you’ll get edit box to search any string into registry editor
- Type “Secure-surf.net” into the find box and then click on Find Next.
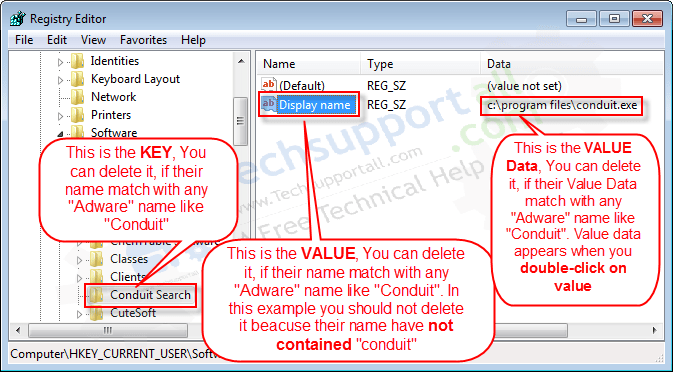
- The search result will highlight the key or value which have contains the Secure-surf.net string.
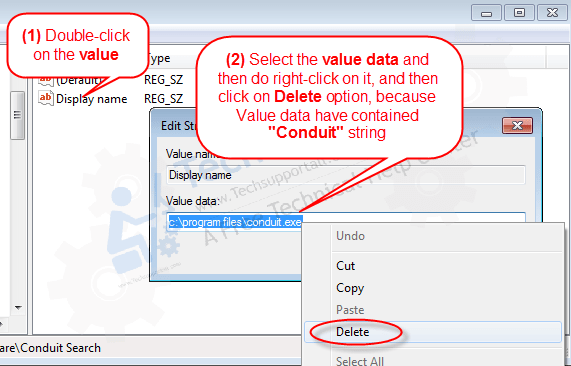
- Now delete the Registry Key/Value/Value-Data if any one contains “Secure-surf.net” string (must see the example screenshot below)
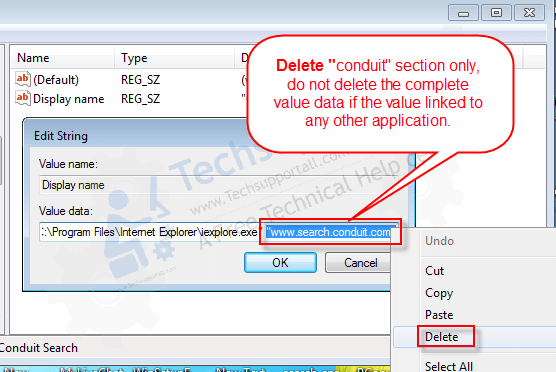
Note:- Do not delete the complete value data, just delete the Secure-surf.net path only (for example see screenshot3 below)
- Use F3 key to find Next. and do the last step to all results.
- We are giving you the example on “Conduit” Adware.
Screenshot 1
Screenshot 2
Screenshot 3
Step 7 : To Remove Secure-surf.net from Autorun Tasks
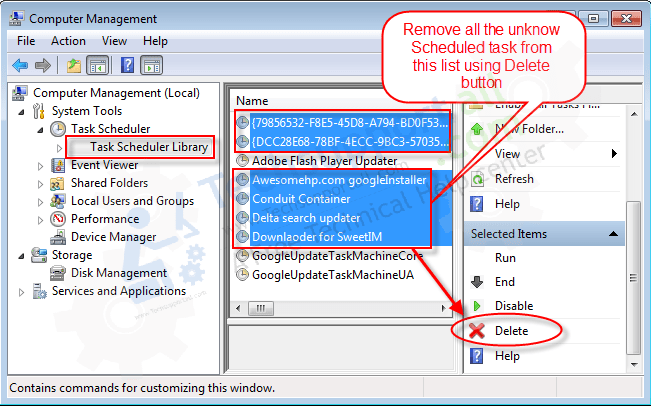
- Click on Start button and then do Right-Click on the computer and then do left-click on Manage. A manage window will appear.
- In the manage window click on Tasks Scheduler from right side pane, then click on “Task Scheduler Library“, Now look on left side pane and Remove all the Tasks which have contains Secure-surf.net string and also remove all the unknown / unwanted tasks from there (As per the screenshot below).
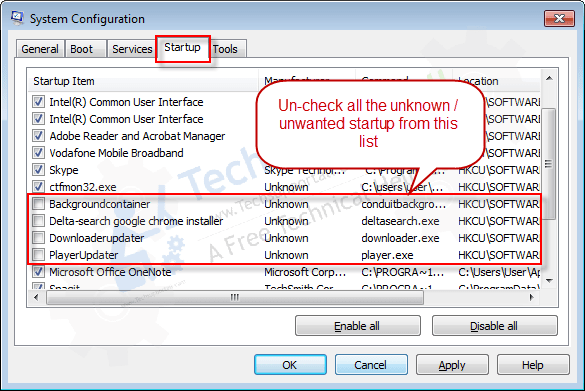
Step 8 : To Remove Secure-surf.net from Startup
- Press “window key + R” (Flag sign key + R) you will get Run box then type “MSCONFIG into the run box then click on OK. You’ll get a msconfig window.
- In the msconfig window click on Startup tab, here you’ll get all the startup entries, so look on the list and then do Un-check the entries which is contains Secure-surf.net. Also Un-check all the others entries which you found unwanted. then click on OK to apply all the changes.
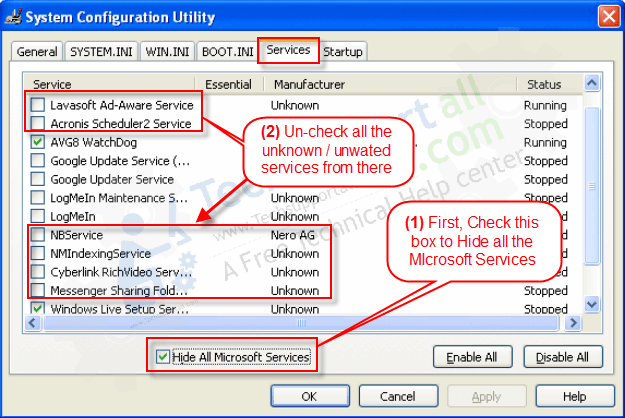
Step 9 : To Remove Secure-surf.net from Services
- Press “window key + R” (Flag sign key + R) you will get Run box then type “MSCONFIG” into the run box then click on OK. . You’ll get a msconfig window.
- In the msconfig window click on Services tab, here you’ll get all the start-up services list, click on “Hide Windows Services” all the windows related services will be hidden. now it’s only display the 3rd party installed services, now look on the list and then do Un-check the service which have contains Secure-surf.net. Also Un-check all the unknown / unwanted services. then click on OK to apply all the changes.
Step 10 : To remove Secure-surf.net registry entries with Adwcleaner.exe
10.1 : Download AdwCleaner from the below link.
Click Here to Download: Adwcleaner.exe
10.2 : Run that downloaded file (Adwcleaner.exe).
10.3 : When you get it started, click on scan button to search the Secure-surf.net files and registry entries (As shown below screenshot).

10.5 : When scanning process will be finished, click on Clean button to delete all the Secure-surf.net files and registry entries (as shown on below screenshot)

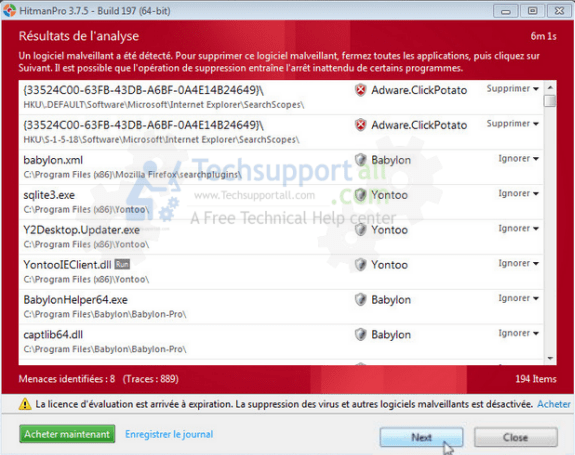
Step 11 : To remove Secure-surf.net with Hitman-Pro
Click here to Download Hitmanpro_x32bit.exe
Click here to Download Hitmanpro_x64bit.exe
Step 12 : To remove Secure-surf.net with Malwarebytes.
12.1 : Download Malwarebytes Anti-Malware Free, then double click on it to install it.
Click Here to Download Malwarebytes.exe


12.2 : Update online Virus Definition


12.3 : Tick mark on “Perform quick scan” then click on Scan
12.4 : When the scan done click on “Show results”
12.5 : After clicking on Show result it will you a another window where you will get the found threats. Click on “Remove Selected”


eset amd malware could not find these adwares (secure-surf.net)
It took almost 30 mins to scan my comp, but after all it made a good job.
many thanks for it!
Thank you so much for helping me remove that adware called secure-surf on my browser. It kept on bugging me for the past few days and this tool solved it! Tho after re-opening my Google Chrome, it seems that there was another adware that was not detected by this tool. But that’s fine, there’s always improvement/upgrades/updates. I’m still glad I got rid of the first one.
used it to get rid of the secure-surf.net pop up that slows down and redirects my web pages and who knows what else. o far it is looking good. i am happy with it. i have bookmarked the web page and if it stays off ill donate
Very useful program! Thats save my desk for adwares/hijacks. Thank you very much!
Worked well. Hope it got ride of safe-secure once and for all!!