Hey, what’s up? This time we’re going to talk about files and folders in Windows 10. Every time we create a file or a folder or a file, the system assigns default permissions. Most of the time, these permissions are full access for the user who created the file. In the same way, these types of access are assigned for the administrators and for the system itself. However, these permissions are customizable and in this post, we will see how to do it. This step will be the same for Windows 7, 8, 8.1, 10, and Server operating system.
Modifying the permissions of a file or folder.
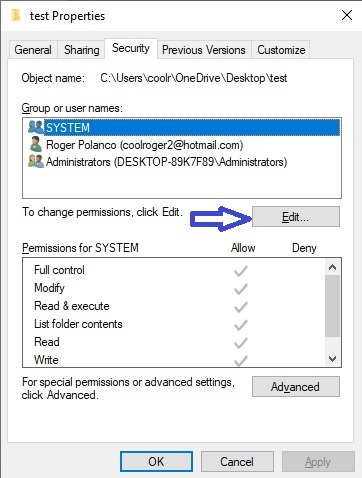
- Before I start I want to clarify that the process is the same for both folder and files. The first thing we have to do is double click on the file to enter the properties. Then enter the security tab to view users and their permissions.

- To modify the permissions correctly, you just have to click on edit.

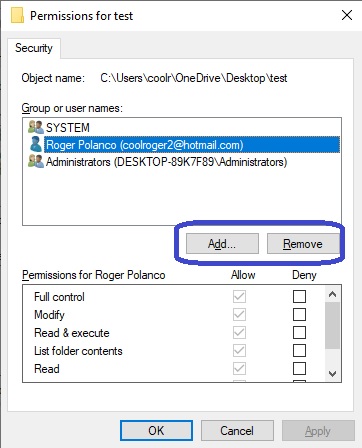
- Immediately a window will open where you can see the users and groups that have access to the folder. Additionally, you can add or remove users, using the Add or Remove buttons.

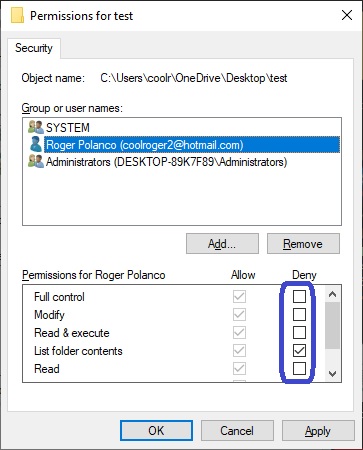
- To change the permissions, please select the user or group. Then check or uncheck the boxes according to the permissions you wish to modify. Specifically, the permissions are related to read, modify, execute and others. Then press Apply to set the changes.

After this, we will have changed the permissions of files or folders in Windows 10. Knowing this is very important to be able to enter folders with restricted access. In the same way, we will be able to save files from unauthorized access. I hope it is useful! See you next time.


