Forum Replies Created
- AuthorPosts
- August 1, 2022 at 10:57 pm in reply to: How to Fix Logitech G Hub Community downloading failed #33951
 AmitParticipant
When you are experiencing the ‘download failed’ or ‘Cannot reach G HUB community, please check your internet connection’ messages with relation to Logitech G HUB community, then try the solution described below.
How to Fix Logitech G Hub Community ‘Download Failed’ Error?
To permanently fix this error you will have to create new rules in your Windows Firewall. The Inbound rules of your Windows Firewall monitor and protect your computer from the incoming internet traffic, while the Outbound rules of your Windows Firewall limits the access of the internet from installed programs. You will have to delete some existing Inbound and Outbound rules, then create some new Inbound and Outbound rules on your Windows Firewall.
Follow the steps given below in their correct order so that you can solve the ‘download failed’ error permanently on your Windows computer:
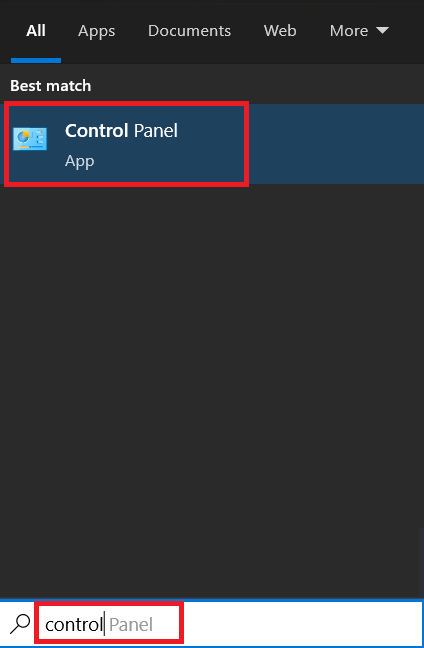
- Type ‘control’ in the search box and click on the ‘Control Panel’ option in the search results.

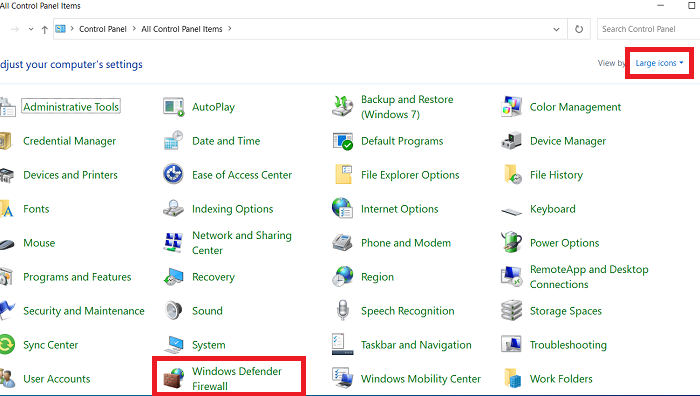
- In the Control Panel window, view by ‘Large icons’, then click on the ‘Windows Defender Firewall’ option.

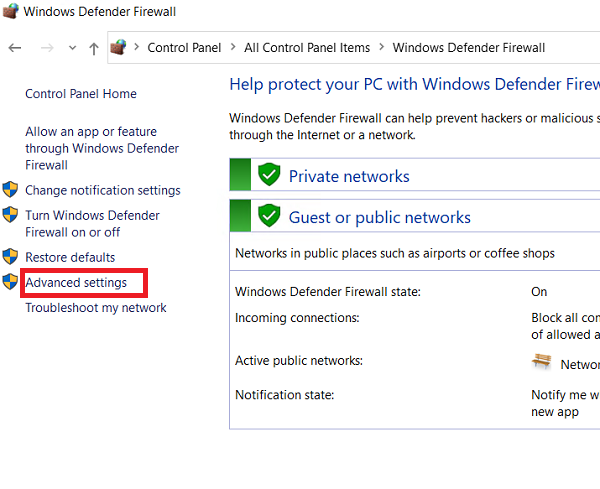
- In the Windows Defender Firewall window, click on the ‘Advanced settings’ option.

Delete and Create Inbound Rules
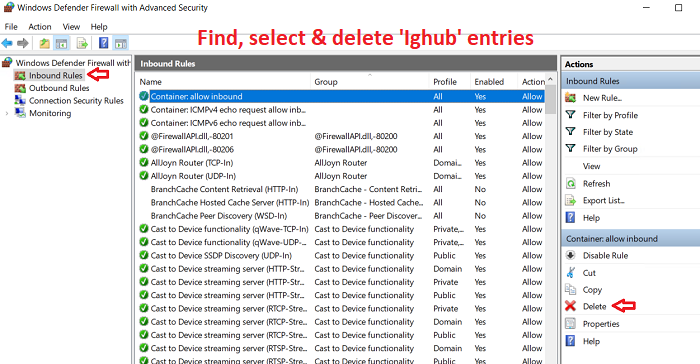
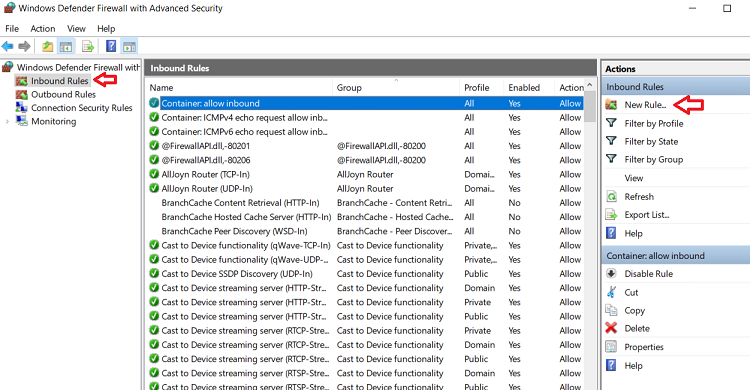
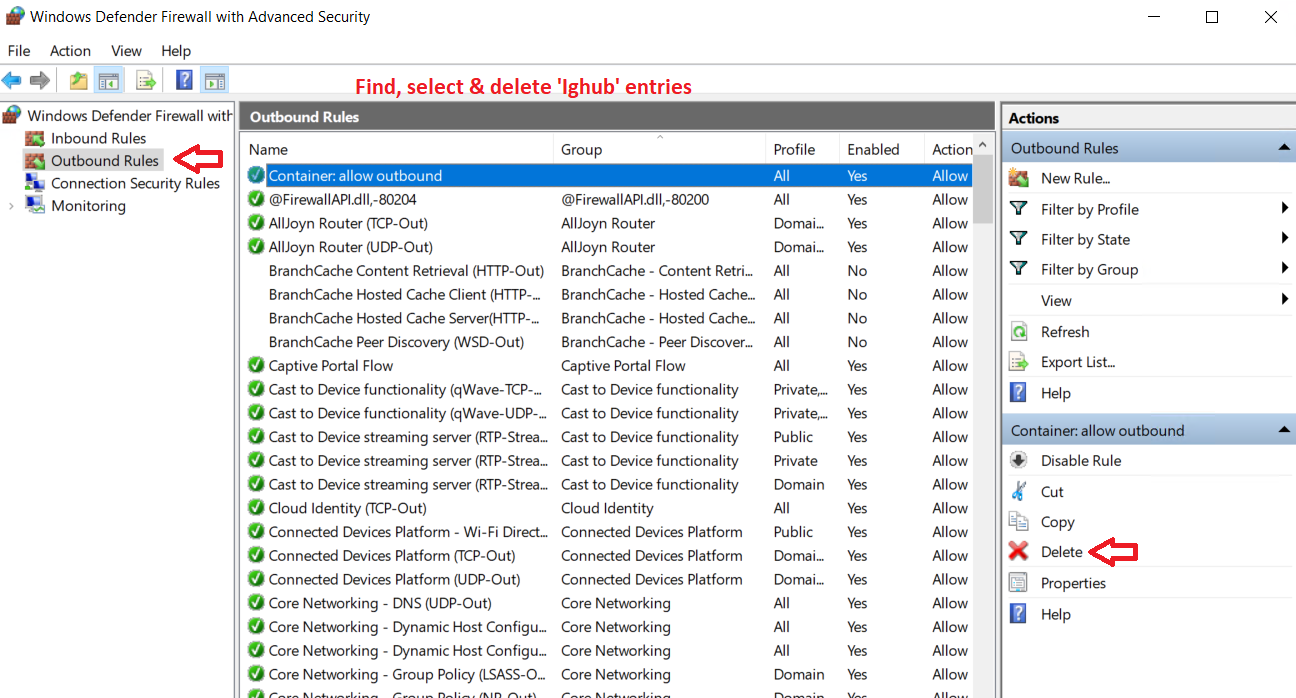
- Choose the ‘Inbound Rules’ option in the right pane, then try to find and select ‘Ighub’ entry in the center pane. If you find any Ighub rules, then click on the ‘Delete’ option in the left pane to delete the ‘Ighub’ entry.

- After deleting the Ighub Inbound rules, click on the ‘New Rule’ link in the left pane.

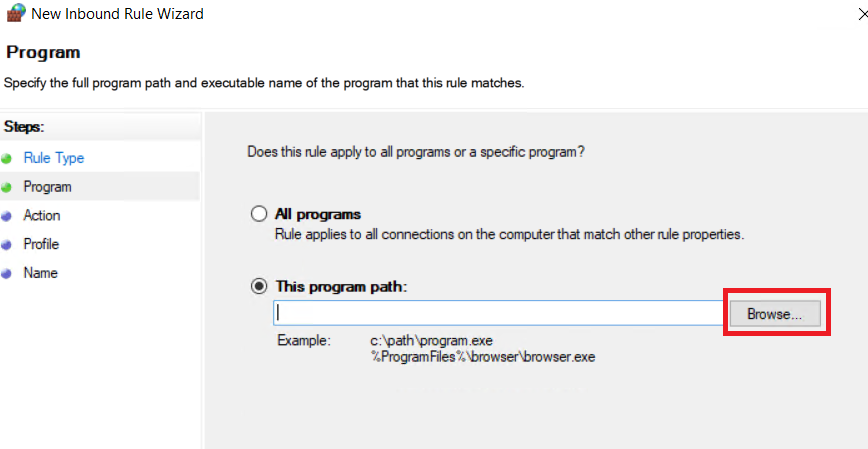
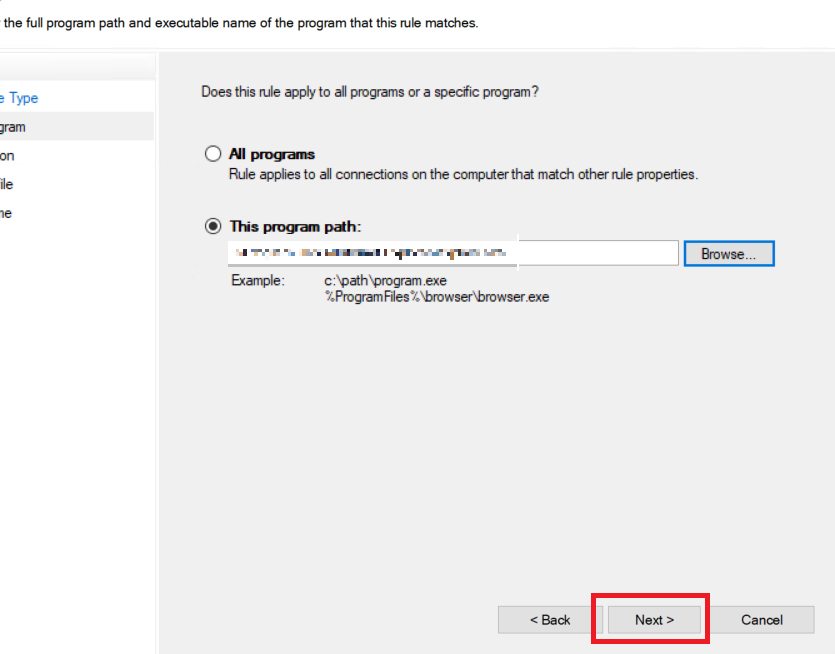
- In the Rule Type window, choose the ‘Program’ option, then click on the ‘Next’ button.

- Click on the ‘Browse’ button in front of the ‘This program path’ field.

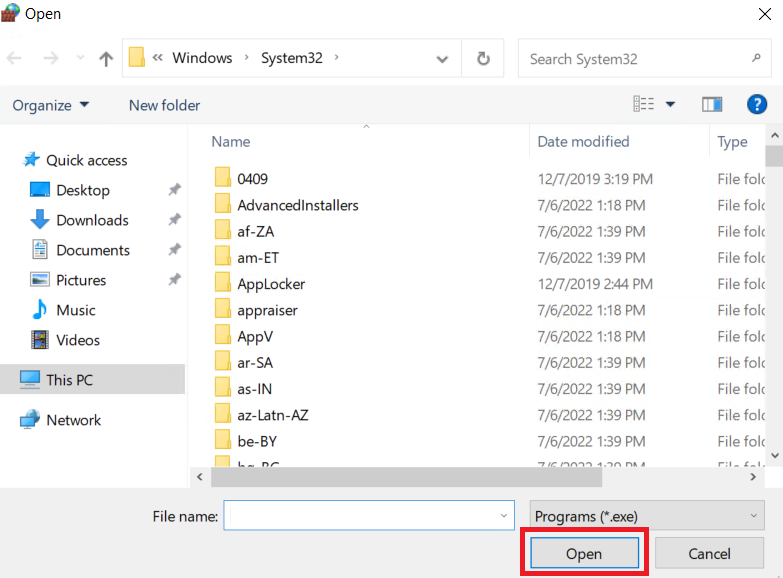
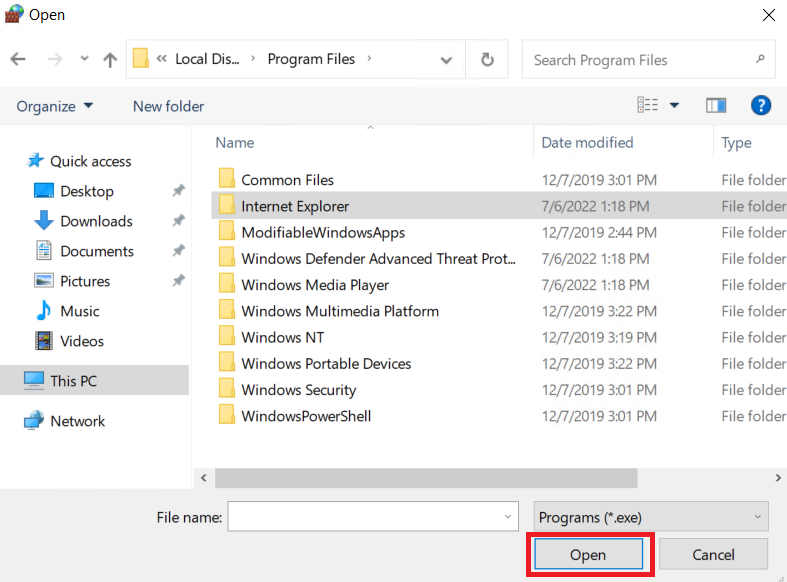
- In the Browse window, locate and select the ‘Ighub.exe’ file, then click on the ‘Open’ button.

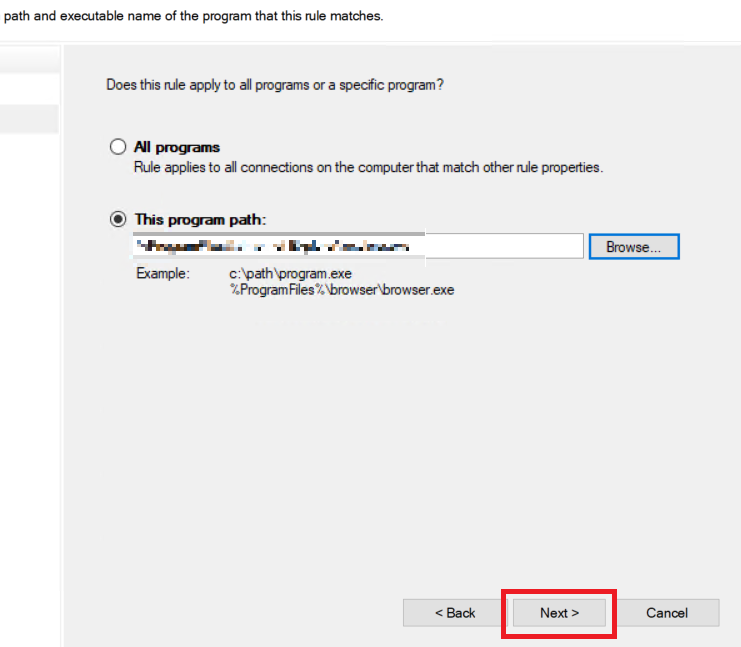
- Click on the ‘Next’ button to proceed.

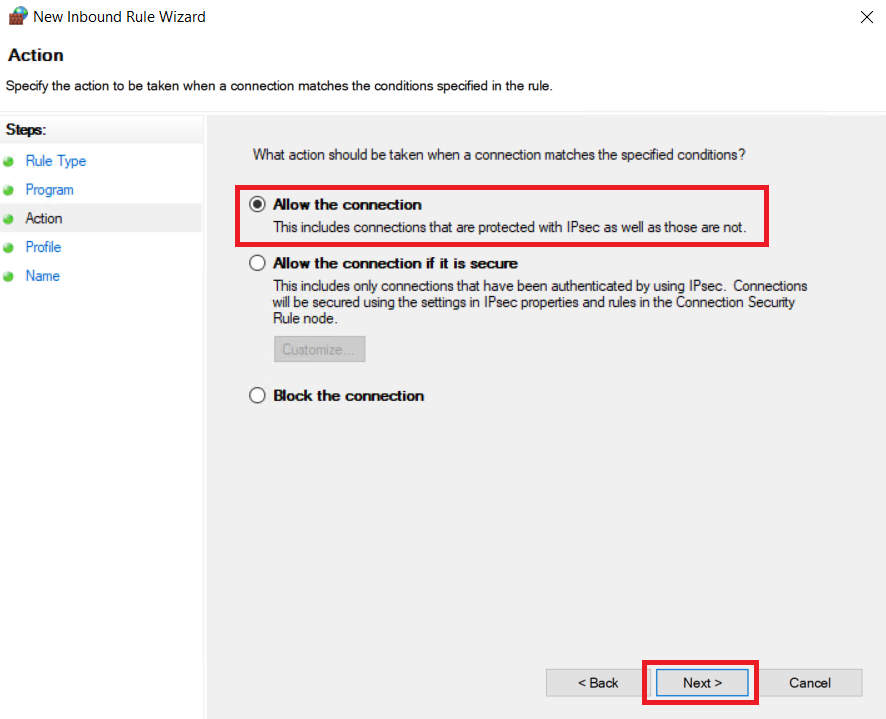
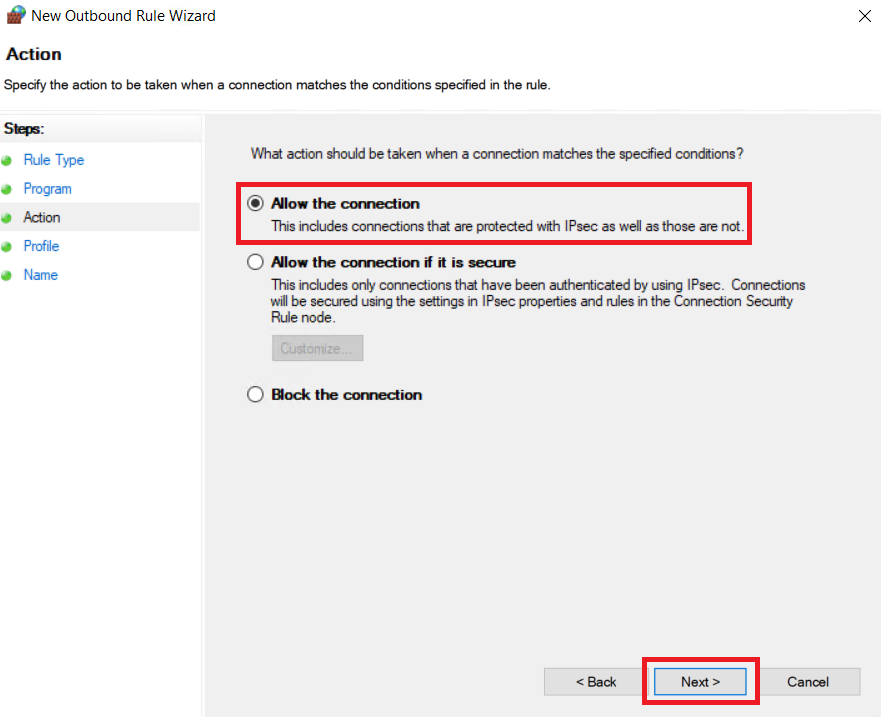
- In the Action window, choose the ‘Allow the connection’ option, then click on the ‘Next’ button.

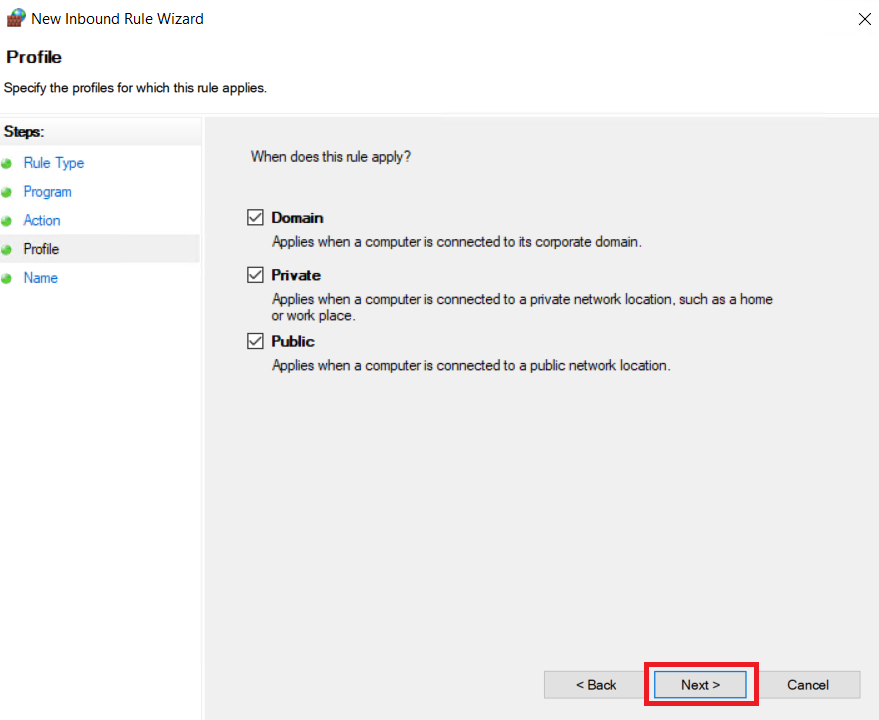
- Make sure that all the options are selected in the Profile window, then click on the ‘Next’ button.

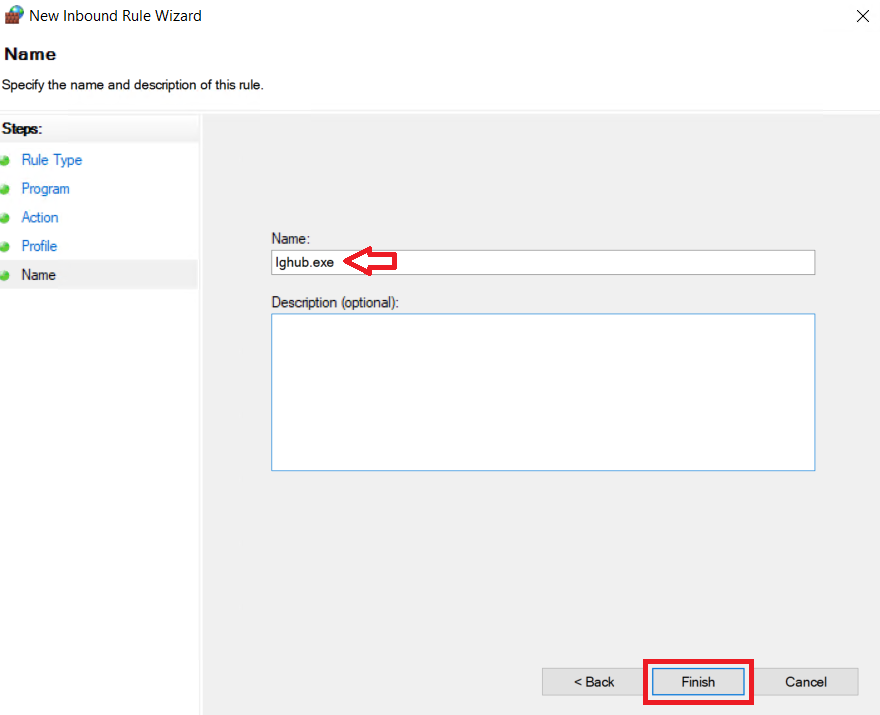
- In the Name field, type ‘Ighub.exe’, then click on the ‘Finish’ button to create the new Inbound rule.

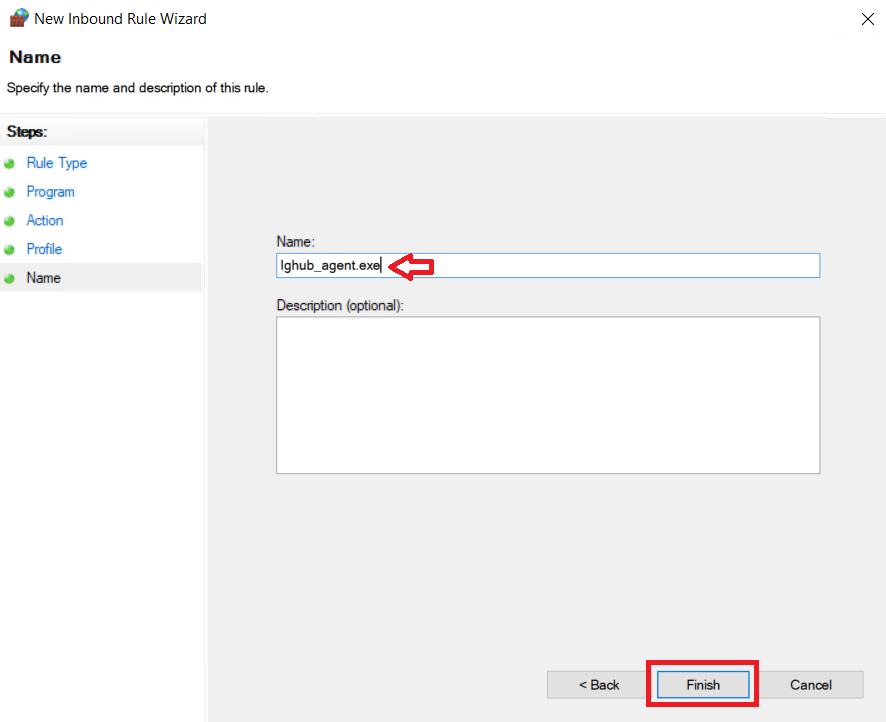
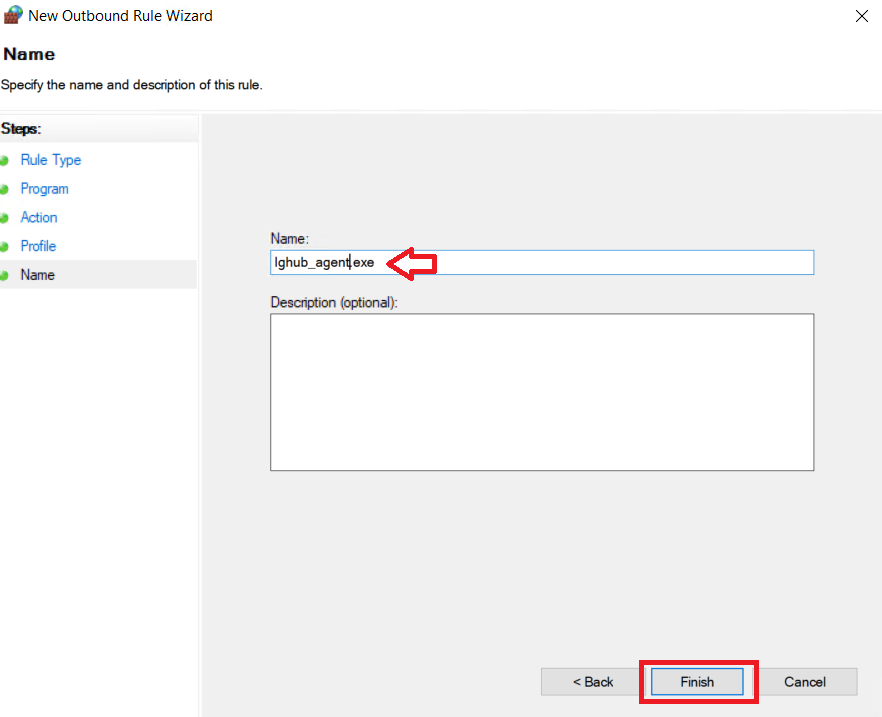
- Once the Ighub.exe rule has been created, then follow the Steps 5 to 11 again to create another Inbound rule for the ‘Ighub_agent.exe’ file. Finally, click on the ‘Finish’ button.

Delete and Create Outbound Rules
- Choose the ‘Outbound Rules’ option in the right pane, then try to locate and choose ‘Ighub’ entry in the center pane. If there is any Ighub entry in the Outbound Rules of the Windows Firewall, then click on the ‘Delete’ option in the left pane to delete the ‘Ighub’ rules.

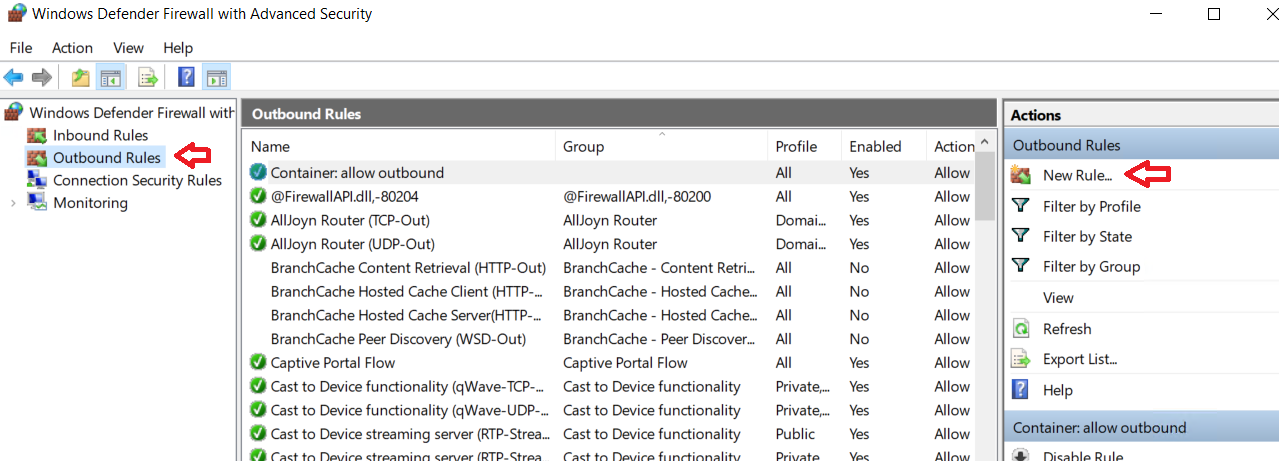
- After deleting the existing Ighub Outbound rules, click on the ‘New Rule’ option in the left pane.

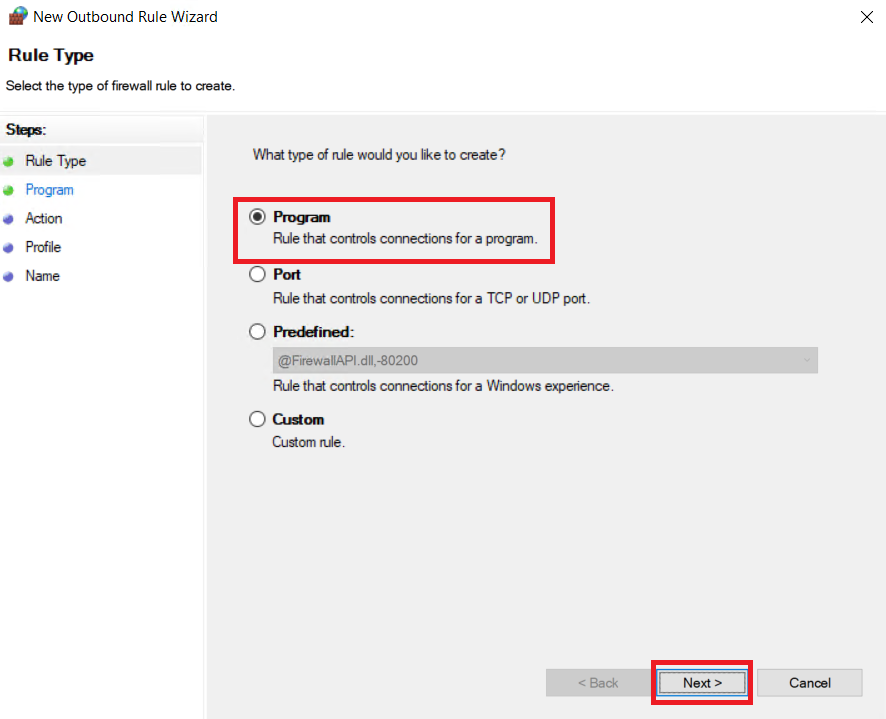
- In the Rule Type window, select the ‘Program’ option, then click on the ‘Next’ button.

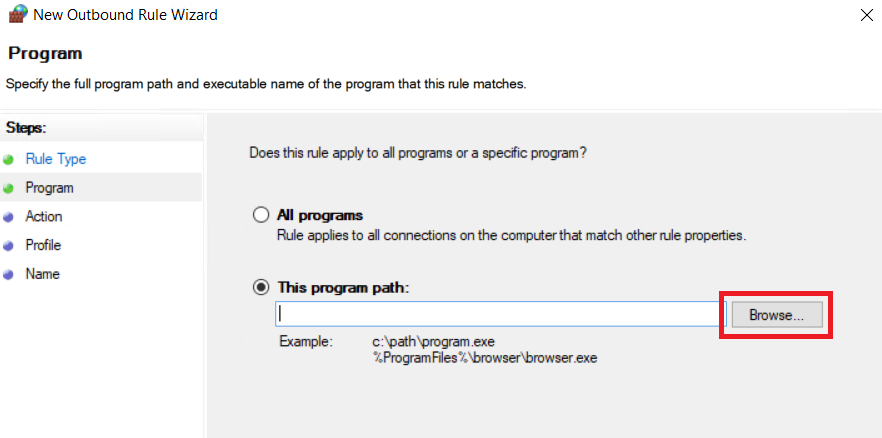
- In front of the ‘This program path’ field, click on the ‘Browse’ button.

- In the Browse window, find and select the ‘Ighub.exe’ file, then click on the ‘Open’ button.

- Click on the ‘Next’ button to proceed.

- In the Action window, select the ‘Allow the connection’ option, then click on the ‘Next’ button.

- In the Profile window, verify that all the options are checked, then click on the ‘Next’ button.

- In the Name window, type ‘Ighub.exe’ in the Name field, then click on the ‘Finish’ button to create the new Outbound rule.
- Once the new Ighub.exe Outbound rule has been created, then follow the Steps 15 to 21 again to create another Outbound rule for the ‘Ighub_agent.exe’ file. Finally, click on the ‘Finish’ button.
That’s it, now close all the opened windows on your computer and try to access the features of the Logitech G HUB community. You will find that your problem has been resolved.
AmitParticipantAs more and more Windows users are upgrading to Windows 11, they are experiencing compatibility issues with their favorite software and games, which they were previously running on Windows 10. One such game is Minecraft that is highly popular among gamers, but neither Microsoft nor Mojang (developers of Minecraft) have officially confirmed that Minecraft can run on Windows 11. Therefore, in this tutorial, we will answer, does Minecraft work on Windows 11 or not, and describe its installation process.
Minecraft System Requirements
Before you start to learn how you can launch Minecraft in Windows 11, you must be sure that your computer hardware is capable of running this game. Although Minecraft has been around from a long time, but its newer versions can be resource hungry. Therefore, it’s important to make sure that your computer is capable of running this game. Read the requirements table mentioned below for further details:

If your computer can run Minecraft on Windows 11 according to the above-mentioned requirements chart, then the following instructions can be helpful for you. In the next sections, you will learn how you can download and install Minecraft on Windows 11 OS.
Does Minecraft Work on Windows 11?
The quick answer to this question is, yes it does. However, there are two versions of Minecraft that you can install on Windows 11 and you will have to decide which one is the right one for you based on your preferences.
- Minecraft Bedrock: This version of Minecraft is specifically developed for Windows 10 and allows players to play with players on other devices, like Android, Xbox, Nintendo and iOS.
- Minecraft Java: This version of Minecraft uses Java which makes it suitable for cross-platform gaming on MacOS. Linux and Windows. Also, this Minecraft version is more resource hungry than Bedrock version.
For Java version of Minecraft, you will have to visit the official site, but you can get the Bedrock version from the Microsoft Store. In the next section, we will describe in detail how to download and install both the Minecraft versions on Windows 11.
How to Download Minecraft on Windows 11?
If you have decided which Minecraft version you want to install on your Windows 11, then we have described below the download and install process for both of its versions.
A) Download and Install Minecraft Bedrock Edition
You can get the Minecraft Bedrock edition directly from the Microsoft Store. Therefore, before following the below-mentioned steps you should sign-in into your MS Store account as you will need to download Minecraft app from there.
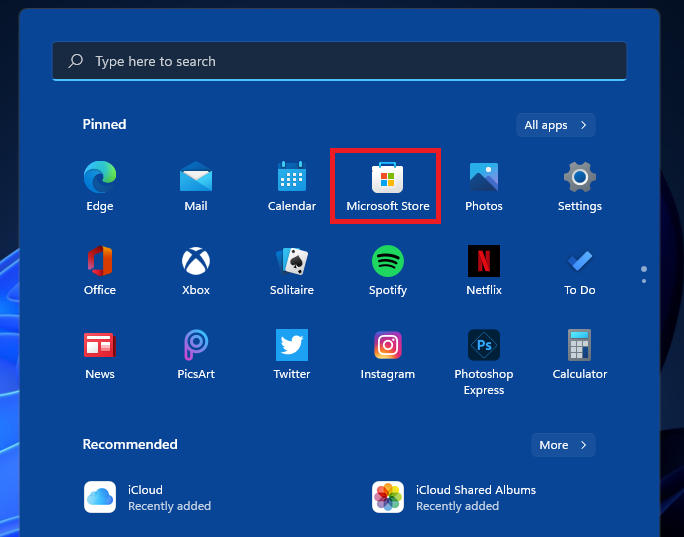
- Open the ‘Start’ menu in Windows 11 and click on the ‘Microsoft Store’ icon.

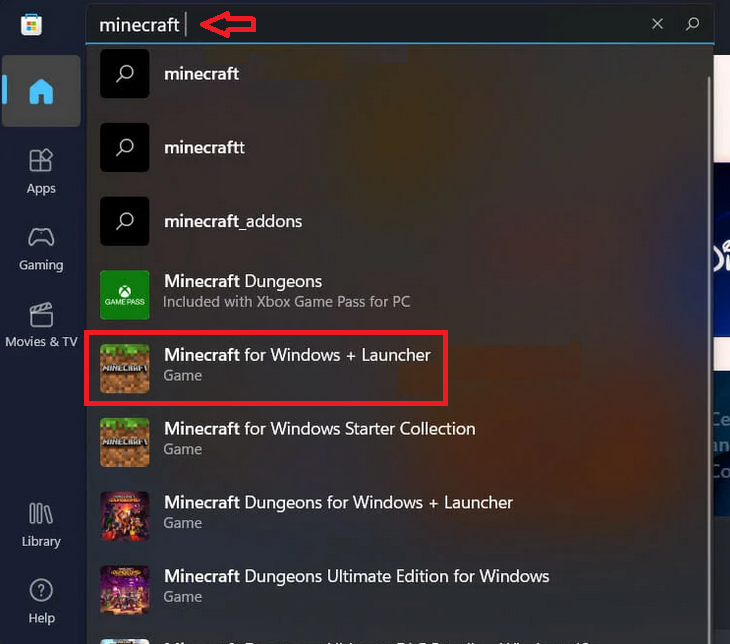
- In the MS Store search box, type ‘Minecraft’ and choose the ‘Minecraft for Windows + Launcher’ option from the search results.

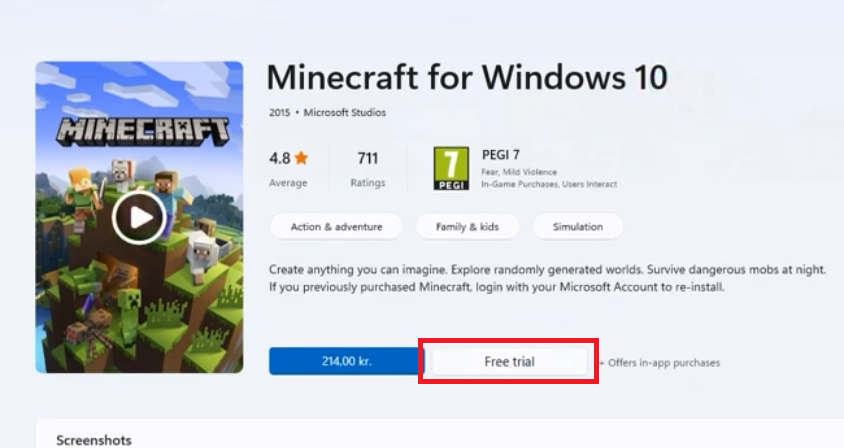
- Click on the ‘Free Trial’ button in the Minecraft app page so that you can try the game without paying for it.

After the Minecraft app is downloaded and installed, you can click on the Play button on the MS Store page of Minecraft to start the game on your computer.
B) Download and Install Minecraft Java Edition
Follow the steps given below to download and install Minecraft Java Edition on Windows 11.
- Go to Minecraft website, click on ‘Games’ and choose ‘Minecraft’ from the options.

- Click on the ‘TRY IT FREE’ link.

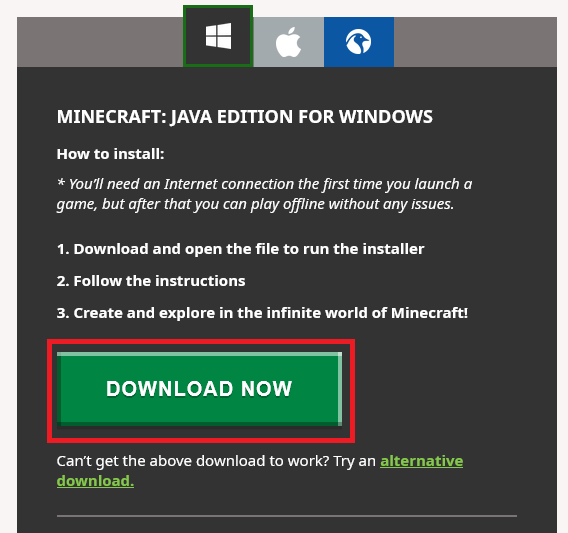
- In the Download page, scroll down to locate the ‘DOWNLOAD NOW’ button for Windows OS and click on it.

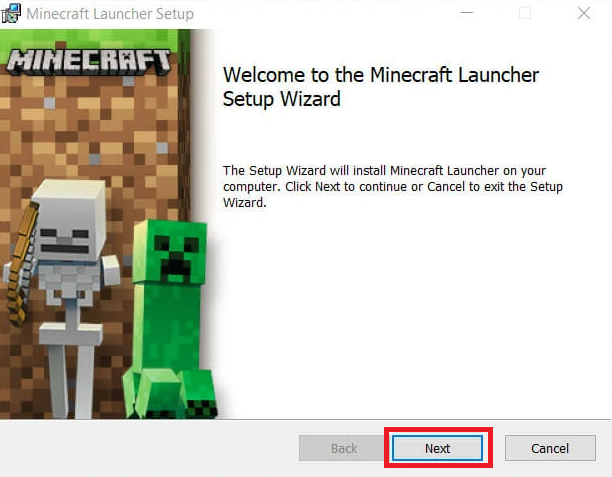
- Once the Minecraft Installer file is downloaded, double click on it to run the file.
- In the Welcome screen, click on the ‘Next’ button to proceed.

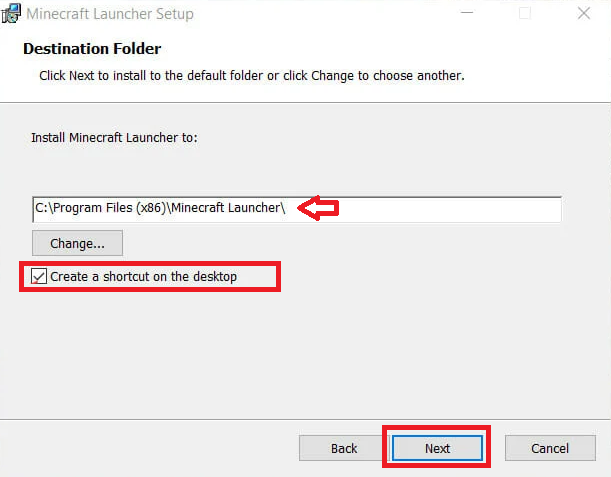
- Make sure that the install destination is correct and select the ‘Create a shortcut on the desktop’ option, then click on the ‘Next’ button.

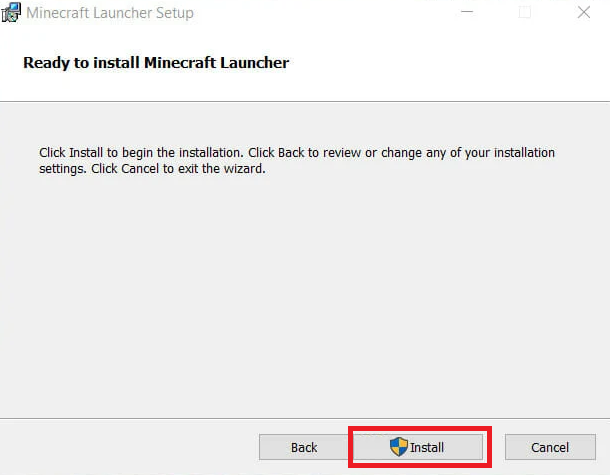
- Click on the ‘Install’ button and follow the prompts to complete the installation process.

You can use the desktop shortcut to run the Minecraft. Also, you must be logged-in to your Microsoft account to play this game.
Conclusion
Does Minecraft work on Windows 11, has a simple answer, yes. However, you must know which version is appropriate for you and how to install it properly? We have answered both these questions above.
AmitParticipantHave you been locked out of your Asus X507U BIOS and you don’t know how to enter without the password? Then, in this guide, we will tell you exactly what steps you need to take so that you can resolve this problem without creating any further problems with your computer system.
How to Reset Asus X507U BIOS Password?
If due to some reason you are unable to login into your Asus X507U laptop, then you will need another computer or laptop to perform the below mentioned steps. However, if your Asus X507U is working fine and you are only blocked out of your BIOS, then you will have to reboot your laptop a few times to complete the following solution. Follow the steps given below in the correct order to avoid any type of mistake:
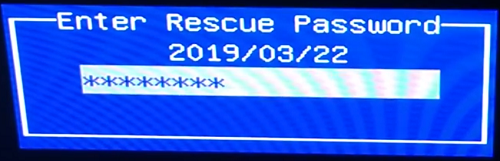
- Press the relevant keys on your laptop to reach the login password screen of your Asus BIOS. Finally, press the ‘Alt’ + ‘R’ keys together on your keyboard.

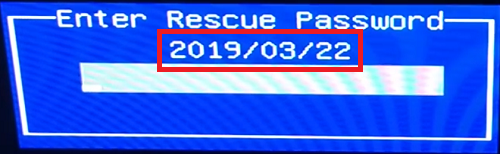
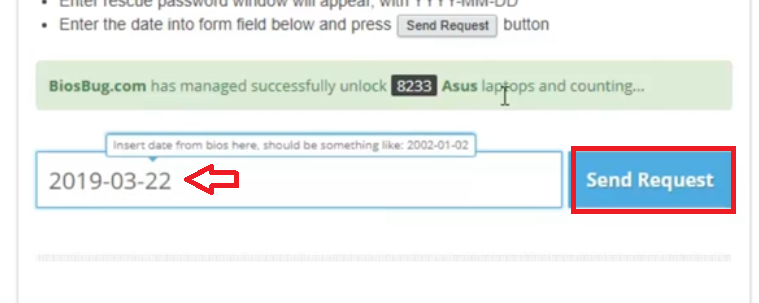
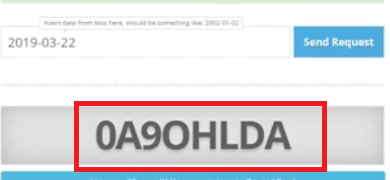
- You will see the ‘Enter Rescue Password’ box, where you will see a ‘Date’. Note down this date as you will need it in the future steps.

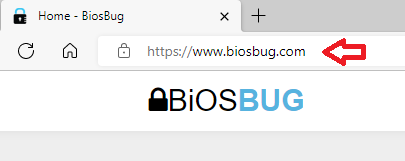
- Go to another computer or use the present laptop to visit BIOSBUG website.

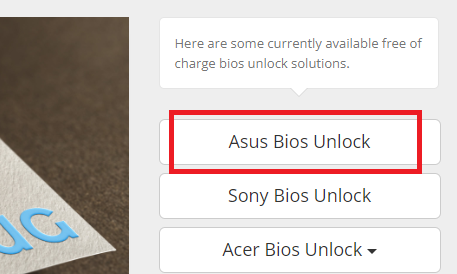
- In the homepage, locate and click on the ‘Asus Bios Unlock’ link.

- In the search box, type the date you noted in Step 3, then click on the ‘Send Request’ link.

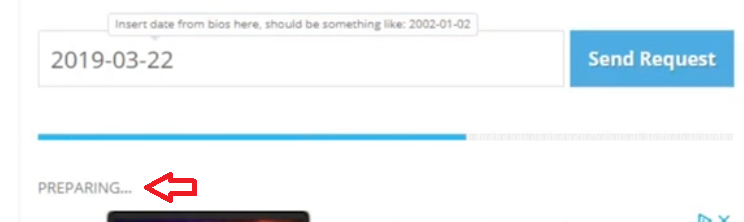
- Wait for the webpage to prepare for the calculation.

- Wait as the Rescue Password is being calculated.

- When the 8-digit Rescue Password has been successfully generated, then note it down for future use.

- Go back to the Step 3 screen and enter the Rescue Password you received in the previous step, then click on the ‘Enter’ button on your keyboard.

That’s it, you have successfully reset the Asus X507U BIOS password. The above-mentioned method can be used for all the Asus laptops and/or computers which support the ‘Alt + R’ function in their BIOS.
July 11, 2022 at 11:20 pm in reply to: How do I add new product Key I just Purchased to windows 7 Pro #33755AmitParticipantSometimes, Windows 7 users want to update their product key for upgrading or activating their OS. Although, Microsoft has tried to keep the process of changing the existing product key in Windows 7 simple and easy, but it can be troublesome for some users. If you are one such user who is thinking “how do I add new product key to Windows 7 pro?”, then we will answer this question in the following tutorial.
Why Change the Product Key of Windows 7?
Primarily, there are two reasons why a user might want to change or add a new product key to their Windows 7 OS.
- Activate Windows: Microsoft is highly vigilant when it comes to piracy and that’s why Windows OS has a habit of asking for your product key each time it gets suspicious of your existing product key. Also, if you have installed a trial version of the Windows 7, then you will have to enter the new product key to activate your OS version.
- Upgrade Windows: Sometimes users want to upgrade their Windows 7 Home edition to Windows 7 Professional or Ultimate edition. In such a scenario, you will have to purchase the product key for the new Windows edition and enter that key into your existing Windows version.
It doesn’t matter for which of the above reasons you want to add new product key to Win 7 Pro, the instructions given below will help you complete your task.
How Do I Add New Product Key to Windows 7 Pro?
There are two ways to add new product key to your Win 7 OS. We have described both these methods below.
Method 1: Using Control Panel
This is the simpler way of completing this task. Follow the steps given below in their correct order:
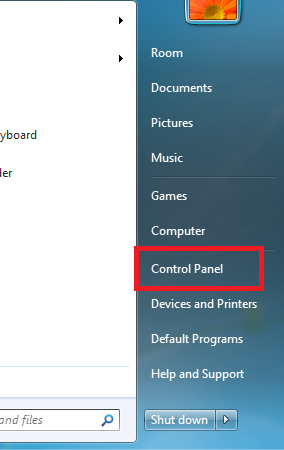
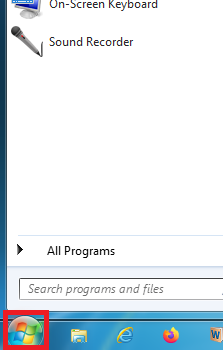
- Click on the ‘Start’ button.
- Click on the ‘Control Panel’ option.
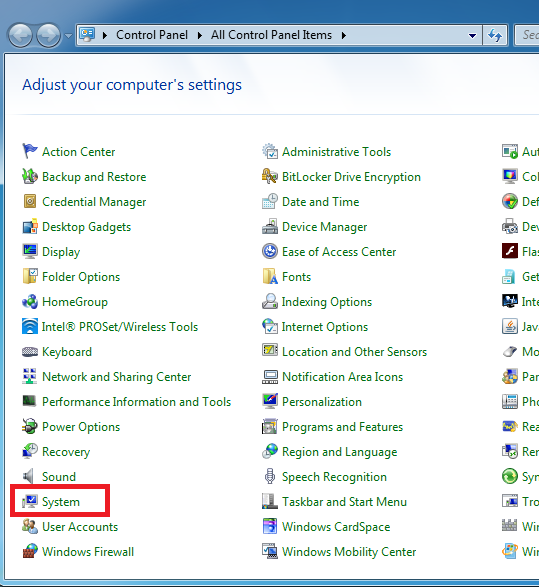
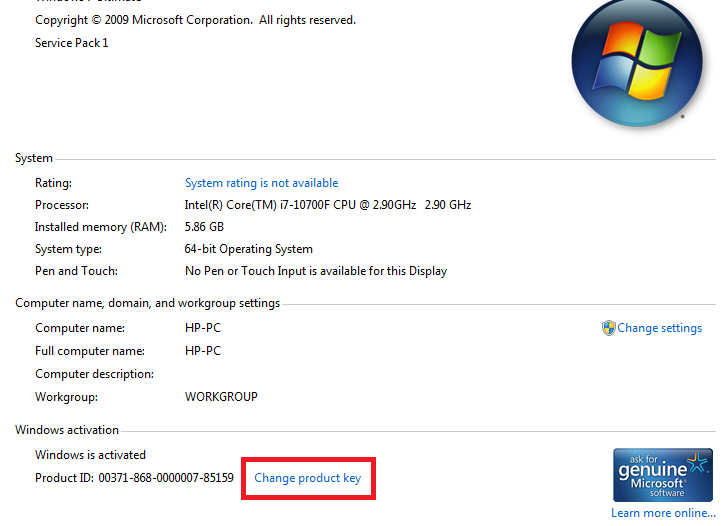
- In the Control Panel window, views in Small Icons mode, then click on the ‘System’ option.

- In the System window, scroll to find and click on ‘Change product key’ link.

You can enter the new product key to complete this task.
Method 2: Using Command Prompt
Sometimes the option to change the product key is unavailable in System page, then you can use the Command Prompt to enter the new product key for Windows 7. Follow the steps given below:
- Click on the ‘Start’ button.
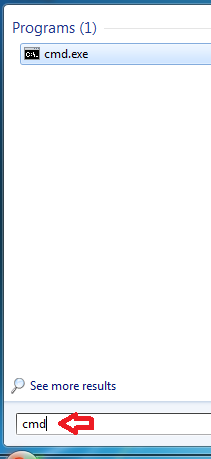
- In the search box, type ‘cmd’.
- In the search results, right click on the ‘cmd’ and choose ‘Run as administrator’ from the options.
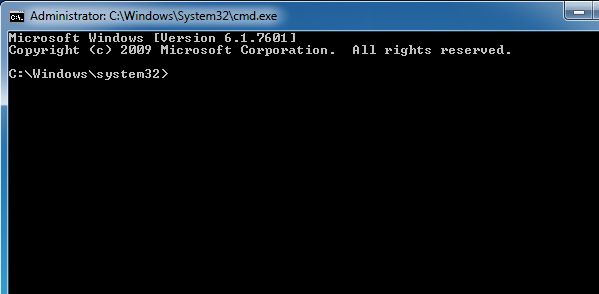
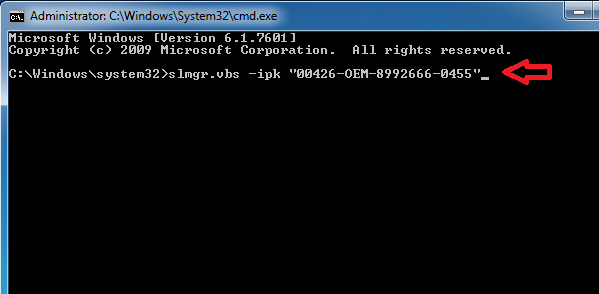
- Click on the ‘Yes’ button in UAC window to open the Command Prompt window. Make sure that you are in “C:\Windows\System32>” location.

- Type “slmgr.vbs -ipk “Input your product key”” command in the Command Prompt window. In our example, we have typed a fake product key, but you should type the one purchased by you. Finally, press the ‘Enter’ key on your keyboard.

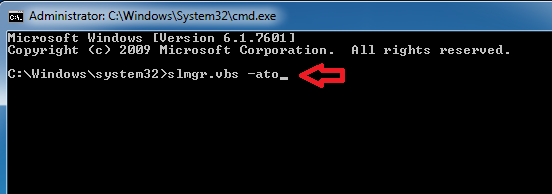
- Type “slmgr.vbs -ato” command in the Command Prompt window, then press the ‘Enter’ key.

That’s it, you have successfully added the new product key to your Windows 7 Pro.
If you were bothered about “how do I add new product key to Windows 7 Pro?”, then we hope you were able to change your product key by now.
- Type ‘control’ in the search box and click on the ‘Control Panel’ option in the search results.
- AuthorPosts