
Upgrades are an essential part of any operating system. Indeed, Windows 10 is no exception. It is well known that many times they solve problems and improve performance. However, occasionally these updates cannot be successfully completed. This results in an annoying warning like the one in the title of this post. Additionally, the computer waits a long time to undo the changes. This can be very irritating. But don’t worry, we will see how to fix it today.

Solution:
Follow the following solutions to fix this issue:
Using the Windows 10 troubleshooter
Windows 10 has an integrated tool that allows you to detect and correct certain problems. Consequently, we can also use it to solve upgrade problems.
- With this in mind, please press the Win+I combination to enter the Windows Settings. Once you’re there, please click on Update & Security.

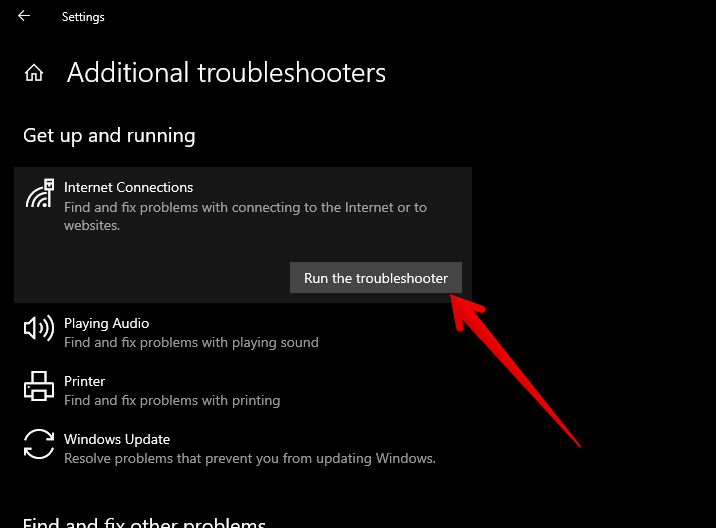
Now, in the left column please click on Troubleshoot. Then in the right menu, click on Additional Troubleshooters.

Next, you only have to look for the solution corresponding to Internet Connections and run it.

Uninstall problematic updates
As mentioned, upgrades often improve system performance. However, sometimes the effect is the opposite and usually triggers different errors. Therefore, one of the best options is to uninstall them. We will detail the process below. Please follow the same route as mentioned in the previous step. But when you get to Update, please click on View update history.

Now click on Uninstall Updates.

A window with the list of installed updates will be displayed immediately. Please click on the update to uninstall it. You can try it out until you get the problem.

Repair the error by deleting the contents of the SoftwareDistribution folder
This folder is located in the Windows directory. Its function is also to store temporary files that will be used to install Windows updates. When any of the files stored there are corrupted, the above-mentioned error may appear. Consequently, it is advisable to delete the contents of the folder. Under normal conditions, this should not be done. However, if it is giving problems with updates, then it is perfectly safe to remove it. The folder is located at this address:
C:\Windows\SoftwareDistribution
However, this folder cannot be deleted in the usual way. Since it is a system folder. For this reason it is necessary to stop some services. Don’t worry, you just have to launch a CMD with administrator privileges.

Then run these two commands one by one:
net stop wuauserv
net stop bits

Once the update services are stopped, you can delete the contents of the folder.

Then it’s time to start the Windows update services again. With this intention, please execute the following commands:
net start wuauserv
net start bits

Using the DISM tool to fix this failure
Windows 10 has a system image analysis tool called DISM. Its main function is to make a comprehensive analysis of the system and correct any errors in the image. In this way, the operation of the system is optimized. With this intention, please launch a CMD with administrator privileges and run the following command:
DISM.exe/Online /Cleanup-image /Restorehealth
Consequently, the tool will connect to the network and obtain some files to perform the action.
Starting App Readiness
This is a service that prepares the applications that are used for the first time in the computer. Enabling it may solve the problem with updates. Enabling it may solve the problem with updates. The first thing you have to do is enter Windows Services.
- With this in mind, press the Win+R combination and run the following command:
services.msc

- Now scroll down to get the App Readiness service. Please double-click on it.

- Please make the following changes: First change the startup type to Automatic. Then start the service for activation.


Repair this error with PowerShell
Finally, we will use the console to update the Wuau system. This is the service responsible for the self-update of the system. In addition, it runs in the background and checks for updates. What we will do is activate it manually with PowerShell with administrator privileges. With this in mind press the Win+X combination and run the option:

Once there, please run the following command:
wuauclt.exe /updatenow

In this way we have different methods to correct this annoying error. See you later!