
Have you ever experienced the frustration of your mouse moving on its own on your Windows computer? It can be incredibly irritating when your cursor jumps around the screen or clicks on things you didn’t intend to. Fortunately, there are several solutions to this problem. In this guide, I will explore the common causes of a this problem and fix mouse moving on its own problem in easy to follow steps.

Possible Causes:
There are several potential causes of a mouse moving on its own in Windows. Here are some of the most common ones:
- Dirty or Damaged Mouse or Mouse Pad: Dirt, dust, and debris can interfere with the sensor on the bottom of your mouse, causing it to move erratically. Additionally, a damaged mouse or mouse pad could also be causing the issue.
- Touchpad or External Devices: If you have an external mouse connected to your laptop or a touchpad on your laptop, it’s possible that they are causing the issue.
- Outdated or Corrupt Mouse Drivers: Outdated or corrupt mouse drivers can cause this problem. The easiest solution is to update your mouse drivers.
- Adjust Mouse Settings: Sometimes, the mouse sensitivity or acceleration settings can cause your mouse cursor to move on its own.
- Malware or Viruses: Malware and viruses can cause a variety of computer issues, including a mouse cursor moving on its own.
- Hardware Issues: In some cases, the issue may be caused by a hardware problem such as a faulty USB port or a damaged cable.
In summary, there are several potential causes of a mouse moving on its own. By following the solutions described in the next section, you can troubleshoot this issue, thus, allowing you to fix it and use your mouse without any further issues.
How to Fix a Mouse Moving on Its Own in Windows 11/10?
As you know by now that mouse cursor moving on its own problem can be caused due to several reasons, and I have described various solutions which cover almost all the reasons mentioned in the above section. If you know the cause of this problem on your computer, then you can follow the solution relevant to your cause. However, if you don’t know why mouse move on its own in your Windows, then read all the solution and follow them one by one.
Fix 1: Check Issues with Mouse and Computer Hardware
The first thing you should check for in your mouse is any sign of physical damage. If your mouse has been dropped or has visible damage, it may not be functioning properly. Check for any physical damage and try using a different mouse to see if the issue persists.
There are certain steps you can take if your mouse cursor is moving on its own depending upon whether you have a wired and wireless mouse.
1) For Wired Mouse:
To check the connectivity of your wired mouse to your computer, follow these steps:
- Check your physical connections: Make sure that your mouse is properly plugged into a USB port or any other designated port on your computer.
- Try a different USB port: If your mouse is connected through a USB port, then try plugging it into a different port. Sometimes, USB ports can become damaged or malfunction, causing connectivity issues.

Connect your USB cable to another USB port - Connect to another computer: If you have access to another computer, then connect your mouse to that computer. If mouse works properly, then there is something wrong with the mouse settings on your computer.

By following these steps, you can check the connectivity of your wired mouse with your computer and troubleshoot any issues that may be causing it to malfunction.
2) For Wireless Mouse:
To check the connectivity of your wireless mouse with your computer, follow these steps:
- Check the batteries: If your wireless mouse is not working, then the first thing to check is the batteries. Ensure that your mouse has fresh batteries and that they are installed correctly.

Make sure the power button is turned on from backside of the printer - Check the wireless receiver: Make sure that the wireless receiver of your mouse is plugged in securely and that it is not loose or damaged.

Connect the mouse receiver properly - Try a different USB port: If the wireless receiver of your mouse is connected through a USB port, then try plugging it into a different USB port.

Connect the mouse receiver to a different USB port


The steps mentioned above allow you to check the connectivity issues of your wireless mouse with your computer and resolve them.
Fix 2: Verify the Mouse Sensitivity Settings
There are two settings in Windows which directly impact the movement of the mouse cursor on your computer. One is the mouse pointer speed and the other is the touchpad sensitivity. I will describe below the steps to change both these settings to your liking and verify if the mouse moving on its own problem is because to these settings.
Step 1: Change Mouse Pointer Speed
First you should change the mouse printer speed on your computer. Since, your mouse pointer seems to be moving on its own, you should preferably reduce the pointer speed of your mouse. Follow the steps given below to complete this task:
- Click on the ‘Start’ button and choose ‘Settings’ from the menu.

Click on settings - In the Settings page, click on the ‘Devices’ option.

Click on devices - In the Devices page, choose the ‘Mouse’ option in the left pane, then under Related settings section, click on the ‘Additional mouse options’ link.

Click on the “mouse” from the left side pane - In the Mouse Properties window, choose the ‘Pointer Options’ tab, under the ‘Motion’ section, move the ‘Pointer’ to the slow side according to your preference. Make sure that the ‘Enhance pointer precision’ option is checked, then click on the ‘Apply’ and ‘OK’ buttons respectively to finalize the changes.

Click on pointer options


Once you have changed the pointer speed, don’t close the Devices page as the next step is also to be performed on this page.
Step 2: Change Touchpad Sensitivity
Follow the steps given below to change the touchpad sensitivity in your Windows:
- In the Devices page, choose the ‘Touchpad’ option in the left pane, then under Touchpad sensitivity section, click on the ‘down arrow’ to see the sensitivity options.

Click on the touchpad from left side pane - In the sensitivity options list, choose anything between ‘Medium’ or ‘Low’ sensitivity.


The impact of changing the mouse pointer speed and touchpad sensitivity can be immediately seen in the movement of your mouse cursor. If your mouse moving on its own problem is resolved, then these settings were causing this problem on your computer.
Fix 3: Update the Mouse Driver
There are two ways to update the mouse driver in your Windows. You can either update the drivers directly from the Microsoft Windows server, or you can visit the manufacturer’s website and download the latest driver for your mouse. I will discuss the first method below:
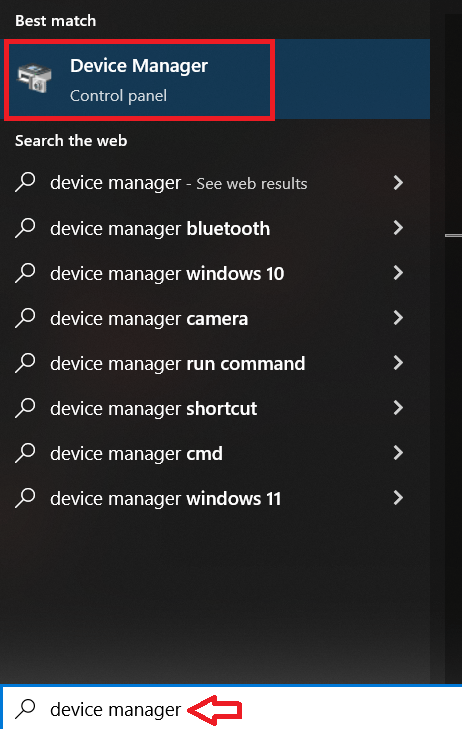
- In the Windows search box, type “Device Manager“, then click on the “Device Manager” option in the search results.

- In the Device Manager window, click to expand the ‘Mice and other pointing devices’ option, then right click your installed mouse and choose ‘Update driver’ from the options.

- In the Update Drivers screen, click on the ‘Search automatically for drivers’ option, then follow the onscreen instructions to complete the driver updating process.


After updating the mouse drivers, check whether the mouse moving on its own problem has been fixed or not. If the problem persists, then try the next solution.
Fix 4: Scan Computer with Anti-Virus Program
If this problem is caused due to some malware or virus infection, then you must scan your computer with a reputed antivirus program and resolve the issues found after the scan. There are multiple antivirus programs to choose from, but as an example, I am describing the steps for the Avast antivirus program. You can follow the similar steps with relevant changes for the antivirus program installed on your computer.
- Run the Avast antivirus program and in the home screen, click on the ‘Protection’ option.

- In the Protection section, click on the ‘Virus Scans’ option.

- In the Virus Scans screen, click on the ‘Full Virus Scan’ option to start the full scan of your Windows computer.

- Wait for the virus scan to complete and follow the relevant steps to resolve all the issues found on your computer.


Now that you have run a full antivirus scan of your computer and resolved all the issues found on your computer. Most probably, the mouse moving on its own issues would have been resolved if it was caused due to some malware or virus infection.
Fix 5: Update Windows 10 Operating System
Updating the Windows 10 operating system is also a reliable fix for mouse moving on its own problem. Follow the steps given below to complete this task:
- Click on the ‘Start’ button and select ‘Settings’ from the menu.
- In the Settings page, click on the ‘Update & Security’ option.

- In the Update & Security page, choose ‘Windows Update’ in the left pane, then click on the ‘Check for updates’ button.


Now that you have successfully updated your Windows 10 OS with its latest updates. You should check your mouse cursor movement and most probably its erratic movement would have stopped.
Moving a mouse on its own can be a frustrating problem, but it can be resolved with the right steps. I have shared several such solutions in this guide, by following these solutions, you can fix mouse moving on its own problem on your Windows computer and get back to using your computer without frustration.
