

Startup programs are actually background services that run specific programs automatically when the system starts or restarts. Windows has a startup folder where it organizes all the programs to start at the startup of the computer. Startup programs are also referred to as startup items, startup applications, and startup services. Windows provides the option to change the status by enabling or disabling a specific app or service from running every time the system boots up.
Why we need to disable the startup programs?
During the installation of software or an app, it automatically creates an entry in the startup. But if it is not really useful and we need to stop programs from running at startup then we can disable it. We can also disable some extra startup apps to speed up the slow computer. As the new computer boots up very fast but as time passes it get slower due to lots startup item entries. Some times we require to prevent programs from opening on startup to troubleshoot certain things.
How to disable startup programs in Windows 10


Simply we can easily disable the startup items by using the startup app utility preinstalled in the Windows 10. We can easily disable the apps from here by setting the status on or off. Apart from this there are other methods as well to change or manage the startup items. Lets know about the some easy methods to achieve it.
- Method 1: Disable Startup Programs using Startup Apps utility
- Method 2: Disable Startup Programs from Task Manager
- Method 3: Disable Startup Programs from Startup Folder
- Method 4: Disable Startup Programs using command prompt
Method 1: Disable startup programs using ‘Startup Apps’
You can use Startup Apps in Windows 10 to manage the programs that load during the computer boot-up process. Follow the steps given below to do this.
step 1: Type “Startup” in the search box and choose “Startup Apps” from the search results.


step 2: Now you will see the list of programs which are supposed to start when you boot your computer.

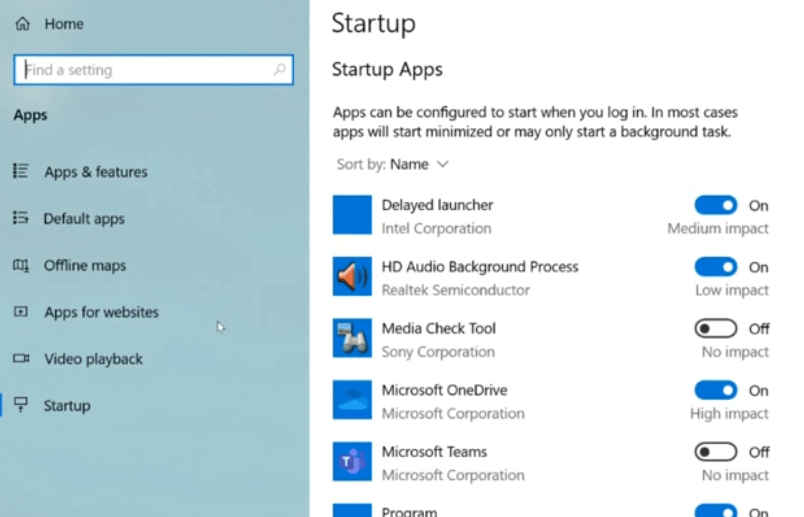
In front of each program, you will find ‘Low impact’, ‘Medium impact’ or ‘High impact’ written. High impact means that applications take longer to load, while Medium impact apps take less time and Low impact programs take least time among the three. This information can help you decide which program is slowing down the startup time of your computer more than any other application.

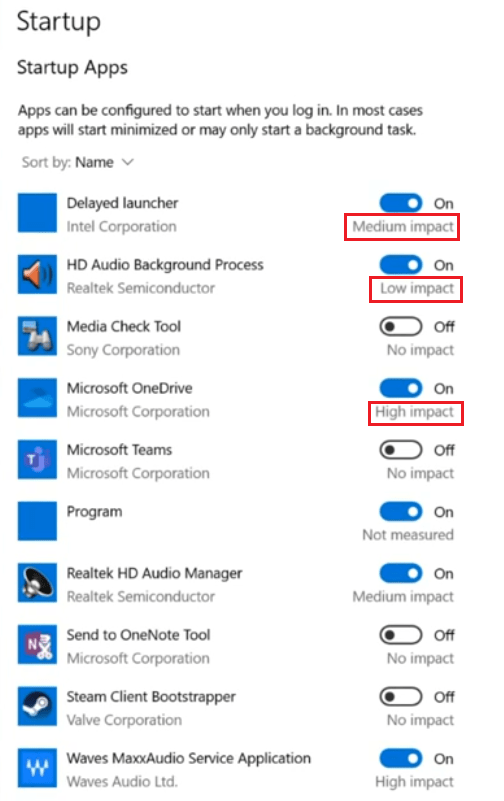
Step 3: Once you have decided which programs you want to disable on the list. You can move the “slider” in front of that program to “enable” or “disable” a program.
Step 4: After making your desired changes, click on the ‘Close’ button to finish the process.
That’s it, you have successfully disabled unwanted programs from the Windows 10 startup list. Next time you restart your computer these settings will take effect.
Method 2: Disable startup programs using ‘Task Manager’
You can disable startup programs through the Task Manager and we are going to describe the steps for doing this below.
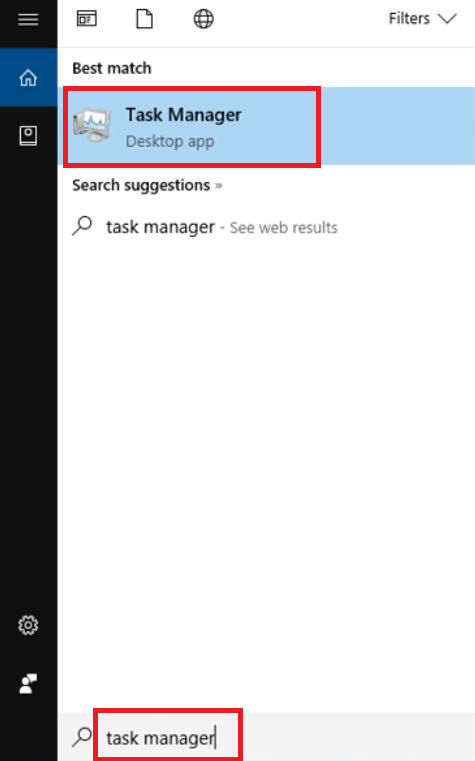
Step 1: Type “Task Manager” in the search box and select “Task Manager” from the search results.

Step 2: In the Task Manager window, click on the “Startup” tab.

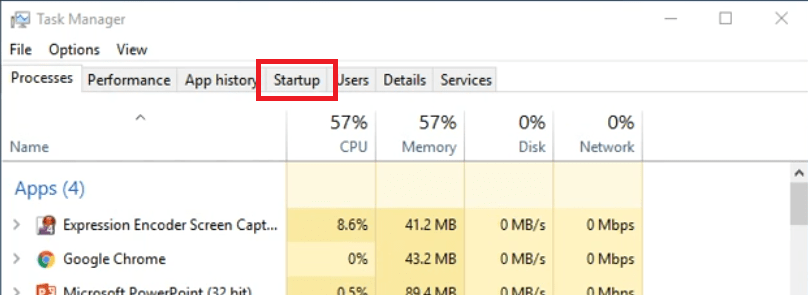
You can now see the list of programs on your startup list.

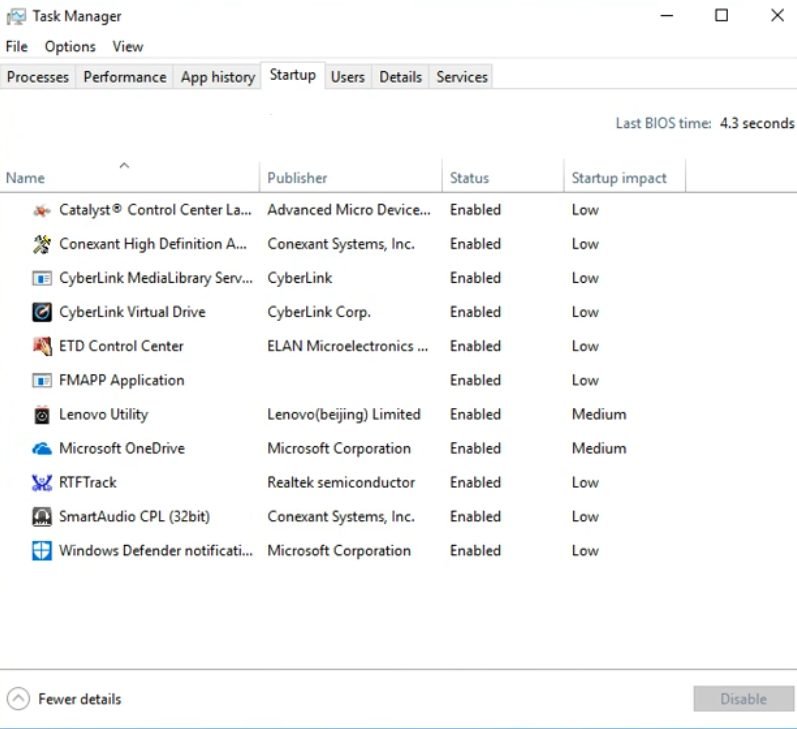
Step 3 : In the “Startup impact” column, you will find “Low“, “Medium” or “High” is mentioned. High means that the program takes most of the time to load during the computer boot-up, the Medium impact program takes less time and the Low startup impact app takes the least amount of time. Now, it will be easier for you to decide which programs to disable.
Step 4: Once you have decided which programs you want to disable. Choose that program from the list and click ‘Disable’ button on the bottom-right corner of the window. Do this one-by-one for all the programs you want to disable.

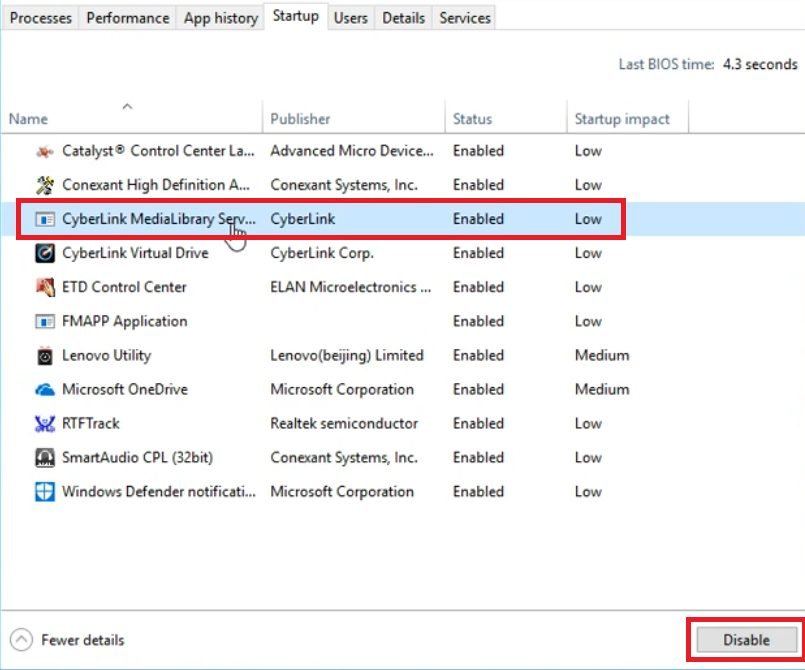
After you have made the necessary changes, click on the ‘Close’ button on the Task Manager. That’s it, you have disabled unnecessary programs from your Windows startup list successfully. These changes will take effect whenever you restart your computer.
Method 3: Remove startup program shortcuts from startup folder
Follow the steps below to remove the startup application shortcut from the startup folder. If you want to know where the startup folder is in Windows 10, Windows 7, so we have explained both locations here. Please see the steps below for more details.
Step for Windows 10, 8.1, 8
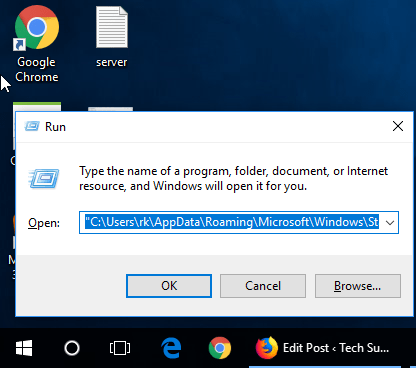
1. Press and hold the “Windows” key then + press the “R” key together. A run box will come up on the lower left side corner.
2. Type “C:\Users\<user name>\AppData\Roaming\Microsoft\Windows\Start Menu\Programs\Startup” command (with quotes) in the run box. Then click on OK. A system configuration window will come up. Replace “<user name>” with your username. In my case, the username is “user” so the final location would be: “C:\Users\user\AppData\Roaming\Microsoft\Windows\Start Menu\Programs\Startup” All the usernames will be listed under “C:\Users”. Or run the “shell:startup” command in the run box.
3. Here, right-click on the program’s shortcut that you want to delete and click on delete.


Steps for Windows 7, Vista, XP
- Press and hold the “Windows” key then + press the “R” key together. A run box will come up on the lower left side corner.
- Type “msconfig” command (without quotes) in the run box. Then click on OK. A system configuration window will come up.
- Click on the startup tab. All the startup programs are listed here. Tip: Ticked programs are the enabled ones and un-ticked are the disabled programs. Run the “shell:startup” command throughout the run.
- You can now un-tick unwanted programs under the startup tab if you want to stop opening up on startups. Then click on “OK.” It may be asking you to reboot the computer. We suggest you to please allow it to restart the computer to save all the settings that you have changed in the system configuration.
Method 4: How to disable startup programs windows 10 using command prompt
To stop startup program from Windows 10 you’ll have to follow the below steps:
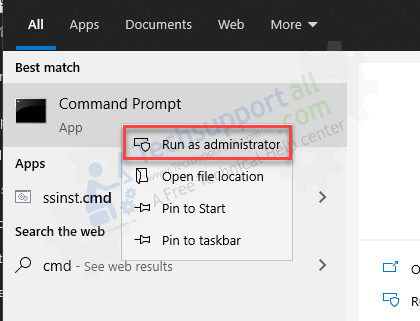
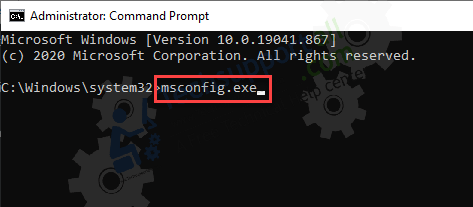
Open the command prompt as an administrator.

2. type there msconfig.exe and press the enter button from your keyboard. msconfig will open up.

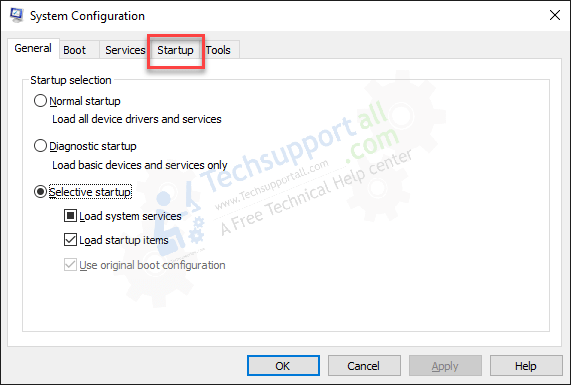
3. Click on Startup tab.

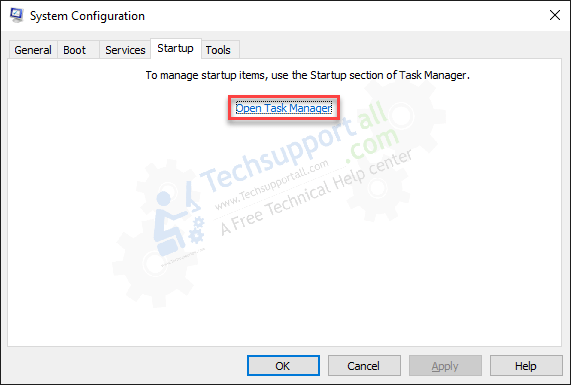
4. Right-click on the application you want to disable. Right-click on the application and choose the disable option.


Disabling resource-hungry startup programs is one of the simplest ways to speed-up a slow your computer. Now you know how to disable startup programs on a Windows 10 computer. If you wisely choose the apps you want to disable, then you will surely see some improvement in the speed of your computer.
Precautions to be Taken While Disabling Startup Programs
Disabling startup programs can improve the speed of your computer, but you must take some precautions as well. As some programs are necessary to be running at startup like antivirus service or some other Windows necessary services otherwise it could result in malfunctioning of the system.
- Choose Apps Wisely: When an application starts at computer boot-up it’s faster to access as it resides in the RAM of your computer. This is really useful for applications you use regularly. Disabling such an app in the startup list will slow down that application. Therefore, don’t disable apps which you need for everyday work.
- Avoid Critical Apps: Certain apps like antivirus, audio device software, etc. are critical for the proper functioning of your computer. Avoid disabling such apps on the startup list.