


CHKDSK (check disk) is an important and powerful utility provided by Windows which can be used to diagnose and if possible repair storage disk issues. This tool verifies the health of disk drives by running multiple scans that test the functionality and soundness of the drives. However, before you start using CHKDSK to monitor and maintain the health of your disk drives you must know all the benefits and risks associated with this tool. Therefore, in this guide, we will not only describe how to scan & fix hard driver issues with CHKDSK in Windows 10, but also suggest the necessary precautions you should take to avoid potential risks.

How CHKDSK Command Works
CHKDSK analyzes the integrity of the file system on the drive by running a thorough scan. While scanning the drive this utility checks the files, file metadata and file system. This tool finds logical file system errors and moves data to safer areas of the drive so that data remains undamaged. Since every hard drive is divided into logical sectors which store data, the CHKDSK tool scans these sectors for errors. This utility fixes soft errors by rewriting the corrupt data and marks hard errors as damaged so that no new data can be saved on them in the future.
CHKDSK is one of the oldest repair utilities bundled with Windows OS. However, over time it has gone through a lot of updates and upgrades, thus, making it faster and more efficient than its previous versions. Also, this tool is one of the few tools which can properly repair a drive ranging from the size of a floppy disk to a multi-terabyte SSD drive.
How to Scan & Fix Hard Drive Issues with CHKDSK in Windows 10
There are three ways you can run the CHKDSK utility on Windows 10.
The most common and the recommended way is to use it through command prompt, but we will describe the other two methods as well, so that you can make an informed choice.
Method 1: Run CHKDSK using Command Prompt
The best way to use CHKDSK tool is through the Windows command prompt. You have a lot of parameters to use, which we will discuss in-detail in a separate section below. First, let’s see how to run CHKDSK using the command prompt.
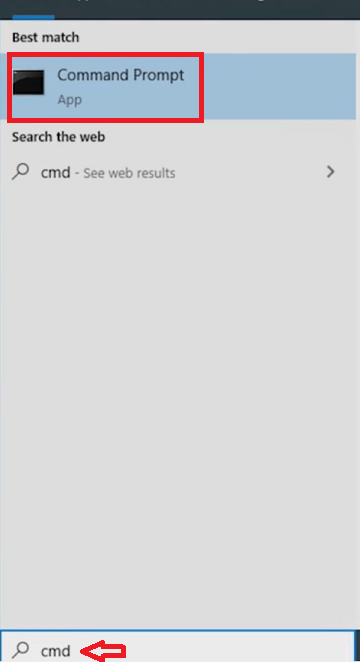
- Type “cmd” in the search box and you will see “Command Prompt” in the results.
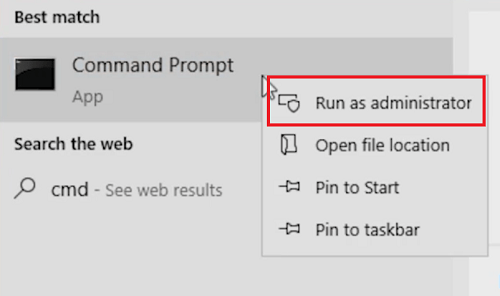
- Right-click ‘Command Prompt’ and choose ‘Run as administrator’ option.
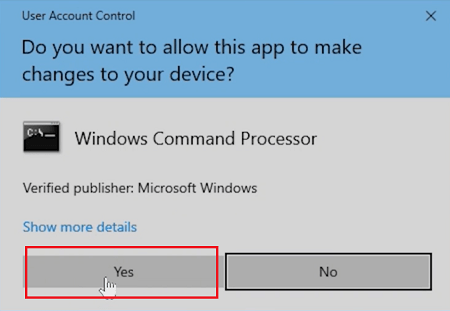
- Click on the ‘Yes’ button to give the necessary permission.
- Type ‘chkdsk’ in the command line and press ‘Enter’.
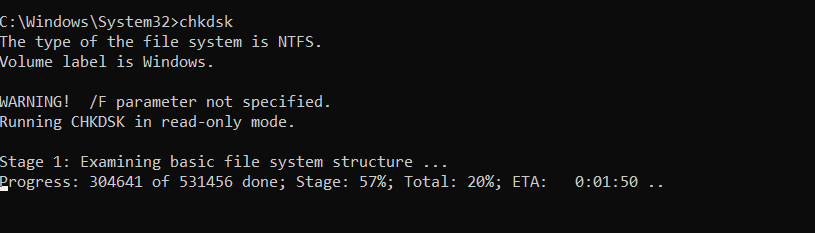
- This will start the disk scan process. Wait for it to complete. After the scan process is completed you can see the complete report.
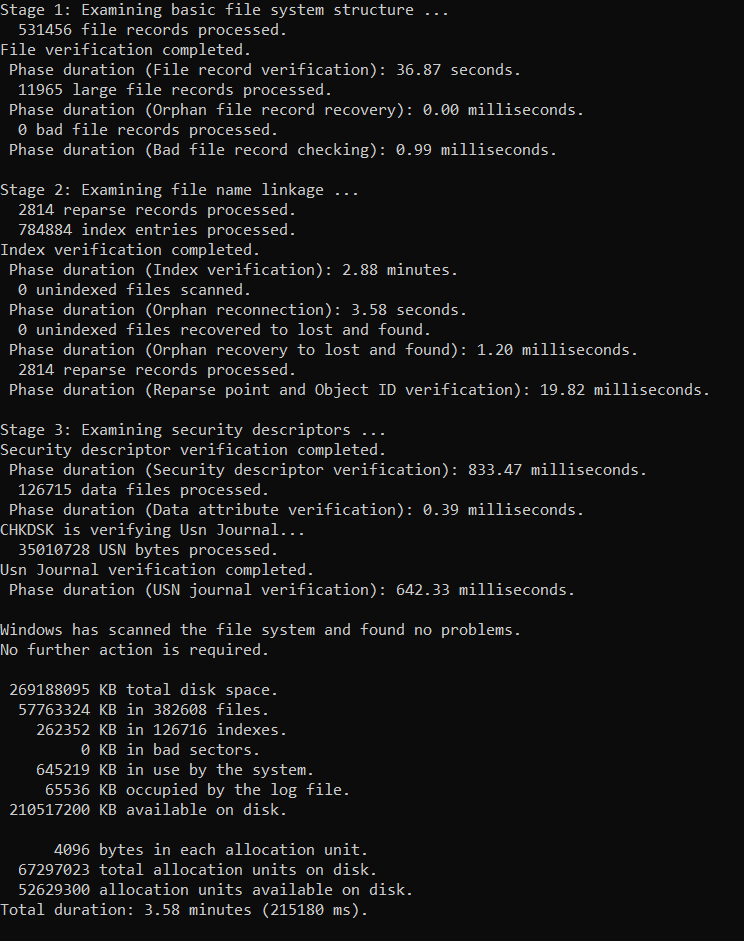
- However, the plain ‘chkdsk’ command doesn’t fix any problem or repair anything. For that you will have to run the CHKDSK tool with some additional parameters.


Method 2: Run CHKDSK using the User Interface (GUI)
You can run CHKDSK utility through Windows GUI. Although running this utility through GUI doesn’t offer you the same versatility as the command prompt, it does the needful. Follow the steps given below to run CHKDSK through Windows GUI.
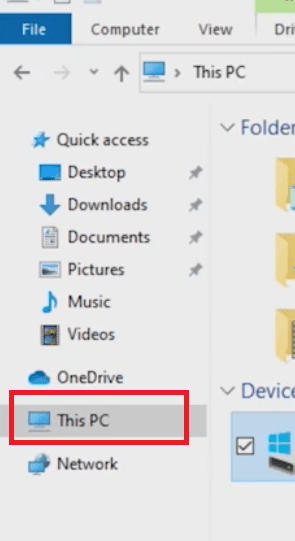
- Click on the ‘File Explorer’ icon and in the File Explorer window click on ‘This PC’.
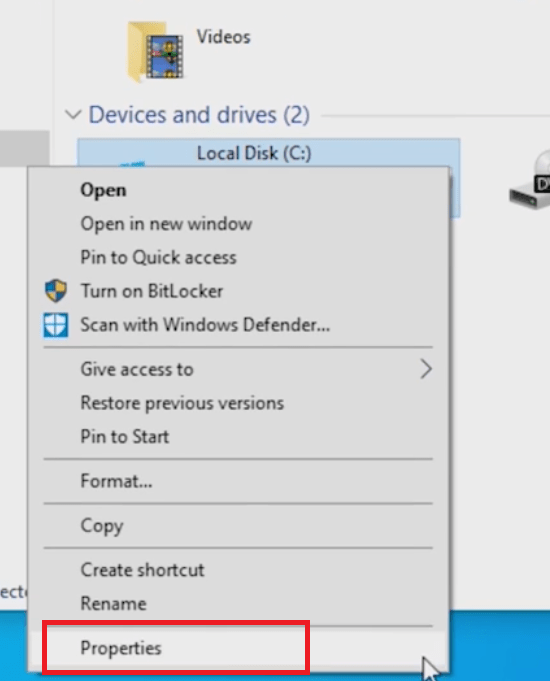
- Right-click the drive you want to scan and choose ‘Properties’ from the options.
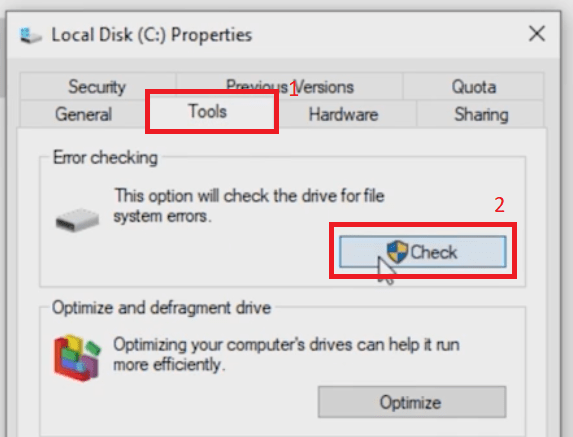
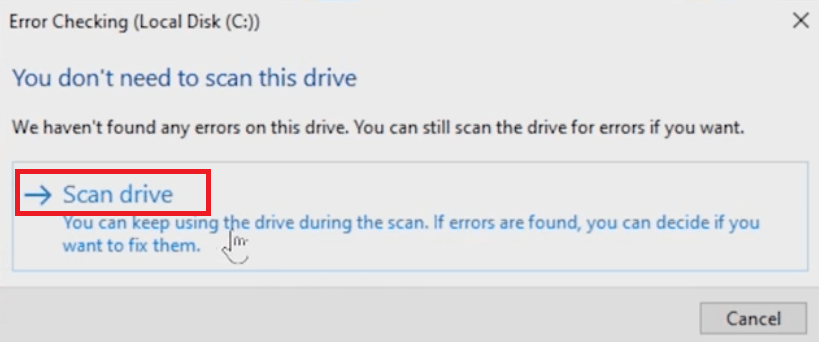
- In the Properties window, click on the ‘Tools’ tab, then click on the ‘Check’ button under ‘Error checking‘.
- Now select the ‘Scan drive’ option and wait for the drive scan to complete.


Method 3: Run CHKDSK through system recovery mode
Running CHKDSK through Windows Recovery is useful in three instances: a) when your computer is unable to boot, b) when you are starting your computer by using Windows recovery media, and c) through Windows Settings. In this example, we will discuss the method to use it through Windows Settings.
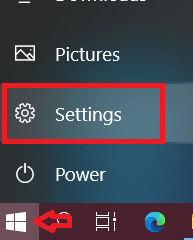
- Click on the ‘Start’ button and choose ‘Settings’ from the list.
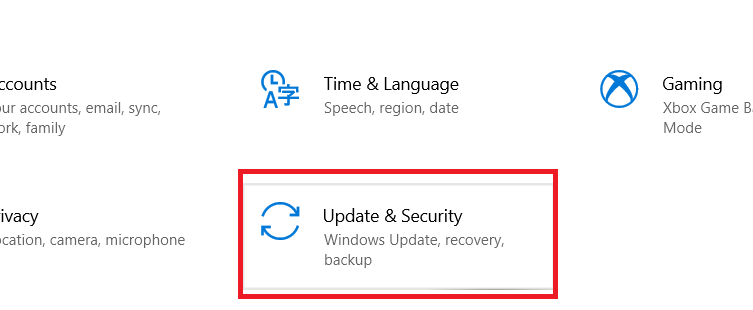
- In the Settings page, click on the ‘Update & Security’ option.
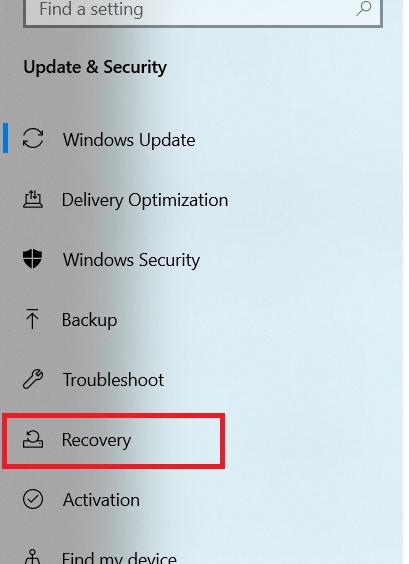
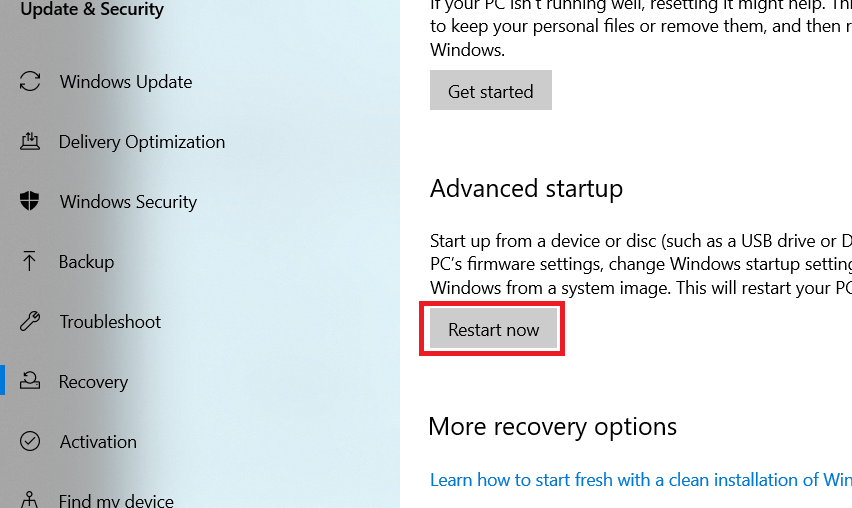
- Now select the ‘Recovery’ option from the list.
- In Recovery page, click on ‘Restart now’ button below Advanced startup section.
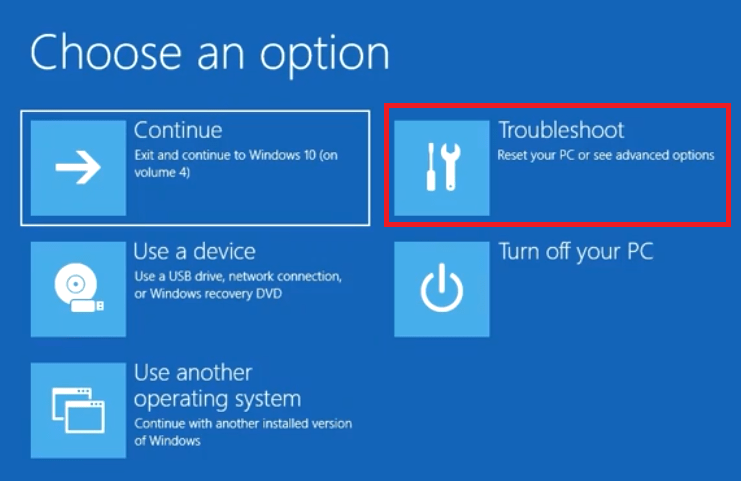
- Choose ‘Troubleshoot’ from the available options.
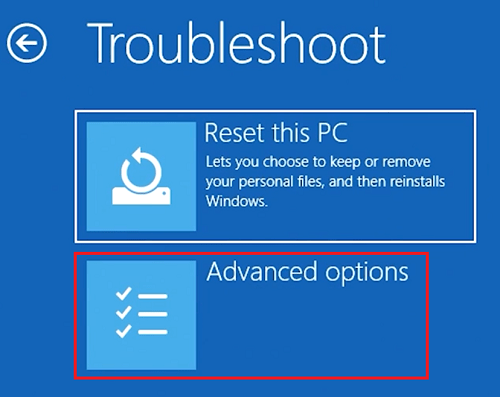
- Under Troubleshoot, click on ‘Advanced options’.
- Under Advanced options, click on ‘Command Prompt’.
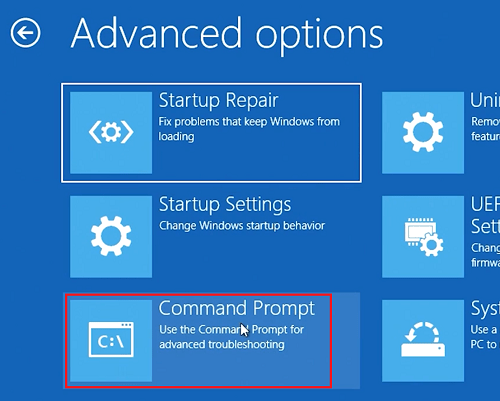
- This will open the Command Prompt window. Now, you can run CHKDSK utility as you would in the Command Prompt.


How to Use CHKDSK on Boot Drive
Boot drive is the drive on your computer which the Windows OS uses to boot itself. Therefore, when you try to run CHKDSK on the boot drive its unable to unmount this drive as it would result in the shutting down of your computer.
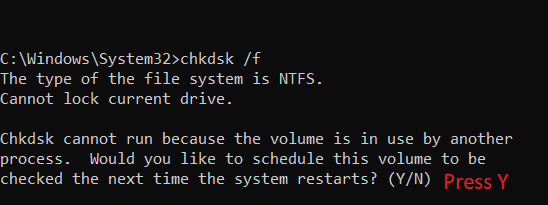

CHKDSK asks for your permission to check the Boot Drive the next time you restart your computer. You should give this permission by pressing the ‘Y’ key. So, the next time you start your computer the CHKDSK tool will run before loading the operating system and will have complete access to the Boot Drive. You can read the complete details of the actions performed and summary of results in the log file afterwards.
Additional Parameters of CHKDSK command
Apart from keeping your drives healthy and your data fully secure, the CHKDSK tool, also speeds-up your Windows 10 computer. However, you can get these benefits from CHKDSK utility only when you know which parameters to use.
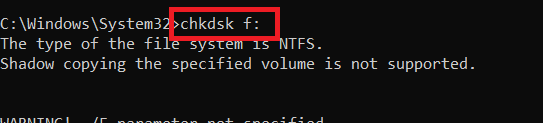
- Drive Volume: By using this parameter you can specify a drive for checking. By default, the chkdsk command checks the current drive in command prompt, but if you want to specify some other drive, then you can use this parameter. You need to type ‘chkdsk’ followed by the ‘drive letter with a colon’. For example, the image below shows how to run CHKDSK on F-drive when current drive in command prompt is C-drive.
- /f: The ‘f’ in this parameter stands for ‘fix’. This parameter is used to fix error on the specified drive. CHKDSK will ask for the permission to dismount the drive before it can fix the errors. You will have to choose ‘Y’ if you want to proceed. After completing the fixing process you will get the complete report.

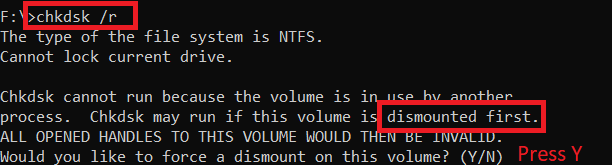
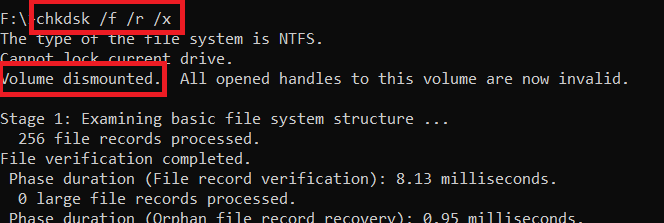
- /r: The ‘r’ in this parameter stands for ‘repair’. This parameter is used to repair the errors on the drive. The difference between ‘/f’ and ‘/r’ is simple. The ‘/f’ parameter will only check and fix the file addresses on the drive, but ‘/r’ will check and repair the file contents as well. Therefore, for this parameter also CHKDSK will ask for the permission to dismount the drive and you will have to choose ‘Y’. Complete report will be shown after the completion of the repair process.
- /x: This parameter is used to dismount the drive. This parameter can be used separately or with other parameters as it saves you the time to give special permission for dismounting the drive, like with /f and /r parameters.


The above mentioned parameters are most commonly used with CHKDSK tool. Apart from them there are some less used parameters, which are mentioned below.
- Path and FileName: This parameter is for FAT and FAT32 file systems, so it will be not useful for Windows 10 users. However, if you want to check an old external drive, then you can use this parameter with ‘chkdsk’ command followed by the file path and/or name. You can specify multiple files by using ‘?’ and ‘*’ characters.
- /v: This parameter displays the name of each file when the disk is checked.
- /i: This parameter can be used only with NTFS file system. By using this parameter you can speed-up the CHKDSK process as it performs a less vigorous check.
- /c: This parameter also reduces checking time by skipping the checking of cycles within the folder structure. You can use this parameter with only NTFS file system.
- /b: This parameter is only available for NTFS file system. It re-scans newly allocated and free clusters for errors and clears the existing bad clusters.
- /I [Size]: This parameter limits the size of the log file to the size you specify. It can be used with NTFS file system.
- /?: Using this parameter you can see the help file with the list of parameters supported by the CHKDSK tool.
- Multiple Parameters: For example, you can use /x with /f and /r and all the process will complete without asking for any further permission. In the same way you can use multiple parameters together to save your time and effort.

Possible Risks of Running CHKDSK on Disk Drives
CHKDSK is really helpful in detecting bad sectors and fixing disk errors, but when this tool is misused, then it may cause irrecoverable damage to the disk drives. Therefore, before running CHKDSK on your computer you must be aware of the risks involved so that you can avoid those situations.
- After Data Loss: If you have accidentally deleted some important files from your computer which you may want to recover later on, then you should avoid running CHKDSK. That’s because after the file deletion the sector where the file was stored will be marked as free or available. In such a scenario, when you run CHKDSK it will move the files from the corrupted or bad sectors to the available free sectors, like the sectors from which the files got accidentally deleted. Therefore, any chance of recovering the accidentally deleted files will become zero and files will be lost forever.
- After Physical Damage: Sometimes data corruption in the drives is caused due to physical damages. If such is the case with your drive, then you should avoid using CHKDSK tool. That’s because the CHKDSK tool will try to scan your drive and in a physically damaged drive this can be a fatal mistake. You will forcefully subject your physically damaged drive to further damage.
- After Virus Attack: In case you have detected a virus or malware attack on your computer, then you should avoid using CHKDSK. That’s because CHKDSK will find and erase the corrupted files without trying to repair them. This can be damaging for your computer if such files are important files needed for the proper working of your computer. Therefore, before running CHKDSK, you should run an anti-virus or an anti-malware program to repair infected files.
- Avoid Large Drives: When scanning a large drive, CHKDSK may take plenty of hours to complete the whole process. However, anything can happen during this time which can further damage the drive. Therefore, it’s better to not use CHKDSK tool on large capacity disk drives.
CHKDSK is a native Windows tool and that’s why it’s safe to run on most occasions, but we have shared some scenarios where running this tool can prove to be risky.
Now you know how to scan & fix hard drive issues with CHKDSK in Windows 10. This tool is an extremely powerful tool for analyzing and repairing hard drives. However, before running this tool on a drive you should make sure that there are no risks involved. Also, despite this amazing tool the best and simplest way to secure your data is to take regular back up.