

Safe Mode is a Windows diagnostic tool that allows you to troubleshoot problems on your computer. This boot mode offers you a stable environment to narrow down the cause of the problem on your computer. You can use Safe Mode with additional features like support for Networking and Command Prompt. However, many users don’t know how to boot Windows Safe Mode with additional features. In this guide, I will explain how to boot / start Windows in ‘Safemode with Networking’ in Windows 7, 8, 9, 10, 11 OS versions.


How to Boot / Start Windows in “Safemode with Networking” in Windows 7, 8, 8.1, 10, 11
It can be tricky for many users to get to the screen where they can choose from all the supported Windows boot options. Therefore, in this section, I will describe how to boot / start Windows 7, 8, 10, 11 in Safe Mode with Networking diagnostic mode. Find the steps which are applicable for your Windows version and execute them in the exact order to get desired results.
Steps for Windows 7
If you are using Windows 7 OS, then follow the steps given below to restart your computer in Safe Mode with Networking:
- Click on the ‘Start’ button, then choose the ‘Shut down’ option and select the ‘Restart’ option.
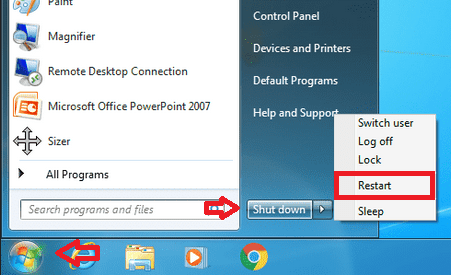
- When your computer is booting-up, press and hold the ‘F8’ function key on your keyboard, unless you see the ‘Advanced Boot Options’ screen.

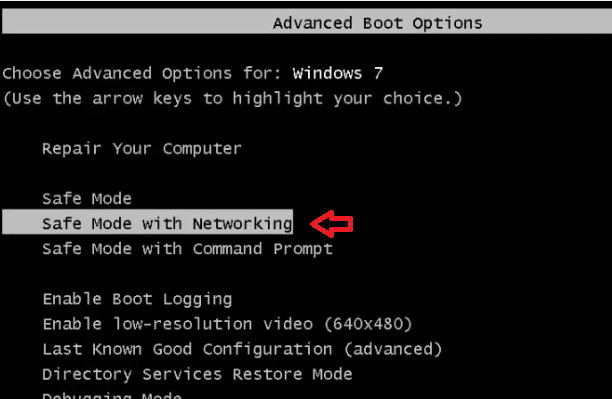
- In the Advanced Boot Options screen, use the down arrow key of your keyboard to select the ‘Safe Mode with Networking’ option, then press the ‘Enter’ key.
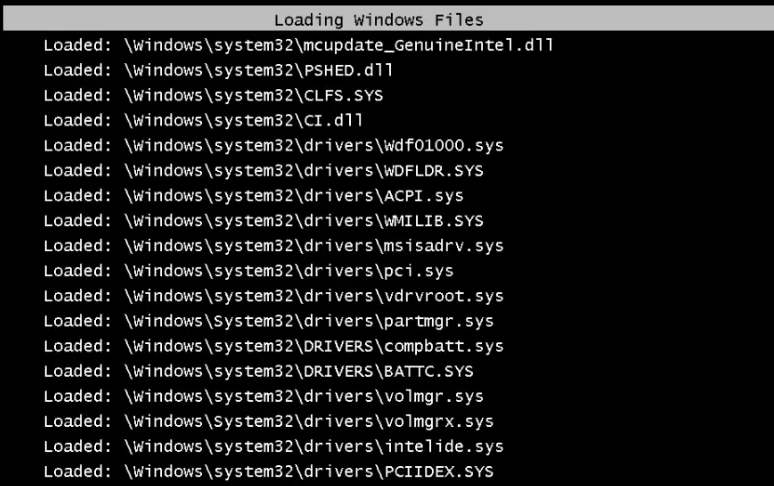
- Wait for the Windows to load its files and follow the onscreen instructions to complete the task.


That’s it, you have logged into your Windows in Safe Mode with Networking.
Steps for Windows 8, 8.1
If you want to reboot your Windows 8 computer in Safe Mode with Networking, then follow the steps given below:
- Press the ‘Windows + C’ keys on your keyboard to display the Charms menu. In the Charms menu, click on the ‘Settings’ option.

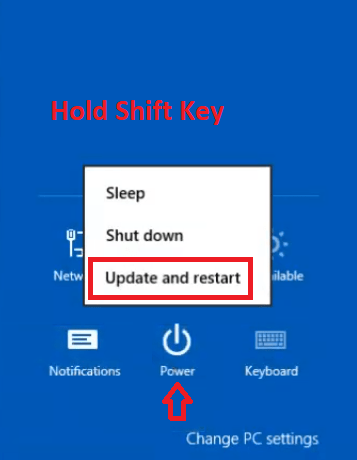
- Click on the ‘Power’ option, press and hold the ‘Shift’ key on your keyboard, then click on the ‘Update and restart’ option.
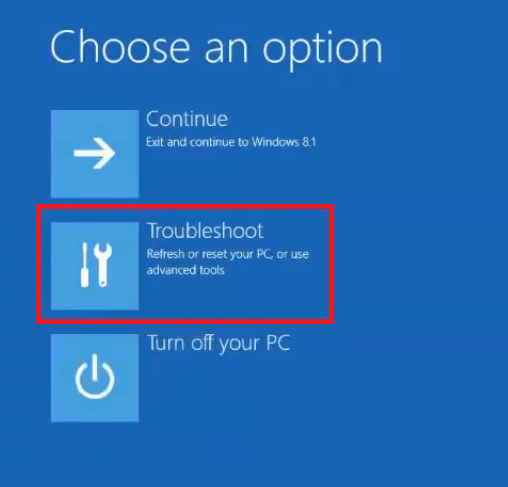
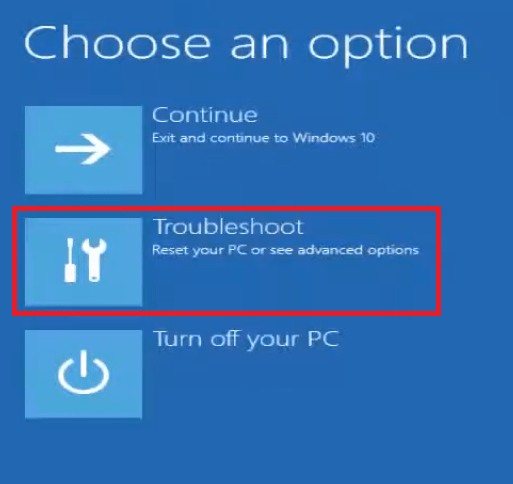
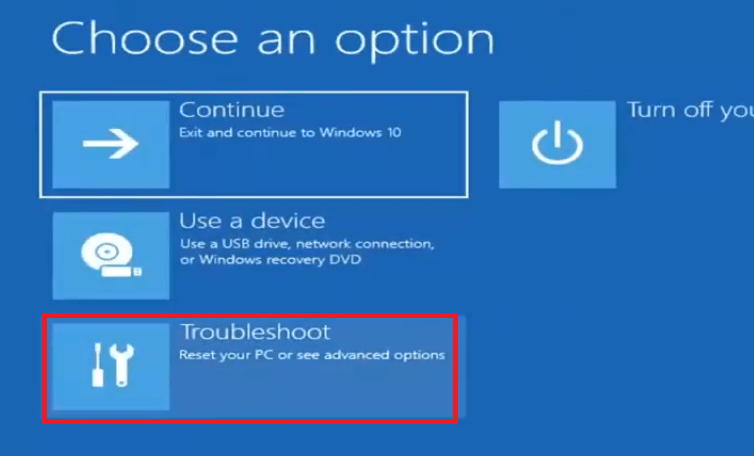
- In the Choose an option screen, click on the ‘Troubleshoot’ option.
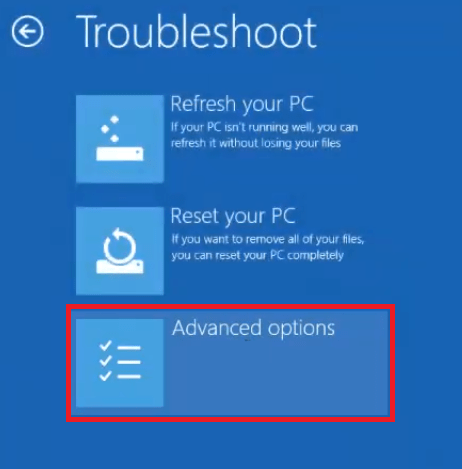
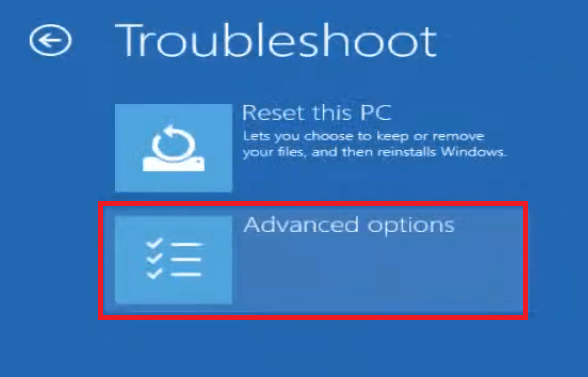
- In the Troubleshoot screen, click on the ‘Advanced options’ option.
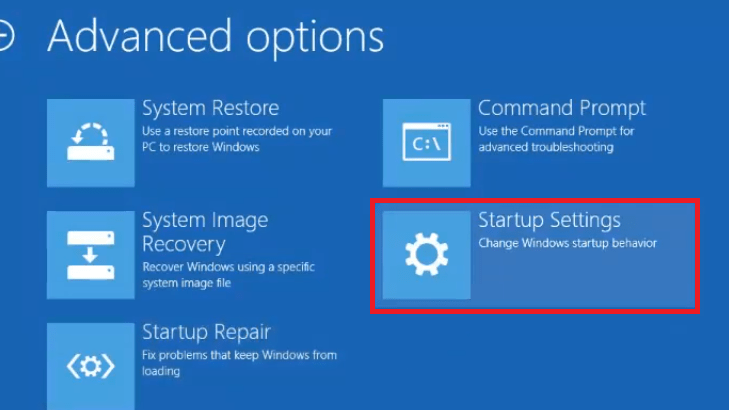
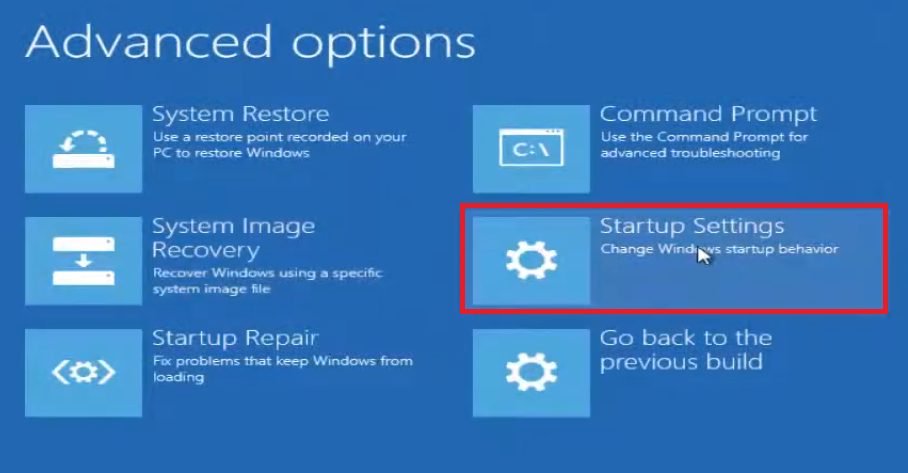
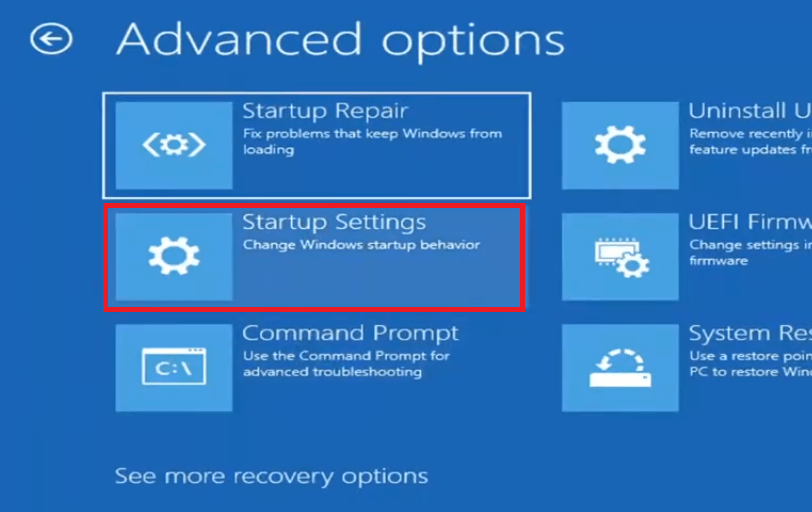
- In the Advanced options screen, click on the ‘Startup Settings’ option.
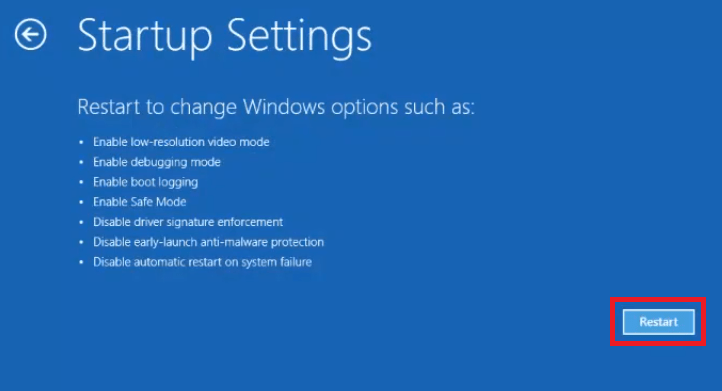
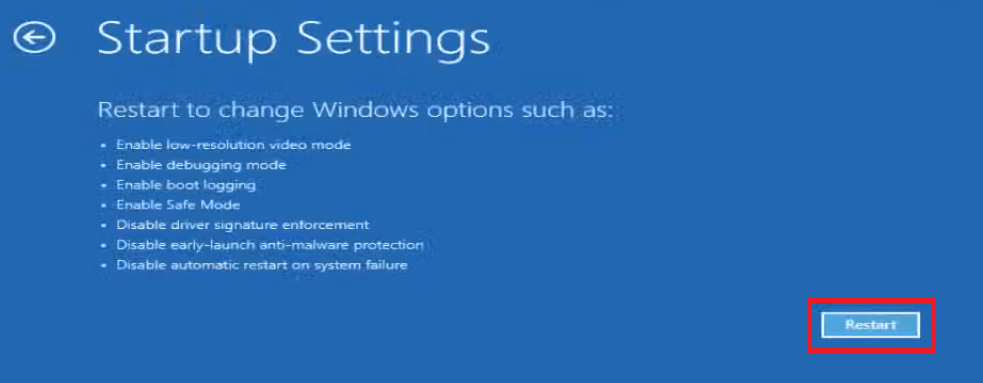
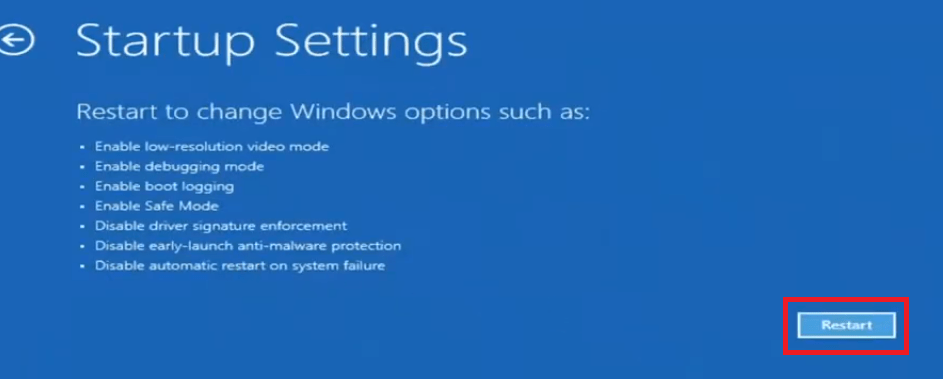
- In the Startup Settings screen, click on the ‘Restart’ button.
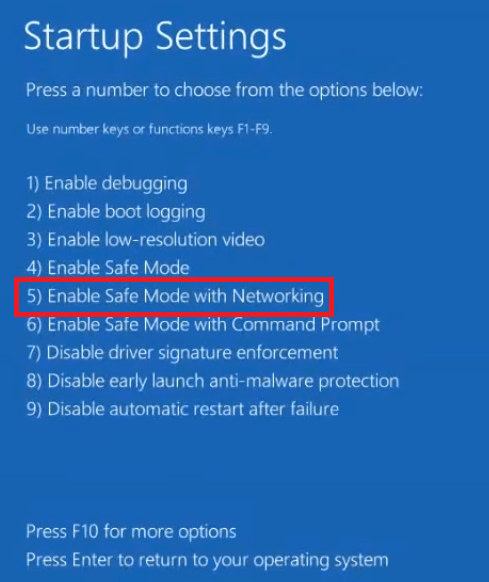
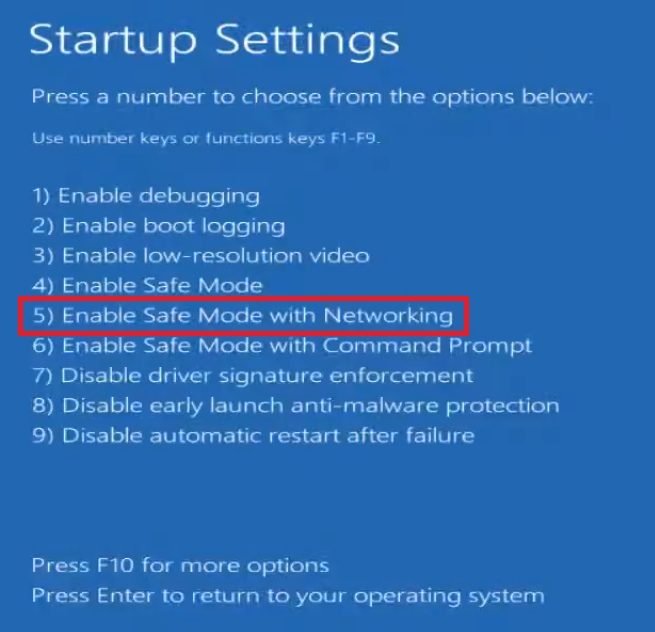
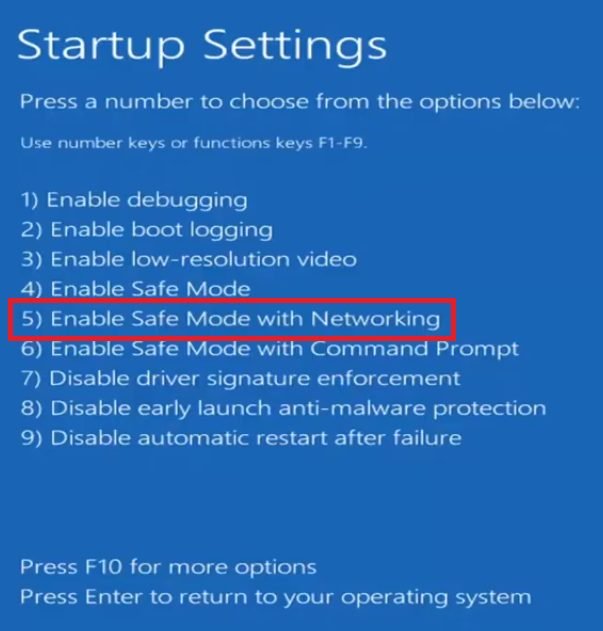
- You will see all the Windows boot options listed below. Press the ‘F5’ function key or the ‘5’ number key on your keyboard, because ‘Enable Safe Mode with Networking’ option is associated with number 5.
- When the Windows asks for the login password, then type the password to login into your computer.


That’s it, you have successfully signed-in into Safe Mode with Windows in your Windows 8 computer.
Steps for Windows 10
Here, I will describe the steps to reboot Windows 10 computer in Safe Mode with Networking :
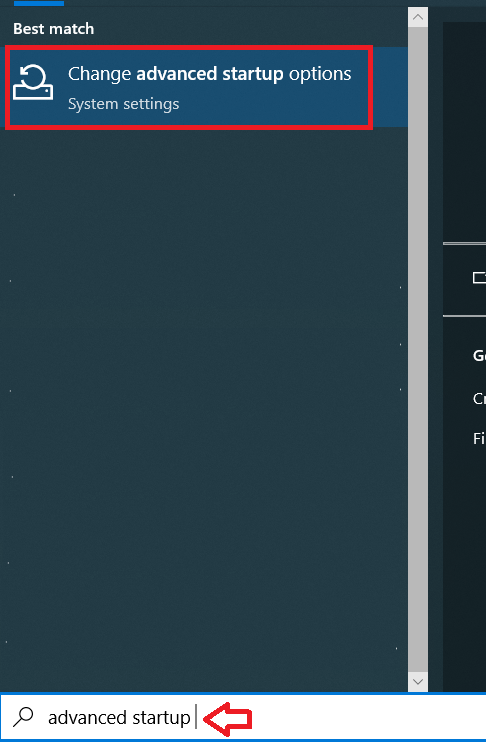
- Type ‘advanced startup’ in the Windows search box, then click on the ‘Change advanced startup options’ in the search results.
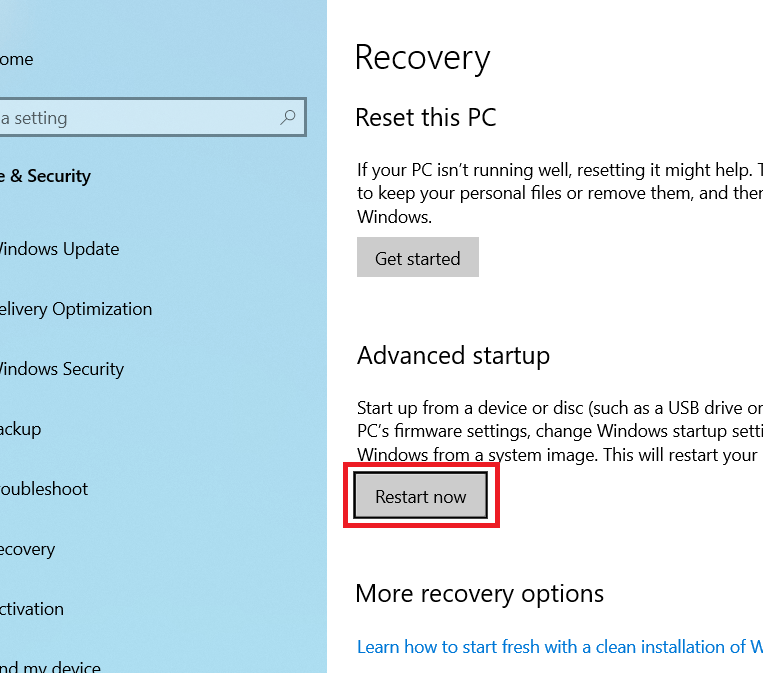
- In the Recover page, click on the ‘Restart now’ button under the Advanced startup option.
- In the Choose an option screen, click on the ‘Troubleshoot’ option.
- In the Troubleshoot screen, click on the ‘Advanced options’ to proceed.
- In the Advanced options screen, find the ‘Startup Settings’ option, then click on it.
- In the Startup Settings screen, click on the ‘Restart’ button to continue.
- In the Startup Settings menu, look for the ‘Enable Safe Mode with Networking’ option and you will find its number 5. Press the ‘5’ number key or the ‘F5’ function key on your keyboard to select this boot option.
- Wait for the Windows to boot in Safe Mode with Networking .


That’s it, you have successfully restarted your computer in Safe Mode with Networking.
Steps for Windows 11
If you want to restart your Windows 11 computer in Safe Mode with Networking, then follow the steps given below in their correct order:
- Right click on the ‘Windows Start’ button, then choose the ‘Shutdown or sign out’ option, now press and hold the ‘Shift’ key on your keyboard and click on the ‘Restart’ option.

- In the Choose an option screen, select the ‘Troubleshoot’ option.
- In the Troubleshoot screen, select the ‘Advanced options’ option.

- In the Advanced options screen, select the ‘Startup Settings’ option to proceed.
- In the Startup Settings screen, read the provided information, then click on the ‘Restart’ button.
- In the Startup Settings menu, you will find that the number 5 is associated with the ‘Enable Safe Mode with Networking’ option. Therefore, press the ‘5’ number key or the ‘F5’ function key on your keyboard to login using the Safe Mode with Networking option.
- Wait for the Windows to boot in Safe Mode with Networking.


That’s it, you are now logged-in into your Windows 11 in Safe Mode with Networking.
Why Use Safemode in Windows?
Starting Windows in ‘Safe Mode’ is a troubleshooting option that loads the operating system with a minimal set of drivers and services. This option can be helpful in various situations:
- Troubleshooting Software Issues: If your computer is experiencing problems, then starting in Safe Mode can help you to determine whether the issue is caused by third-party software or drivers. If the problem doesn’t occur in Safe Mode, then it’s likely that a third-party application or driver is responsible.
- Running Antivirus or Anti-Malware Scans: If your computer is infected with malware or viruses, then booting into Safe Mode can provide a secure environment to run scans and remove malicious software.
- Backing Up Data: If your system is unstable and you need to backup important files before attempting repairs, then Safe Mode can provide a stable environment to do so.
Safe Mode is a diagnostic tool which offers you multiple options, like ‘Safe Mode with Networking’ and ‘Safe Mode with Command Prompt.’ This diagnostic tool is not meant for regular use, it provides a limited set of features to help diagnose and fix problems in Windows OS. Once the problem has been identified and resolved, then you should restart your computer normally.
Difference between Safemode and Safemode with Networking
‘Safe Mode’ and ‘Safe Mode with Networking’ are both diagnostic modes in Windows, but they have some key differences between them. Understanding these differences will help you decide when and why you should opt for the ‘Safe Mode with Networking’ mode. Some important differences between these modes are mentioned below:
- Networking Support: Safe Mode with Networking includes all the functionalities of regular Safe Mode, but it also enables basic networking support. This means you can access the internet and local network resources.
- Downloading Updates and Tools: You can download and install updates, patches, drivers, or diagnostic tools from the internet in Safe Mode with Networking mode, which you can’t do in Safe Mode.
- Running Online Scans: In Safe Mode with Networking you can run antivirus or anti-malware scans, and also access online resources for troubleshooting help. You can’t perform these tasks in Safe Mode.
- Remote Assistance: If you want to seek remote assistance to resolve the issues in your computer, then you can do so in Safe Mode with Networking. This can be useful when seeking help from online support or forums.
Therefore, if you are trying to troubleshoot an issue which is related to a software and you suspect it might be related to networking or if you need to download updates or access online resources for troubleshooting, then Safe Mode with Networking is the better choice. If you are troubleshooting a problem that doesn’t seem to be related to the network, then opting for the regular Safe Mode might be sufficient.
Now you know how to boot / start Windows in Safemode with Networking in Windows 7, 8, 10, 11 OS versions. The exact process for performing this task may vary depending on the version of your Windows, but if you follow the process described in this guide, then you will be able to complete this task without any issues.